Importing Data
5 minutes to readYour existing data can be imported into Caspio during App creation or at any time from the Tools menu at the top. Regular data imports can also be scheduled via Tools > Data import/export tasks if the option is available in your Plan.
Caspio can import data files in the following formats:
- Microsoft Excel files (.xlsx, .xlsm, .xltx, .xltm, .xlam) – maximum 255 fields
- CSV (Comma Separated Values) – maximum 255 fields
- Tab Delimited text – maximum 1023 fields
- Fixed Width text – maximum 1023 fields
- Caspio XML (every setting) – maximum 1023 fields
- Custom XML – maximum 1023 fields
One or multiple files of different formats can be compressed in ZIP format for faster upload. The maximum uncompressed size of each individual file is currently 512 MB.
The import process has two main steps: uploading your file and configuring the import. You can begin the upload and continue with other Caspio tasks and come back later and begin the import process from a message that will be posted in the messages area upon the completion of the upload process.
Uploading Data
- To begin the Import process, select Tools from the main menu bar and click Import.
- The pop-up window may look differently in various browsers. Click the Browse button to find and select the file you wish to import and click Next. This starts the upload process. Large files could take a few minutes to upload depending on your bandwidth. While the file is being uploaded, avoid closing the browser window because this will cancel the upload process but the screen displaying the progress provides you with a link to continue with other Caspio tasks.
- Once the file is successfully uploaded, a confirmation message will display. Click Next.
Importing Data
- If the file format is not automatically recognized, you will be prompted to specify file format and whether or not the first row contains field names.
- The next step is to select the app where you want the data to be imported. Note that the default option is All Assets which may not be your desired choice.
- Under Configure Objects, you will see a list of table(s) found in your imported file. Each table can be imported as a new table, or used to append or replace an existing table in your Caspio account.
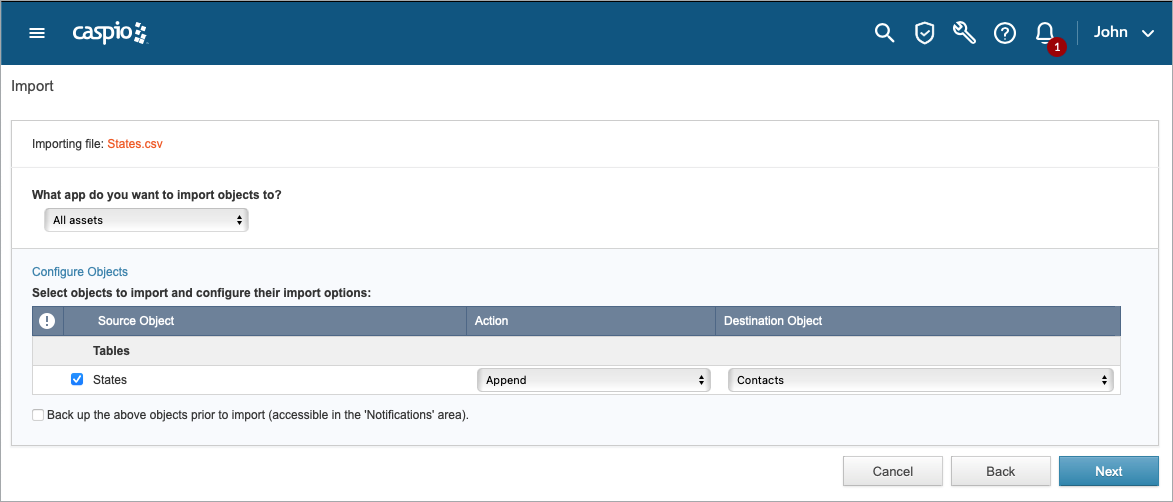
Some or all of the following options may be available depending on the content of your account:
- Create New: Creates the imported table as a new object.
- Replace: Overwrites the data in the existing table and loads the new data into it. Any new fields are added to the table design. If there is a new unique value that violates the uniqueness of an existing value, the record is not replaced.
- Append: Adds the new data to an existing table. Any fields that do not exist in the current table design are added. If there is a new unique value that violates the uniqueness of an existing value, the record is not appended.
- Update: Requires defining a matching unique field. Updates the data of the existing table with the imported data. Matching data is overwritten. New, non-matching data is appended. Existing non-matching data remains unchanged.
- Update Design: Merges table designs without importing new data. Any fields that do not exist in the current table design are added. Unless your destination table is empty, the imported table cannot have a new unique field.
Importing Images, Documents and other Files
- Create New Folder – Creates a new folder to place the files.
- Rename Duplicate Files – Places the files in the selected folder and duplicate files are renamed.
- Replace Duplicate Files – Places the files in the selected folder and any duplicate files are overwritten.
- Skip Duplicate Files – Places the files in the selected folder and duplicate files are skipped.
Configuring Fields
Next, on the Configure Fields screen, you can configure your field properties. Caspio tries to make the best choices for you but you should review the settings for each field.
Note that choosing a Data Type that is incompatible with your field may cause data loss. For example if your import file contains dates in a field but the selected data type for the destination field is yes/no nothing gets imported for that field. Visit Data Types for details.
Next Caspio imports your data. This process can take a few minutes depending on the number of records being imported. You can click Close to continue with other tasks. The import will continue in the background and the results will be available in the messages area. The unclaimed uploaded files stay in the messages area for 24 hours. Once the import is finished, the results of the import will be provided including any problems that may have been encountered.
