Integration with Zapier
5 minutes to readUsing Zapier, you can create workflows (called “Zaps”) that send data to or retrieve data from Caspio, or trigger actions in other applications based on changes in your Caspio tables.
Common use cases:
- Adding records to Caspio from form submissions in other applications
- Notifying other systems when data changes
- Updating marketing or CRM tools with Caspio data
- Synchronizing information across multiple services
How the integration works
Zapier supports two types of interactions with Caspio:
- Triggers – Start a Zap when records are created, updated, or deleted in your Caspio tables.
- Actions – Create, update, delete, or search for records in Caspio.
Note:
- Caspio is not affiliated with Zapier, and Zapier’s fees are managed separately.
- Configuring, testing, and executing Triggers and Actions consumes the integrations calls resource in your Caspio account.
Connecting Zapier to Caspio
To get started, create a Caspio Web services profile and connect it to Zapier.
Prerequisites:
- A Caspio account with the Integrations feature
- A Zapier account where you can create and manage Zaps
Steps:
- In Caspio, create a Web services profile. Verify that the Enable access to all objects and Profile can create objects checkboxes are selected.
Note: These permissions give Zapier full access to read and write data across your Caspio account. Review your security requirements before enabling them.
- Save the profile and open it from the list. You will need the Client ID, Client Secret, and Integration URL to configure the Zapier connection.
- In Zapier, add the connection to Caspio:
- From the left panel, click App Connections.
- Click Add connection, and in the window that opens, select Caspio.
- Click Add connection.
- In the window that opens, paste the Client ID, Client Secret, and Integration URL copied from your Web services profile in Caspio.
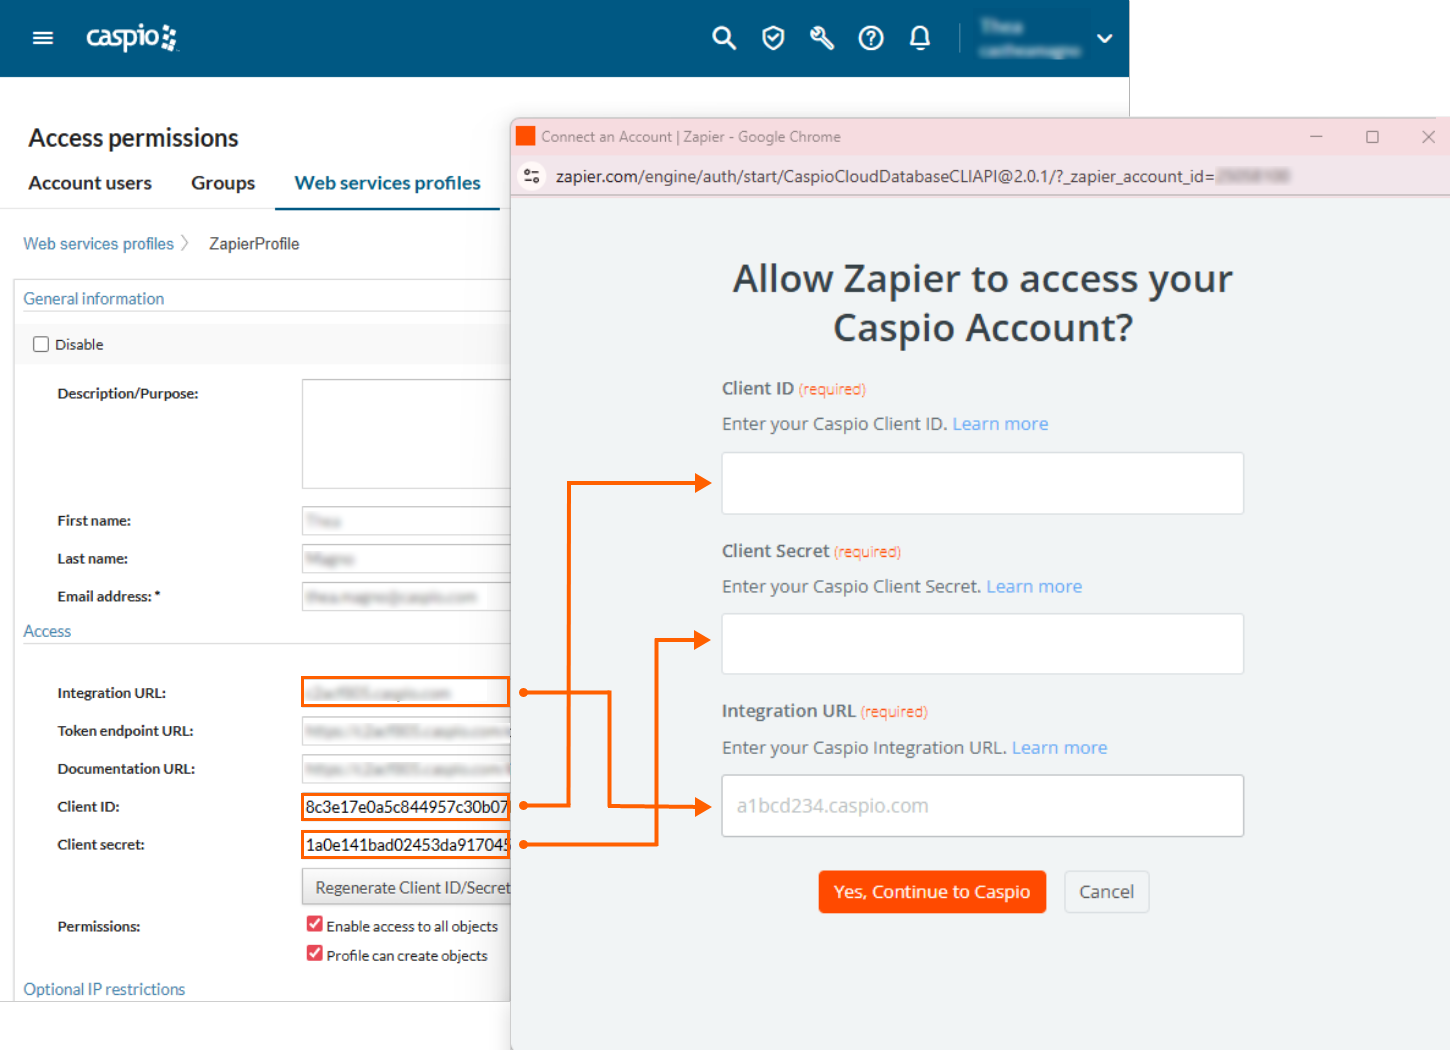
- Confirm the connection by clicking Yes, continue to Caspio.
Triggers
In Zapier, Caspio triggers let you start Zaps automatically when data changes in your Caspio tables. You can run a Zap when records are created, updated, or deleted. Triggers are useful for keeping data synchronized across systems or performing follow-up actions automatically. For example, when a new record is added to a Caspio table, you can use Zapier to create or update a record in another application.
When you enable a Zap that uses a Caspio trigger, Zapier automatically creates a webhook in your Caspio account to listen for the selected event type. When the event occurs, Caspio sends an outgoing webhook to Zapier, starting the workflow instantly. On the list of outgoing webhooks in Caspio, the webhook name starts with Zapier and the Created by column shows the name of the Web services profile used by the Zapier app connection.
Supported trigger events:
- Deleted record – Triggers when a record is deleted from a table.
- New record – Triggers when a record is added to a table.
- Updated record – Triggers when a record is updated in a table.
- New or updated record – Triggers when a record is added or updated in a table.
- New or deleted record – Triggers when a record is added or deleted in a table.
- Updated or deleted record – Triggers when a record is updated or deleted in a table.
- New, updated, or deleted record – Triggers when a record is added, updated, or deleted in a table.
Configuring event sources
When setting up a Caspio trigger in Zapier, you can also configure event sources. Event sources allow you to specify which parts of Caspio are allowed to initiate the trigger. This ensures that only the intended changes start your Zap.
Available event sources include:
- DataPages
- DataParts
- Datasheet
- Extensions
- Tasks
- Triggered action
Actions
Caspio actions in Zapier let you perform data operations in your Caspio account, such as creating, updating, deleting, or finding records in tables and views.
Available record actions:
- Delete record – Deletes one or more records from a table or view.
- Create record – Creates a record in a table or view.
- Update record – Updates one or more records in a table or view.
- Find record – Retrieves one or more records from a table or view. Use it to locate the correct records before performing an update or delete. This action is required for both.
To configure a Find record action:
- Select the source table or view.
- Configure your filtering criteria:
- Filter field – The field to search in
- Operator – The comparison type (equals, contains, greater than, etc.)
- Filter value – The value to search for
- Choose the behavior when:
- No records are found
- Multiple records are found
Supported data types:
The Find record action supports filtering on the following Caspio field types:
- Text (255)
- Text (64000)
- Number
- Integer
- Currency
- Date/Time
- Yes/No
- Password
- Attachment
- File
- List – String
- List – Number
- List – Date
Ending the integration with Zapier
If you decide to stop using the integration with Zapier, it is important to follow the correct order of steps to avoid leaving inactive webhooks or credential errors:
- Delete your Zaps first. This ensures that Zapier no longer attempts to connect to Caspio using the credentials you provided.
- After deleting your Zaps, remove the associated Web services profile in Caspio.
Following this order prevents orphaned webhook connections and helps ensure your Caspio environment remains clean after ending the integration with Zapier.
Note: If you already removed the Web services profile before deleting the workflows, log in to your Caspio account and, in Outgoing Webhooks, manually delete the relevant webhooks that use the Zapier outgoing URLs.
