• search
  • Contact Sales
  • Support
    • Online Help
    • Community Forum
    • Contact Support
  • Log in
Get a Demo Try Free
High Contrast
Caspio logo Help
Try Free
  • High Contrast
  • search
  • Contact Sales
  • Support
    • Online Help
    • Community Forum
    • Contact Support
  • Log in
Get a Demo Try Free
  • Help Center
  • Creating Apps With Flex
  • Application Design
  • Forms
  • Conditional Logic in Forms
  • Launch Your Caspio Journey
  • Create Applications
    • Applications Overview
    • Creating Apps With Bridge
      • Bridge App Overview
        • Creating a New App Container
        • Importing an App
        • Exporting an App
        • Deleting an App
        • Shared Objects
        • Backing Up Your Applications
        • Sharing an App with Another Account
        • App Parameters
          • Adding App Parameters
          • Managing App Parameters
          • Using App Parameters
      • Authentication
        • Setting Up User Permissions in Your App
        • Adding a Logout Link
        • Record Level Security
          • Create a Workflow using Record Level Security and Filtered Dropdown
          • Restrict Access to Data by User or Role
          • Filter Lookup Dropdown or Listbox Based on User or Role
        • Stamp a Record with User Profile Data
        • OpenID
        • Create a Standalone Login Screen
        • Hiding Multiple Login Forms
      • DataPages
        • What is a DataPage?
        • DataPage Types
        • Forms
          • Submission Forms
          • Update Forms
          • Password Recovery Forms
          • Form Element Types
          • Conditional Forms
          • Child Forms
          • Accepting Payments in Your Application
        • Reports
          • Creating a Report DataPage
          • Comparison Types in Report DataPages
          • Search by Distance
          • Report Page Results Layout
          • Interactive Reporting Options
          • Pivot Table Reports
          • Counting the Number of Times a Record Has Been Viewed
          • Display a Field Data as Hyperlink
          • Fixed Rows and Columns
          • Making the Search Results Downloadable as PDF
          • Editing Data Through My Details Page
          • Making the Details Downloadable for Users
          • Data Editing Options in Reports
          • Combined Chart and Report
          • Adding “Today” to “After Now” or “Next X Days” Criteria
          • Filtering Reports Based on an Expiration Date
          • Advanced Reporting
            • Calculations in Reports
            • Data Grouping
            • Totals and Aggregations
            • Calculated Fields and Datediff Function
        • Charts
        • Calendars
        • HTML Pages
        • DataPage Components
          • Dropdowns and Listboxes
          • Cascading Elements
          • Calculated Values
          • Field Configuration Options
            • Field and Column Width
            • Placeholder Text
            • Rollover Hints – Mouse-Over Help Icon
            • Image Auto-Rotation
          • DataPage Header and Footer
          • HTML Blocks
          • Disabling HTML Editor in DataPage Header/Footer and HTML Blocks
          • Field Formatting Options
          • Custom Date Formatting
          • Multi-column and Sections
          • CAPTCHA
          • Virtual Fields
          • Setting up Default Values
          • AutoComplete
        • Managing DataPages
          • Modifying DataPages
          • Previewing DataPages
          • Moving DataPages
          • Copying DataPages
          • DataPage Revisions
          • DataPage Folders
          • Exporting and Importing DataPages
          • Moving Existing DataPages To a New App
        • Responsive DataPages
          • Responsive DataPage Prerequisites
          • Responsive Behavior on Tablet and Mobile
          • Modifying Styles for Tablet and Mobile
        • AJAX Loading
        • PDF Download
          • Adding a text watermark
          • Adding an image watermark
          • Adding page breaks to details page
          • Adding header and footer
        • Best Practices in Creating Caspio Applications
      • Notifications
        • Email Notifications
          • Verifying Email and Domain
          • Configuring Email
          • Setting Up Dynamic or Conditional Notification Emails
        • SMS Notifications
          • Configuring the SMS-enabled Countries
          • Configuring SMS
          • Adding SMS Sender Name
      • Parameters
        • Parameter Types
        • System Parameters
        • Passing Parameters through Caspio
        • Displaying Parameters
        • Parameters as Query String Values
        • Receiving Parameters
        • Resetting Parameters
        • Passing Multiple Values in One Parameter
        • Formatting Parameters in Email Body and HTML Blocks
        • Parameters in Dropdowns, Listboxes and Radio Buttons
        • Custom Filter Elements
      • Connections
        • SAML Single Sign-On
        • Setting Up ID Services
      • Styles
        • Creating or Editing a Style
        • Layout Options
        • Fix the Width of the DataPage
        • Button Alignment
        • Field Alignment
        • Border Options
        • Using Google Web Fonts
        • Glossy Heading Text
        • Gradient Backgrounds for DataPages
        • Gradient Backgrounds for Fields
        • Replace Links to Records with Images
        • Replace Standard Buttons with Images
        • Change the Color of Field Error Labels
        • Change Text on a Button
        • Put Multiple Fields on One Line
        • Styling Advanced Reports
        • Add Rounded Borders to the Form and Fields
        • Use an Image as Form Background
        • Fix the Width of Labels and Data in List and Gallery Reports
        • Customize the ID Service Icon of the Login Screen
      • Localizations
        • Creating or Editing a Localization
        • Handling Arabic, Hebrew and Other Right-to-Left Languages
        • Formatting Options
        • Using Localization Feature to Improve Usability
        • Format Types
      • Files and Images
        • Uploading Files and Images
        • FileStor CDN
        • Managing Files
        • Bulk File Import and Export
        • Creating Thumbnails with the Image Resizer
        • Using Files in DataPages
        • Orphan File Cleanup
    • Creating Apps With Flex
      • Flex Overview
      • Managing Apps
        • Archiving, Sending, and Receiving Apps Using Vault
        • Installing Apps
      • Roles
        • Creating New Roles
        • Adding Users and Groups to Roles
        • DataPart Display Based on the User Role
        • Editing Role Permissions
          • User’s Own Records
          • Custom Access
        • Removing Users and Groups from Roles
        • Deleting Roles
      • Application Design
        • Segments
          • Themes and Widgets
          • Editing Segment Settings
        • Creating AppPages
        • AppPage Types
        • Adding DataParts
        • Moving DataParts
        • Resizing DataParts
        • Adding Elements to DataParts
          • Calculated Values in Flex DataParts
        • Forms
          • Form Elements
          • Search Form
          • Submission Form
          • Details/Update Form
          • Conditional Logic in Forms
        • Reports
          • Tabular Report
          • Card Report
          • Pivot Table
        • Sign-up Form
        • Charts
          • Creating and Configuring Charts
          • Chart Display Options
        • Text/HTML
        • Data Filters
          • Creating Filters
        • Communication Between DataParts
        • Designing User-Friendly Navigation Between AppPages
      • Parameters
        • Inserting Parameters
        • Application Parameters
        • Adding Support for Lookup Values in Data Source Parameters
        • Stamping Records with User ID
      • Branding
      • Flex FAQ
  • Manage Users and Groups
    • Directories Overview
      • User Authentication in Directories
      • Converting Tables to Directories
      • Creating Directories
    • Directory Users
      • User Status Overview
      • Creating Users
      • Activating Users
      • Adding Users to Groups
      • Resetting User Passwords
      • Resetting Two-Factor Authentication
      • Suspending and Unsuspending Users
      • Changing User Sign-In Method
    • Directory Groups
    • Directory Security
      • Session Management
      • Turning On Two-Factor Authentication
      • Customizing Directory Security Policy
      • Redirecting to Custom URLs After Sign-in and Sign-out
    • Directory User Portal
    • Directory Emails
    • Identity Providers
      • Adding Identity Providers
        • Tutorial: Adding Microsoft Entra ID (formerly Azure AD) Identity Provider
        • Tutorial: Adding Okta Identity Provider
        • Tutorial: Adding OneLogin Identity Provider
      • Editing Identity Providers
      • Deleting and Disabling Identity Providers
      • Configuring Single Logout
    • App Connections
      • Creating App Connections 
        • Authenticating Users to Caspio Apps in Multiple Accounts Using a Single Directory
        • Tutorial: Adding HubSpot App Connection
        • Tutorial: Adding BambooHR App Connection
        • Tutorial: Adding Slack App Connection
      • Managing App Connections 
      • Deleting and Disabling App Connections
  • Manage and Organize Your Data
    • Data Management Overview
    • Tables and Views
      • Creating Tables
      • Modifying a Table’s Design
      • Removing Blanks From a Dropdown or Listbox
      • Lookup Tables
      • Views
        • Creating a View to Filter Data
        • Creating a View to Join Tables
        • Self-Join Views
        • Modifying Views
        • Importing and Exporting Views
    • Data Types
      • List Data Types
      • Function Reference
      • Adding a Formula Field in a Table
      • Managing Files With the Attachment Data Type
    • Managing Data in Datasheet
      • Find and Replace Specific Values
      • Filtering Data
      • Downloading Table or View Data
    • Database Relationships
      • Relationship Settings
    • Importing Data
    • Exporting Data
    • Sharing Data Between Apps
    • Best Practices for Designing Databases and Tables
    • Logs
      • Managing Logs
        • Logs Retention Period
      • App Access Logs
      • Directory Logs
      • Email Logs
      • Integrations Logs
      • Payment Logs
      • SMS Logs
  • Leverage AI
    • AI Assistant Overview
  • Automate Tasks and Workflows
    • Automations Overview
    • Triggered Actions
      • Creating a Triggered Action
        • Actions
          • UPDATE
          • DELETE
          • INSERT INTO
          • SEND EMAIL
          • SEND SMS
        • Data
          • SELECT
        • Logic
        • Loops
        • Text
        • Number
        • Date
        • Variables
    • Tasks
    • Data Import/Export Tasks
      • Data Import Tasks
      • Data Export Tasks
      • Configuring a Repository Site
      • IP Addresses for Data Import/Export Tasks
      • Data Import/Export Tasks Tips and Best Practices
  • Generate PDF Documents
    • Document Generation Overview
    • Creating Templates
    • Mapping Fields in Templates
    • Template Field Types
    • Configuring Template Settings
      • Formatting Field Values
      • Adding Watermarks
      • Encrypting PDF Documents
      • Configuring PDF Document Properties
      • Changing PDF File for a Template
    • Enabling Document Generation in Applications
    • Managing Templates
  • Integrate and Extend Your Apps
    • Integrations Overview
    • Webhooks
      • Getting Started with Webhooks in Caspio
      • Webhooks Rules and Limitations
      • IP Addresses for Webhooks
      • Creating and Managing Webhooks
        • Configuring Call Throttling
      • Creating and Managing Events
        • Event Types
        • Activating or Deactivating Events
      • Testing Webhooks
    • Extensions
      • AI-Powered GPT Connect
      • Extension for Slack
      • QR Code Generator
      • Barcode Generator
      • Location IQ
    • Web Services API
      • Creating a Web Services API Profile
      • Authenticating REST API
      • Important Header Parameters
      • Special Considerations
      • Error Handling
      • Swagger UI
      • Migration to REST API v3
    • Caspio MCP Server
    • Integration with Keragon
    • Integration with Make
    • Integration with n8n
      • n8n Integration – Credentials
      • n8n Integration – Triggers
      • n8n Integration – Actions
    • Integration with Zapier
  • Deploy Your Apps
    • Deploying Bridge Apps
      • General Deployment Guide
      • Remove iFrame Border and Change Size
      • Block Access to DataPages by IP Address
    • Deploying Flex Apps
      • Mapping a Friendly Subdomain
  • Manage Account and Billing
    • Account Settings
    • Account Users, Groups and API Profiles
      • Inviting New Account Users
      • Creating Groups for Account Users
      • Managing Permissions
      • Changing Account Owner
    • Custom Domain
    • Caspio ID
      • Managing Your Caspio ID
      • Forgot Your Password
      • Getting Support PIN
    • Account Notifications
    • Changing Your Plan
    • Updating Payment Settings
    • Payment History
    • Resource Usage
    • Support Login
    • Search for Objects
  • Videos
    • Bridge Videos
      • Build Your First App
      • Recorded Training
      • Customize Your Apps
      • Advanced Topics
      • Full App Implementation
      • Tips and Tricks
    • Flex Videos
      • Build Your First App
      • Recorded Training
  • Resources and Best Practices
    • Frequently Asked Questions (FAQ)
    • Tech Tips
    • Troubleshooting
      • Troubleshooting SMS Delivery
      • Troubleshooting Email Delivery and Domain Verification
      • Cannot Log in to My Caspio Account
      • Issue with Login to Apps or DataPages
      • Issue with Redirection After Logout
      • Acknowledgement Emails Are Not Received
      • Issues with Email Verification Code
      • JavaScript Does Not Work with Multiple DataPages
      • Cannot See an SSL Lock Icon for My Web Page
      • Responsive UI Does Not Display Properly
      • Date Fields from Excel Import Incorrectly
      • Troubleshooting Custom PDF Generator
      • Troubleshooting Data Import Speed
      • Troubleshooting Amazon S3 Connection for Data Import and Export Tasks
      • System Limitations
      • Errors and Messages
    • System Requirements
    • Deprecations
      • Deprecation of Caspio 1.3.0 App Connection in Zapier
      • Deprecation of REST API v1 and REST API v2
      • Deprecation of Microsoft Office Plugin
      • Deprecation of Twitter as an ID Service in Authentications and Connections
      • Deprecation of Google Drive for Data Import/Export Tasks
      • Deprecation of HTTP Deployment
      • Deprecation of the Option to Disable AJAX Loading
      • Deprecation of MS Access for Import/Export
      • Deprecation of Cb_ErrorLog Tables
      • Deprecation of Google Map Mashup Generator
      • Deprecation of Frame Deployment
      • Deprecation of .xls Excel Format for Data Import
      • Deprecation of SEO Deployment Method
      • Deprecation of WordPress Deployment
      • Deprecation of Unverified Email Addresses
      • Deprecation of SOAP Web Service
      • Deprecation of Internet Explorer 11 and Microsoft Edge Legacy Browsers
  • Release Notes
    • Caspio 70.0
      • Impacted Areas 70.0
    • Caspio 69.0
      • Impacted Areas 69.0
    • Caspio 68.0
      • Impacted Areas 68.0
    • Caspio 67.0
    • Caspio 66.0
    • Caspio 65.0
    • Caspio 64.0
    • Caspio 63.0
    • Caspio 62.0
    • Caspio 61.0
      • Impacted Areas 61.0
    • Caspio 60.0
    • Caspio 59.0
    • Caspio 58.0
    • Caspio 57.0
    • Caspio 56.0
    • Caspio 55.0
    • Caspio 54.0
    • Introducing Flex
    • Caspio 53.0
    • Caspio 52.0
    • Caspio 51.0
    • Caspio 50.0
    • Caspio 49.0
    • Caspio 48.0
    • Caspio 47.0
    • Caspio 46.0
    • Caspio 45.0
    • Caspio 44.0
    • Caspio 43.0
    • Caspio 42.0
      • Known Issue: Scrolling on macOS Devices
    • Caspio 41.0
    • Caspio 40.0
    • Caspio 39.0
    • Caspio 38.0
    • Caspio 37.0
      • Impacted Areas 37.0
    • Caspio 36.0
    • Caspio 35.0
    • Caspio 34.0
      • Impacted Areas 34.0
    • Caspio 33.0
    • Caspio 32.0
    • Caspio 31.0
      • Impacted Areas 31.0
    • Caspio 30.0
    • Caspio 29.0
    • Caspio 28.0
    • Caspio 27.0
    • Caspio 26.0
    • Caspio 25.0
    • Caspio 24.0
    • Caspio 23.0
    • Caspio 22.0
    • Caspio 21.5
    • Caspio 21.0
      • Impacted Areas 21.0
    • Caspio 20.0
    • Caspio 19.0
      • Impacted Areas 19.0
      • Security Patch 19.5
    • Caspio 18.0
    • Caspio 17.0
    • Caspio 16.0
    • Caspio 15.0
    • Caspio 14.0
      • Impacted Areas 14.0
    • Caspio 13.0
      • Caspio 13.0
      • Impacted Areas 13.0
    • Caspio 12.0
      • Impacted Areas 12.0
    • Caspio 11.0
      • Impacted Areas 11.0
    • Caspio 10.0
    • Caspio 9.9
      • Impacted Areas 9.9
    • Caspio 9.8
    • Caspio 9.7
    • Caspio 9.6
      • Impacted Areas 9.6
    • Caspio 9.5
      • Impacted Areas 9.5
    • Caspio 9.4
      • Impacted Areas 9.4
    • Caspio 9.3
      • Impacted Areas 9.3
      • Caspio 9.3
    • Caspio 9.2
      • Impacted Areas 9.2
    • Caspio 9.1
      • Impacted Areas 9.1
    • Caspio 9.0
      • Known Issues 9.0
      • Impacted Areas 9.0

Conditional Logic in Forms

8 minutes to read

Conditional logic allows you to dynamically control how fields and sections behave in Flex form DataParts based on values entered by app users. Conditional logic rules allow your forms to automatically show, hide, enable, disable, or require form elements depending on specific conditions.

For example, a form can display additional fields only when an app user selects a particular option. A form can require extra information for certain responses or disable fields that are not relevant in a given situation. Conditional logic helps keep forms shorter and easier to complete by displaying only the information that is relevant at each step.

A typical rule consists of one or more conditions and one or more actions. Conditional logic rules automatically evaluate field values within the current DataPart when the form loads and when any value changes. Conditions compare field values using operators appropriate for a given field data type, and they can compare a runtime field with another field or with a static value. Conditions can also be grouped using AND and OR logic, allowing you to build more complex nested condition groups of up to six levels. When a rule’s conditions are met, its action is applied.

Conditional logic supports the following data types in rule criteria: Text (255), Text (64000), Number, Integer, Currency, Date/Time, Yes/No, Random ID, Autonumber, Prefixed Autonumber, and GUID. Formula fields are evaluated according to the data type returned by the formula. If the resulting type cannot be determined, the value is treated as text.

Conditional logic is supported in Submission, Details/Update, and Search Forms.

Rules operate only within the current DataPart and cannot reference fields from other DataParts.

Examples:

  • In a registration form, you can configure a rule that shows the Company Name field and makes it required when the app user selects Business in the Account Type field. This ensures that company information is collected only when the app user is registering as a business.
  • In a service request form, you can configure a rule that displays a Manager Approval field when the Estimated Cost entered by the user exceeds a defined threshold such as 5000. This allows approval fields to appear only when additional authorization is required.
  • In a job application form, you can configure a rule that displays a Previous Employer section when the applicant selects any work experience option other than None. This keeps the form shorter for applicants without prior experience while allowing additional information to be collected when needed.

Creating rules

  1. In a Form DataPart configuration right panel, under Conditional logic, click Add.
  2. In the panel that opens, enter a name for your rule.
  3. In the Under the following conditions section, create a condition based on which this rule will execute:
    1. Click Add condition.
    2. Select a form field whose value will be compared.
    3. Select the comparison type.
    4. Select the value for comparison:
      • If you want to enter the value, select Static value and enter the value.
      • If you want to dynamically compare with another field value, select Runtime field.
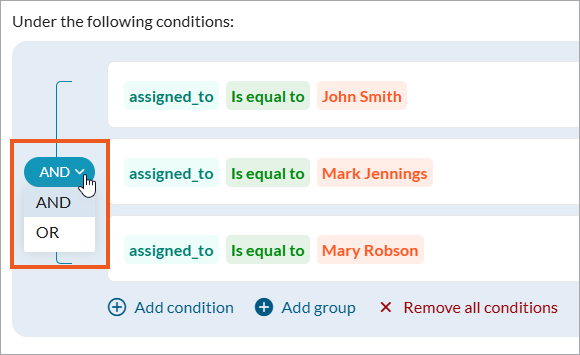
    5. Optional: If needed, add multiple conditions. If you do, select whether all conditions should be met (AND) or only one condition can activate the rule (OR).
      Screenshot of conditional logic interface showing the AND OR operators.
    6. Optional: To build more complex conditional logic, click Add group to create nested levels of criteria. Use AND and OR as required.
  4. In the Run this action section, configure what happens once this rule’s condition logic is fulfilled:
    1. Click Add action.
    2. Select the action type:
      • Show – Displays the targeted field or section when the rule conditions are met.
      • Hide – Conceals the targeted field or section so it is not visible to the app user.
      • Enable – Allows app users to interact with the targeted field or section and enter or modify values.
      • Disable – Prevents app users from interacting with the targeted field or section.
      • Make required – Requires app users to provide a value in the targeted field before the form can be submitted. Available for fields only.
      • Make not required – Removes the requirement to enter a value in the targeted field. Available for fields only.
    3. Optional: If your rule hides or disables a field or section, and you want the form to save the value of the hidden or disabled fields, select the Save hidden/disabled field values on form submission checkbox.

    Note: Fields hidden or disabled by conditional logic remain available to Calculated Values regardless of whether this option is used. Calculated values always evaluate using the current field values stored in the form model.

    1. Select whether the action should apply to a field or a form section.
    2. Select the specific field or form section to be affected by this rule.
    3. Optional: If needed, add multiple actions to run based on this rule’s condition logic.
  5. Save the rule by clicking Save.

In the Conditional logic section, you can edit your existing rules, as well as disable and enable them as required.

How field values are evaluated

Conditional logic dynamically evaluates actual values in the form fields.

A condition is met explicitly when its specific criteria are satisfied (for example, a rule shows the Company Name field when Account Type = Business, and the user selects Business). An implicit behavior occurs when the system derives a field state indirectly from other rules whose conditions are not met. For example, the same field remains hidden when Account Type is not Business because the “show” action condition is not satisfied.

When multiple rules apply conflicting actions, the final state is determined using predefined precedence logic. Rules whose conditions are explicitly met take precedence over behavior that would otherwise occur implicitly.

Example: In a registration form, Rule 1 is: when the Account Type is set to Business, show a Company Details section:
Screenshot of a sample rule UI.
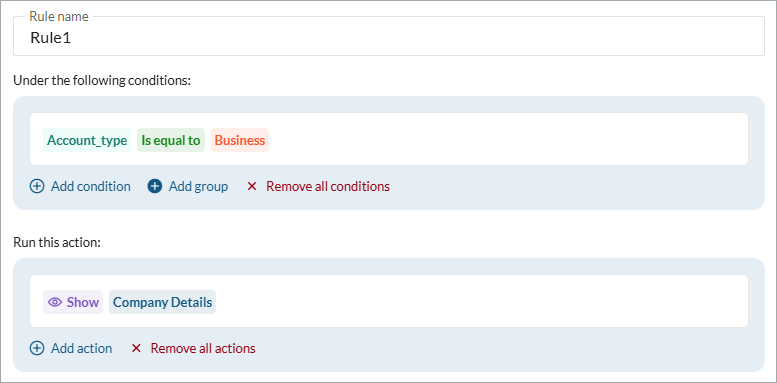
Without any other rules, the section would implicitly remain hidden for all account types other than Business because the show condition is not met. However, Rule 2 explicitly specifies that the Company Details section should also be shown when Account Type is Partner:
Screenshot of a sample rule UI.
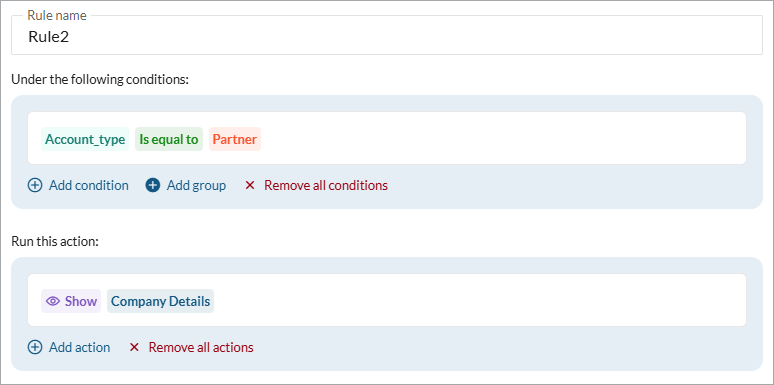
When the condition of Rule 2 is explicitly met for a Partner account type, Rule 2 overrides the implicit behavior of Rule 1 (to hide the section for all account types other than Business). As a result, the section appears for both Business and Partner selections.

When there are conflicting explicit rules, the following precedence applies:

  • Hide overrides Show.
  • Disable overrides Enable.
  • Make not required overrides Make required.

If multiple rules hide or disable a field with different save configurations, the rule that preserves the value takes precedence. This ensures that if any rule explicitly specifies that a value should be retained, the value will be saved.

Use rules that apply both Hide and Make required to the same field with caution, because the form cannot be submitted if a required field is hidden and does not contain a value.

Here is how field values are evaluated for various form elements:

  • Checkbox fields – The rule engine evaluates the value defined for the checked state. An unchecked checkbox is treated as a null value.
  • Dropdown, radio buttons, listbox, and AutoComplete (Force selection enabled) – Comparisons use the stored value defined in the lookup configuration or custom values.
  • AutoComplete (Force selection disabled) – The rule evaluates the value typed directly by the user.
  • Yes/No fields – Values are evaluated as Yes or No.
  • Calculated fields – The rule evaluates the value returned by the calculation formula.
  • Hidden elements and default values – Hidden form elements can still be used in rule conditions, but not in actions. Default field values are evaluated when the form loads.

If a numeric field is empty during comparison, it is treated as 0.

Using conditional logic in Search Forms

Search Forms do not store data in the database but can preserve values within the user session.

If the option to save hidden or disabled values is enabled, values from those fields remain available as DataPart field parameters. If the option is disabled, blank values are sent instead. This allows Search Forms to act as a parameter collection step before redirecting users to another AppPage where DataParts use those parameters to filter results.

For example, a Search Form can collect filtering criteria and redirect users to a results page while preserving parameter values even if some filter fields were hidden based on earlier selections.

Limits and restrictions

Each DataPart can contain up to 50 conditional logic rules. Within a single rule, you can define up to 50 conditions and 200 actions.

Conditional logic rules operate only within the current DataPart. Criteria cannot reference fields from other DataParts, and hidden form elements cannot be used as targets for rule actions.

  • PRODUCT

  • Platform Overview
  • What Is Low Code?
  • Case Studies
  • Marketplace
  • Pricing
  • Get a Custom Demo
  • Free Trial
  • SOLUTIONS

  • Healthcare
  • Education
  • Government
  • Financial Services
  • Energy and Utilities
  • Nonprofits
  • Media
  • Consulting
  • RESOURCES

  • Resource Center
  • Caspio Academy
  • Online Help
  • Online Help
  • Onboarding
  • Get Certified
  • Professional Services
  • Managed Application Services
  • Support Center
  • Legal Center
  • COMPANY

  • Our Story
  • Careers
  • Leadership
  • News
  • Partner Programs
  • Referral Program
  • Academic Program
  • Discount Programs
  • Contact Us
  • TRENDING

  • HIPAA Compliance
  • SOC 2 Type 2 Compliance
  • FERPA Compliance
  • Build Custom CRM
  • Create Web Dashboards
  • Best Online Database
  • Build a Mini CRM SaaS in 1 Hour
  • Migrate MS Access Online
  • Launch Patient Portal
Caspio Logo

Caspio is the world’s leading cloud platform for building online database applications without coding.
Start a free trial today and experience the power of no-code.

Footer Partners

© 2026 Caspio, Inc. Sunnyvale, California. All rights reserved.

  • Privacy Statement
  • Terms of Use
  • Report Abuse
  • Feedback