Bridge
Creating an Approval Process for New Submissions
5 minutes to readWhen creating an app that allows end-users to submit new records you may find it necessary to add an approval process. Thanks to this, you can review new records before publication. This article shows you how to set all new records to inactive for you to review and publish submissions using an internal DataPage.
Steps:
- Create a new table or edit your existing table that holds all of your public facing records to include an ”Active” field of Yes/No type. All of your records will be marked inactive by default.
Note: You can mark all of your current records as active either individually, or by downloading the current table to an Excel workbook, setting all of the values of the Active column to “TRUE” and then importing the data back into Caspio using the “Replace” option.
- In your Report DataPage visible publicly to your end-users, filter the published records so only approved records are visible.
- Proceed to the Select Search Fields Move the Active field created in the previous step to the right-hand column using the arrow buttons.
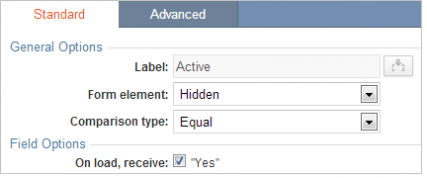
- Select the Active field in the DataPage Elements panel and from the Form element dropdown list, select Hidden. Next to On load, receive, select the “Yes” value. Save the changes.

- Only records with the Active checkbox selected will appear visible to your end users. If you have not yet marked any records as active, all searches will return “no records found”.
- Create a search and report to view and publish unpublished records.
-
- Select the public facing DataPage, and click More> Copy.
- Rename the page to indicate it is for internal review of records and click Save.
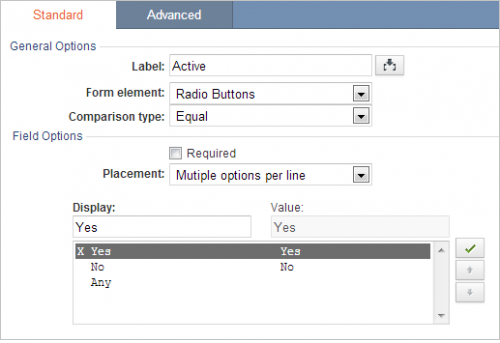
- Edit the copied DataPage. In the Configure Search Fields screen, select the Active field in the DataPage elements panel and change the form element to Radio Buttons.

- Change the details page to allow modifications of individual fields:
- In the Select Details Page Fields screen, move the Active field to the right-hand panel.
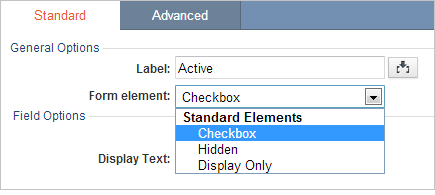
- As this DataPage is internal, you can change the default Display Only setting to an editable form element. For example, using the Form element dropdown, change the form element to Checkbox.
- Click Finish.

From now on, when using this DataPage you will be able to edit any mistakes in the fields as well as mark the individual record as active.
You can customize the settings of various elements listed in the Element Type. Some of the options for the Layout section are explained in the following table:
| Setting | Description |
| Padding | Specifies the spacing between the border of a container and its contents.Format: top right bottom leftExample: 1px 1px 0px 4pxYou can enter only two values to specify vertical and horizontal padding, or one value to set equal padding on all four sides.Applies to: Text Fields, Text Areas, File Fields, Label Cells, Field Cells, Buttons Cells, Data Cells, HTML Block Cells, Header Cells, Record Action Column, Data Download Layout, Paging Layout, Heading1 (h1), Heading2 (h2), Heading3 (h3) |
| Margin | Specifies the spacing between the border of a container and the parent container.Applies to: Outer Container in Results pages (the spacing between the table’s border and the browser window), Heading1 (h1), Heading2 (h2), Heading3 (h3), Paragraph (p) |
| Table Width | Specifies the width of the table, either absolute (in px) or relative to the available horizontal space (in %) or the width of the current font’s ‘m’ character (in ems).Applies to: Outer Container in Results Pages, Paging Layout. |
| Cellspacing | Applies to Outer Container in List/Grid Layout only and specifies the distance between the individual record cells. |
| Container Width | Applies to Data Download Layout only. For Data Download, you specify the width of the visible container instead of the entire table width. This enables right alignment of the Data Download control on the page. To ensure correct alignment, the Same as Results Table checkbox must be checked to keep the width of the entire table same as the Results table. |
| Cell Width | Specifies the width of the table, either absolute (in px) or relative to the available horizontal space (in %) or the width of the current font’s ‘m’ character (in ems).Applies to: Label Cells, Field Cells, Data Cells, Header Cells, Record Action Column |
| Alignment | Specifies how contents are aligned in the cell, horizontally and vertically. Click the ellipsis (…) button to bring up the picker and click the desired alignment icon.Applies to: Confirmation Messages, Label Cells, Field Cells, Buttons Cells, Data Cells, HTML Block Cells, Header Cells, Record Action Column, Data Download Layout, Paging Layout |
| Text Alignment | Specifies how text is aligned on the page or within a container. Click the ellipsis (…) button to bring up the picker and click the desired alignment icon.Applies to: Error Messages, Buttons |
| Wrap Text | Check this to wrap any long text in the container.Applies to: Label Cells, Field Cells, Data Cells, HTML Block Cells, Header Cells, Record Action Column, Data Download Layout, Paging Layout |
| Line Width | Specifies the spacing between adjacent lines of text (similar to Line Spacing in text editors where 100% would be Single and 200% would be Double).Applies to: Paragraph (p) |

