Adding a Logout Link
3 minutes to readThe logout link is a hyperlink that tells Caspio to discard the user’s identity credentials. By default, the hyperlink does not change your user’s browser location. However, you can customize the action that the browser will take after the user clicks a logout link.
Caspio offers two main methods for logging out of your apps. You can logout users automatically after a specific amount of time. This method is the easiest to implement. You can also create a logout link to provide users with more immediate control. Both methods are outlined below.
Adding a Logout link
In this section, you create a logout link for an authenticated DataPage. Ensure an Authentication has been created already.
- In Authentications listing, click Properties of an Authentication that is used for the DataPage for which you will later add the logout link.
- Save the logout link.

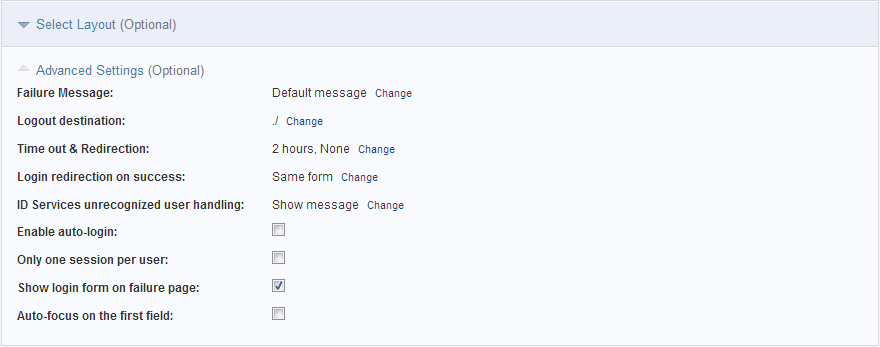
- Next, customize the destination after logout. Click Edit and expand Advanced Settings. In the Logout destination field, click Change. Select a logout destination from the drop-down and enter a URL. By default, the logout link directs the user to a fresh authentication login form. You can change this action to have the browser go to a specific URL, such as your homepage, or have the browser go to a specific DataPage which will be deployed directly from Caspio.In this scenario, the Logout destination is Go to a new page and URL is a relative web address. Click Save.

- Next, choose a location on your DataPage for your logout link. Open a DataPage and proceed to a screen where you configure your fields. Web Forms have one Configure Fields screen whereas Search and Report pages have three for search, results, and details pages.
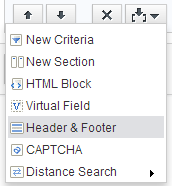
- You can add a logout link into the header, footer, or an HTML block. The footer is the most common location used. In this scenario, click Insert button and select Header & Footer.

- Next, you create the logout link. Using the template below, replace the Logout URL with the logout link you copied from step 2. The logout link URL must be surrounded by quotation marks. Also, replace the Link Text with the label you would like to display for the logout link. You can copy this HTML link and use it in any of your authenticated DataPages.
<a href="http://bn.caspio.com/folderlogout">Logout</a>

- You can continue to edit the DataPage, click Preview to view your new edits of any screen, or exit the wizard. You have added a logout link to your DataPage. You can view your updated DataPage by clicking Preview.
Configuring a timed Logout
In this section, you configure a timed logout session. You can configure an Authentication to automatically discard the end-user’s identity credentials after a specific amount of time. Customizing the logout time is accomplished entirely in the Authentication wizard.
- Open the same Authentication you used in the first set of instructions and click Advanced Settings.
- By default, the time out period is 2 hours and time out redirection is the same login form. You can change this amount of time to several options ranging from 15 minutes to one week. You can also change the destination to have the browser go to a specific URL, such as your homepage, or have the browser go to a specific DataPage which will be deployed directly from Caspio. Click Save.

You have successfully configured and customized the automatic timeout period and destination for an Authentication.

