Setting Up ID Services
2 minutes to readTo enable Google ID Services with Caspio, you first need to register your application with Google. After you do it, the identification codes and keys for Google ID can be used in your Caspio Authentications and Connections.
OpenID does not require any registration.
Note: Use this article only as a reference. Third-party providers might update the user interfaces at any time. If you need further help with these settings, see the support site of the provider.
Register a Google Application
- Open the https://console.developers.google.com/cloud-resource-manager website and sign in to Google with an activated account.
- Click CREATE PROJECT.
- Name your project and click Create.
- In the left navigation menu, click API & Services > Credentials.
- Click the OAuth consent screen tab and enter the information for your new Client ID.
- In the Credentials tab, click Create credentials and select OAuth client ID.
- In the Application type list, select Web application.
- Enter the Site URL of your Caspio account in the following fields:
- Authorized JavaScript origins – Use the https:// format. For example, use https://b1.caspio.com if your account belongs to Site1.
- Authorized redirect URLs – Use the https:///dp.asp format. For example, use https://b1.caspio.com/dp.asp if your account belongs to Site 1.
- Click Create and note the client ID and client secret. You need these values to enable Google ID Services with Authentication in Caspio.
- To finish, click OK.
Next Steps
When you have the identification codes and keys for an ID Service that you want to enable in Caspio, you can start creating Authentications and Connections.
Customizing ID Service Sign-In Screen
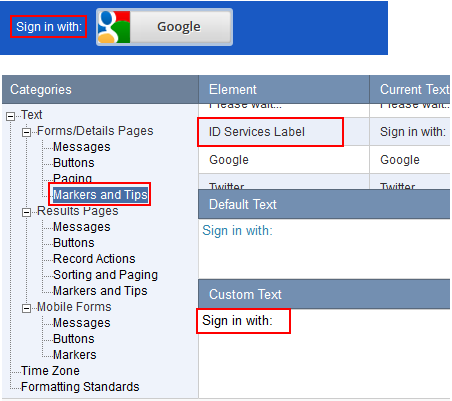
The text used on your login screen can be customized in the Localization object of your DataPage. Open your localization object and go to Forms/Details Pages > Markers and Tips > ID Service Label as shown below and change the text as you wish.