• search
  • Contact Sales
  • Support
    • Online Help
    • Community Forum
    • Contact Support
  • Log in
Get a Demo Try Free
High Contrast
Caspio logo Help
Try Free
  • High Contrast
  • search
  • Contact Sales
  • Support
    • Online Help
    • Community Forum
    • Contact Support
  • Log in
Get a Demo Try Free
  • Help Center
  • Creating Apps With Bridge
  • DataPages
  • Calendars
  • Launch Your Caspio Journey
  • Create Applications
    • Applications Overview
    • Creating Apps With Bridge
      • Bridge App Overview
        • Creating a New App Container
        • Importing an App
        • Exporting an App
        • Deleting an App
        • Shared Objects
        • Backing Up Your Applications
        • Sharing an App with Another Account
        • App Parameters
          • Adding App Parameters
          • Managing App Parameters
          • Using App Parameters
      • Authentication
        • Setting Up User Permissions in Your App
        • Adding a Logout Link
        • Record Level Security
          • Create a Workflow using Record Level Security and Filtered Dropdown
          • Restrict Access to Data by User or Role
          • Filter Lookup Dropdown or Listbox Based on User or Role
        • Stamp a Record with User Profile Data
        • OpenID
        • Create a Standalone Login Screen
        • Hiding Multiple Login Forms
      • DataPages
        • What is a DataPage?
        • DataPage Types
        • Forms
          • Submission Forms
          • Update Forms
          • Password Recovery Forms
          • Form Element Types
          • Conditional Forms
          • Child Forms
          • Accepting Payments in Your Application
        • Reports
          • Creating a Report DataPage
          • Comparison Types in Report DataPages
          • Search by Distance
          • Report Page Results Layout
          • Interactive Reporting Options
          • Pivot Table Reports
          • Counting the Number of Times a Record Has Been Viewed
          • Display a Field Data as Hyperlink
          • Fixed Rows and Columns
          • Making the Search Results Downloadable as PDF
          • Editing Data Through My Details Page
          • Making the Details Downloadable for Users
          • Data Editing Options in Reports
          • Combined Chart and Report
          • Adding “Today” to “After Now” or “Next X Days” Criteria
          • Filtering Reports Based on an Expiration Date
          • Advanced Reporting
            • Calculations in Reports
            • Data Grouping
            • Totals and Aggregations
            • Calculated Fields and Datediff Function
        • Charts
        • Calendars
          • Calendar DataPage – Monthly Example
          • Calendar DataPage – Weekly Example
        • HTML Pages
        • DataPage Components
          • Dropdowns and Listboxes
          • Cascading Elements
          • Calculated Values
          • Field Configuration Options
            • Field and Column Width
            • Placeholder Text
            • Rollover Hints – Mouse-Over Help Icon
            • Image Auto-Rotation
          • DataPage Header and Footer
          • HTML Blocks
          • Disabling HTML Editor in DataPage Header/Footer and HTML Blocks
          • Field Formatting Options
          • Custom Date Formatting
          • Multi-column and Sections
          • CAPTCHA
          • Virtual Fields
          • Setting up Default Values
          • AutoComplete
        • Managing DataPages
          • Modifying DataPages
          • Previewing DataPages
          • Moving DataPages
          • Copying DataPages
          • DataPage Revisions
          • DataPage Folders
          • Exporting and Importing DataPages
          • Moving Existing DataPages To a New App
        • Responsive DataPages
          • Responsive DataPage Prerequisites
          • Responsive Behavior on Tablet and Mobile
          • Modifying Styles for Tablet and Mobile
        • AJAX Loading
        • PDF Download
          • Adding a text watermark
          • Adding an image watermark
          • Adding page breaks to details page
          • Adding header and footer
        • Best Practices in Creating Caspio Applications
      • Notifications
        • Email Notifications
          • Verifying Email and Domain
          • Configuring Email
          • Setting Up Dynamic or Conditional Notification Emails
        • SMS Notifications
          • Configuring the SMS-enabled Countries
          • Configuring SMS
          • Adding SMS Sender Name
      • Parameters
        • Parameter Types
        • System Parameters
        • Passing Parameters through Caspio
        • Displaying Parameters
        • Parameters as Query String Values
        • Receiving Parameters
        • Resetting Parameters
        • Passing Multiple Values in One Parameter
        • Formatting Parameters in Email Body and HTML Blocks
        • Parameters in Dropdowns, Listboxes and Radio Buttons
        • Custom Filter Elements
      • Connections
        • SAML Single Sign-On
        • Setting Up ID Services
      • Styles
        • Creating or Editing a Style
        • Layout Options
        • Fix the Width of the DataPage
        • Button Alignment
        • Field Alignment
        • Border Options
        • Using Google Web Fonts
        • Glossy Heading Text
        • Gradient Backgrounds for DataPages
        • Gradient Backgrounds for Fields
        • Replace Links to Records with Images
        • Replace Standard Buttons with Images
        • Change the Color of Field Error Labels
        • Change Text on a Button
        • Put Multiple Fields on One Line
        • Styling Advanced Reports
        • Add Rounded Borders to the Form and Fields
        • Use an Image as Form Background
        • Fix the Width of Labels and Data in List and Gallery Reports
        • Customize the ID Service Icon of the Login Screen
      • Localizations
        • Creating or Editing a Localization
        • Handling Arabic, Hebrew and Other Right-to-Left Languages
        • Formatting Options
        • Using Localization Feature to Improve Usability
        • Format Types
      • Files and Images
        • Uploading Files and Images
        • FileStor CDN
        • Managing Files
        • Bulk File Import and Export
        • Creating Thumbnails with the Image Resizer
        • Using Files in DataPages
        • Orphan File Cleanup
    • Creating Apps With Flex
      • Flex Overview
      • Roles
        • Creating New Roles
        • Adding Users and Groups to Roles
        • DataPart Display Based on the User Role
        • Editing Role Permissions
          • User’s Own Records
          • Custom Access
        • Removing Users and Groups from Roles
        • Deleting Roles
      • Application Design
        • Segments
          • Editing Segment Settings
          • Themes and Widgets
        • Adding AppPages
        • AppPage Types
        • Moving DataParts
        • Resizing DataParts
        • Adding DataParts
        • Forms
          • Form Elements
          • Search Form
          • Submission Form
          • Details/Update Form
        • Reports
          • Tabular Report
          • Card Report
          • Pivot Table
        • Sign-up Form
        • Charts
          • Creating and Configuring Charts
          • Chart Display Options
        • Text/HTML
        • Data Filters
          • Creating Filters
        • Calculated Values in Flex DataParts
        • Communication Between DataParts
        • Designing User-Friendly Navigation Between AppPages
      • Parameters
        • Inserting Parameters
        • Application Parameters
        • Adding Support for Lookup Values in Data Source Parameters
        • Stamping Records with User ID
      • Branding
      • Flex FAQ
  • Manage Users and Groups
    • Directories Overview
      • User Authentication in Directories
      • Converting Tables to Directories
      • Creating Directories
    • Directory Users
      • User Status Overview
      • Creating Users
      • Activating Users
      • Adding Users to Groups
      • Resetting User Passwords
      • Resetting Two-Factor Authentication
      • Suspending and Unsuspending Users
      • Changing User Sign-In Method
    • Directory Groups
      • Creating Groups
      • Modifying Groups
      • Deleting Groups
    • Directory Security
      • Session Management
      • Turning On Two-Factor Authentication
      • Customizing Directory Security Policy
      • Redirecting to Custom URLs After Sign-in and Sign-out
    • Directory User Portal
    • Directory Emails
    • Identity Providers
      • Adding Identity Providers
        • Tutorial: Adding Microsoft Entra ID (formerly Azure AD) Identity Provider
        • Tutorial: Adding Okta Identity Provider
        • Tutorial: Adding OneLogin Identity Provider
      • Editing Identity Providers
      • Deleting and Disabling Identity Providers
      • Configuring Single Logout
    • App Connections
      • Creating App Connections 
        • Authenticating Users to Caspio Apps in Multiple Accounts Using a Single Directory
        • Tutorial: Adding HubSpot App Connection
        • Tutorial: Adding BambooHR App Connection
        • Tutorial: Adding Slack App Connection
      • Managing App Connections 
      • Deleting and Disabling App Connections
  • Manage and Organize Your Data
    • Data Management Overview
    • Tables and Views
      • Creating Tables
      • Modifying a Table’s Design
      • Removing Blanks From a Dropdown or Listbox
      • Lookup Tables
      • Views
        • Creating a View to Filter Data
        • Creating a View to Join Tables
        • Self-Join Views
        • Modifying Views
        • Importing and Exporting Views
    • Data Types
      • List Data Types
      • Function Reference
      • Adding a Formula Field in a Table
      • Managing Files With the Attachment Data Type
    • Managing Data in Datasheet
      • Find and Replace Specific Values
      • Filtering Data
      • Downloading Table or View Data
    • Database Relationships
      • Relationship Settings
    • Importing Data
    • Exporting Data
    • Sharing Data Between Apps
    • Best Practices for Designing Databases and Tables
    • Logs
      • Managing Logs
        • Logs Retention Period
      • App Access Logs
      • Directory Logs
      • Email Logs
      • Integrations Logs
      • Payment Logs
      • SMS Logs
  • Leverage AI
    • AI Assistant Overview
  • Automate Tasks and Workflows
    • Automations Overview
    • Triggered Actions
      • Creating a Triggered Action
        • Actions
          • UPDATE
          • DELETE
          • INSERT INTO
          • SEND EMAIL
          • SEND SMS
        • Data
          • SELECT
        • Logic
        • Loops
        • Text
        • Number
        • Date
        • Variables
    • Tasks
    • Data Import/Export Tasks
      • Data Import Tasks
      • Data Export Tasks
      • Configuring a Repository Site
      • IP Addresses for Data Import/Export Tasks
      • Data Import/Export Tasks Tips and Best Practices
  • Generate PDF Documents
    • Document Generation Overview
    • Creating Templates
    • Mapping Fields in Templates
    • Template Field Types
    • Configuring Template Settings
      • Formatting Field Values
      • Adding Watermarks
      • Encrypting PDF Documents
      • Configuring PDF Document Properties
      • Changing PDF File for a Template
    • Enabling Document Generation in Applications
    • Managing Templates
  • Integrate and Extend Your Apps
    • Integrations Overview
    • Webhooks
      • Getting Started with Webhooks in Caspio
      • Webhooks Rules and Limitations
      • IP Addresses for Webhooks
      • Creating and Managing Webhooks
        • Configuring Call Throttling
      • Creating and Managing Events
        • Event Types
        • Activating or Deactivating Events
      • Testing Webhooks
    • Extensions
      • AI-Powered GPT Connect
      • Extension for Slack
      • QR Code Generator
      • Barcode Generator
    • Web Services API
      • Creating a Web Services API Profile
      • Authenticating REST API
      • Important Header Parameters
      • Special Considerations
      • Error Handling
      • Swagger UI
      • Migration from REST API v2 to v3
    • Integration with Make
    • Integration with Zapier
  • Deploy Your Apps
    • Deploying Bridge Apps
      • General Deployment Guide
      • Remove iFrame Border and Change Size
      • Block Access to DataPages by IP Address
    • Deploying Flex Apps
      • Mapping a Friendly Subdomain
  • Manage Account and Billing
    • Account Settings
    • Account Users, Groups and API Profiles
      • Inviting New Account Users
      • Creating Groups for Account Users
      • Managing Permissions
      • Changing Account Owner
    • Changing Your Plan
    • Updating Payment Information
    • Payment History
    • Custom Domain
    • Account Notifications
    • Resource Usage
    • Caspio ID
      • Managing Your Caspio ID
      • Forgot Your Password
      • Getting Support PIN
    • Support Login
    • Search for Objects
  • Videos
    • Bridge Videos
      • Build Your First App
      • Recorded Training
      • Customize Your Apps
      • Advanced Topics
      • Full App Implementation
      • Tips and Tricks
    • Flex Videos
      • Build Your First App
      • Recorded Training
  • Resources and Best Practices
    • Frequently Asked Questions (FAQ)
    • Tech Tips
    • Troubleshooting
      • Troubleshooting SMS Delivery
      • Troubleshooting Email Delivery and Domain Verification
      • Cannot Log in to My Caspio Account
      • Issue with Login to Apps or DataPages
      • Issue with Redirection After Logout
      • Acknowledgement Emails Are Not Received
      • Issues with Email Verification Code
      • JavaScript Does Not Work with Multiple DataPages
      • Cannot See an SSL Lock Icon for My Web Page
      • Responsive UI Does Not Display Properly
      • Date Fields from Excel Import Incorrectly
      • Troubleshooting Custom PDF Generator
      • Troubleshooting Data Import Speed
      • System Limitations
      • Errors and Messages
    • System Requirements
    • Deprecations
      • Deprecation of Twitter as an ID Service in Authentications and Connections
      • Deprecation of Google Drive for Data Import/Export Tasks
      • Deprecation of HTTP Deployment
      • Deprecation of the Option to Disable AJAX Loading
      • Deprecation of MS Access for Import/Export
      • Deprecation of Cb_ErrorLog Tables
      • Deprecation of Google Map Mashup Generator
      • Deprecation of Frame Deployment
      • Deprecation of .xls Excel Format for Data Import
      • Deprecation of SEO Deployment Method
      • Deprecation of WordPress Deployment
      • Deprecation of Unverified Email Addresses
      • Deprecation of SOAP Web Service
      • Deprecation of Internet Explorer 11 and Microsoft Edge Legacy Browsers
  • Release Notes
    • Caspio 60.0
    • Caspio 59.0
    • Caspio 58.0
    • Caspio 57.0
    • Caspio 56.0
    • Caspio 55.0
    • Caspio 54.0
    • Introducing Flex
    • Caspio 53.0
    • Caspio 52.0
    • Caspio 51.0
    • Caspio 50.0
    • Caspio 49.0
    • Caspio 48.0
    • Caspio 47.0
    • Caspio 46.0
    • Caspio 45.0
    • Caspio 44.0
    • Caspio 43.0
    • Caspio 42.0
      • Known Issue: Scrolling on macOS Devices
    • Caspio 41.0
    • Caspio 40.0
    • Caspio 39.0
    • Caspio 38.0
    • Caspio 37.0
      • Impacted Areas 37.0
    • Caspio 36.0
    • Caspio 35.0
    • Caspio 34.0
      • Impacted Areas 34.0
    • Caspio 33.0
    • Caspio 32.0
    • Caspio 31.0
      • Impacted Areas 31.0
    • Caspio 30.0
    • Caspio 29.0
    • Caspio 28.0
    • Caspio 27.0
    • Caspio 26.0
    • Caspio 25.0
    • Caspio 24.0
    • Caspio 23.0
    • Caspio 22.0
    • Caspio 21.5
    • Caspio 21.0
      • Impacted Areas 21.0
    • Caspio 20.0
    • Caspio 19.0
      • Impacted Areas 19.0
      • Security Patch 19.5
    • Caspio 18.0
    • Caspio 17.0
    • Caspio 16.0
    • Caspio 14.0
      • Impacted Areas 14.0
    • Caspio 15.0
    • Caspio 13.0
      • Caspio 13.0
      • Impacted Areas 13.0
    • Caspio 12.0
      • Impacted Areas 12.0
    • Caspio 11.0
      • Impacted Areas 11.0
    • Caspio 10.0
    • Caspio 9.9
      • Impacted Areas 9.9
    • Caspio 9.8
    • Caspio 9.7
    • Caspio 9.6
      • Impacted Areas 9.6
    • Caspio 9.5
      • Impacted Areas 9.5
    • Caspio 9.4
      • Impacted Areas 9.4
    • Caspio 9.3
      • Impacted Areas 9.3
      • Caspio 9.3
    • Caspio 9.2
      • Impacted Areas 9.2
    • Caspio 9.1
      • Impacted Areas 9.1
    • Caspio 9.0
      • Known Issues 9.0
      • Impacted Areas 9.0

Calendars

10 minutes to read

Calendar DataPages enable you to display your table data in monthly or weekly calendar layouts. They are multi-page applications that provide the following high-level capabilities:

  • An interactive search form or pre-defined criteria
  • A results screen where matching records are displayed in a calendar format
  • An optional details page where one record is displayed and some or all fields may be editable
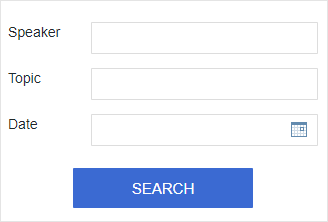
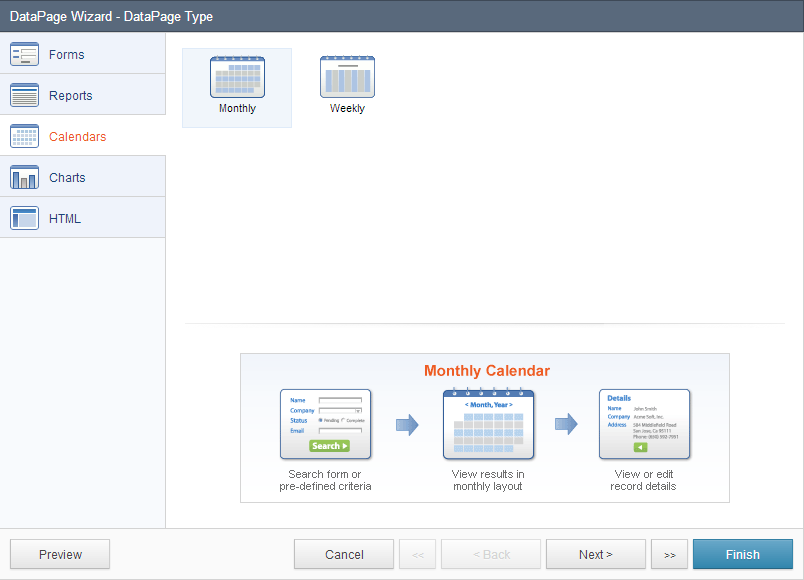
Creating a Calendar with Interactive Search

Calendars are created easily through DataPage Wizards. In the section, you create a Calendar DataPage with an interactive search form, a results page, and a details page. These instructions show you how to create a sample seminar calendar with a search form and details page.

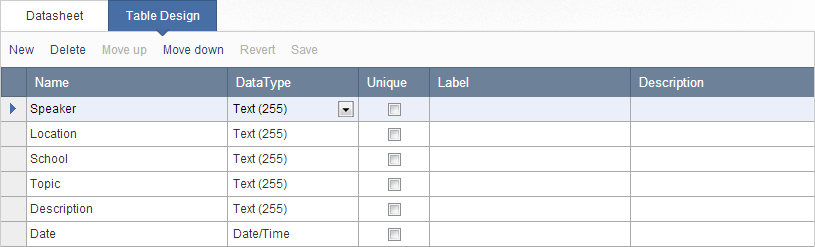
Ensure that your data source must have a date/time or timestamp field and it must be available prior to the creation of the Calendar Datapage.  In this scenario, records of seminar events are listed into a table. The table name is Spring_2013_Seminars. The table design is displayed:

Detailed steps to create a Calendar Datapage:

  1. On Caspio homepage, click DataPages on the sidebar menu and click New DataPage.
  2. On the DataPage Type screen, select Calendars on the left menu and click Monthly.
  3. On the DataPage DataSource screen, you can select the table or view as your data source, Style and Localization. Select whether your DataPage will be publicly accessible or restricted by an Authentication or Connection.


    In this scenario, Spring_2013_Seminars is the table used as the data source for this DataPage and the DataPage is named “Spring_2013_Seminars Calendar”. No authentication is required.

  4. On the Search Type screen, you can customize how the search will be performed. You can allow users to use a search form to select and filter the Results page or automatically display results based on a pre-defined criteria. If you decide to allow users to select data using a search form, check Show Search Form. You can also check Place cursor in first field, which allows the first field to be automatically selected.
    Calendars_4
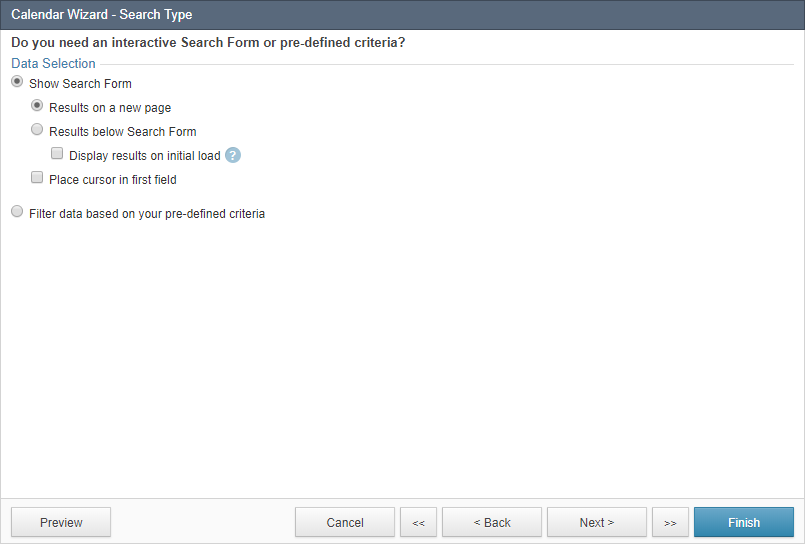
Alternatively, if you decide to filter data based on your pre-defined criteria, check Filter data based on your pre-defined criteria, which automatically directs your users to the results page based on set criteria and do not provide users with a search function. If this DataPage is protected by an Authentication or  Connection, you can also enable Record Level Security, which correctly identifies and associates each user from the Authentication or Connection data source to the user’s record in the current data source.
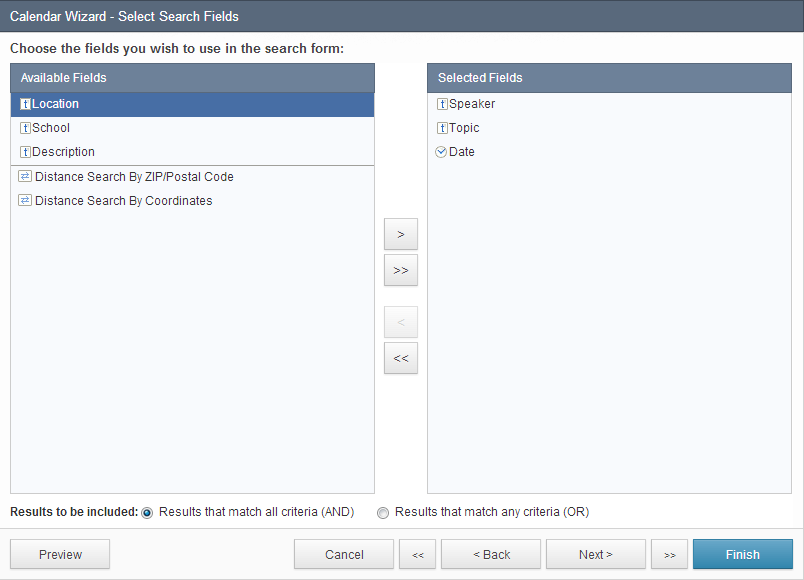
  5. On the Select Search Fields screen you can select which fields are used in your search form. To select fields, move the fields from the Available Fields list to the Selected Fields list. You can also choose to include how the criteria should filter your results. Check Results that match all criteria (AND) to return records where all selected criteria are true. For most scenarios, the Boolean operator must remain at this default state. Check Results that match any criteria (OR) to return records that match any of the selected criteria.
    Calendars_5
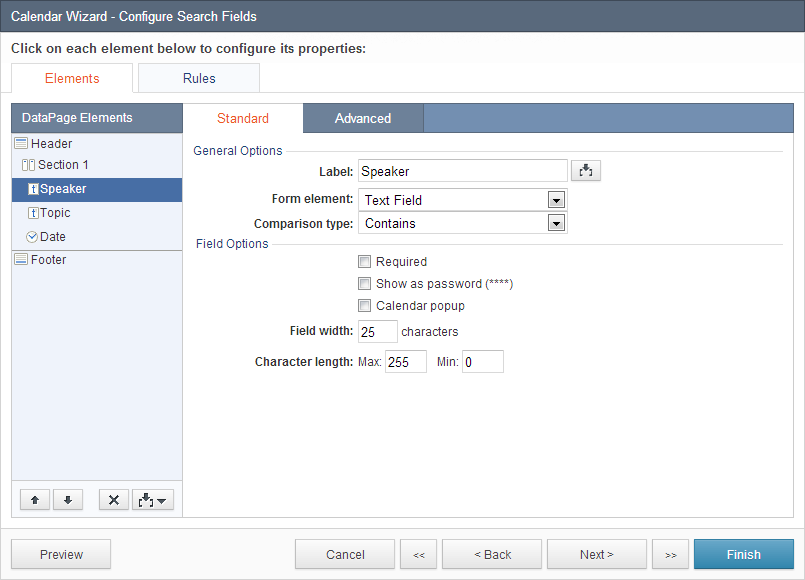
  6. On the Configure Search Fields screen you can configure the functionality, appearance, data validations, and other properties for your search fields. Select a field from the DataPage Elements menu on the left and configure field properties on the right. You can insert new elements into your search form, including a New Criteria, New Section, HTML Block, Virtual Field, Header & Footer, CAPTCHA, and Distance Search by Reference or Coordinates.

    Note: Some Unicode characters such as emoji are ignored in the search criteria.

    Calendars_6
    In the Advanced tab you can configure the field layout options and External Associations and Defaults. Layout Options:

    • By default, every form field starts on a new line. Check Continue next element on same line to place multiple fields on one line.
    • You can override the default label position and specify another one using the Label Position dropdown.
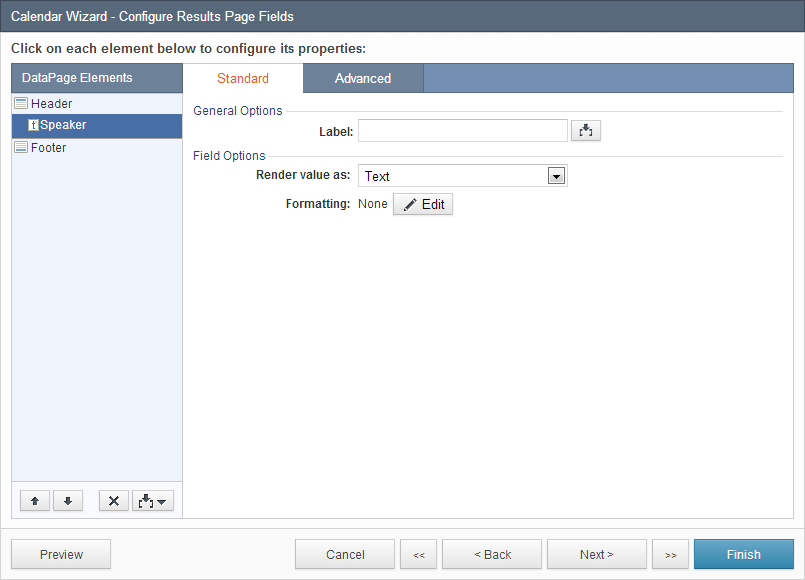
  7. On the Select Results Page Fields screen, you can select the desired fields from your data source to display in your calendar page. An icon on the left of every field indicates the field’s data type. To select fields, move the fields you wish to include from the Available Fields list to the Selected Fields list.
    Calendars_7
    In this scenario, only the Speaker field is displayed on the calendar page. All fields will be selected later for the details page.
  8. On the Configure Results Page Fields, You can render the appearance, formatting and other properties for each field that were selected on the previous screen. Select a field from the DataPage Elements menu on the left and configure field properties on the right. You can insert new elements into your results page, including a HTML Block, Header & Footer, and Calculated fields. In the Advanced tab you can configure layout options for each DataPage Element. By default, every form field starts on a new line. Check Continue next element on same line to place multiple fields on one line. Check Hide field if blank to hide a field when it has a blank value for Display Only fields. You can limit the amount of text by enabling the Truncate option. If enabled, enter a character value to start the text truncation and select an option from the dropdown:
    • Characters (nearest word) – Truncates at the end of the last word before the specified limit.
    • Characters (exact) – Truncates at the exact number of specified characters, including spaces and line breaks.
    • Paragraphs – Truncates at the exact number of paragraphs, as identified by a line break.

    Check Allow users to expand/collapse to include an icon or “More…” link for users to view the truncated text. You can choose a particular icon in Styles or customize the text link in Localizations.

    If the Formulas and Calculations feature is available on your account, you can use the Grouping tab to group fields by one or more fields and customize the grouping display with the standard or collapsible option.

    In this scenario, a Header & Footer is inserted to display a heading title. The label for the Speaker field is removed, so the field name will not display on the calendar.

    Calendars_8

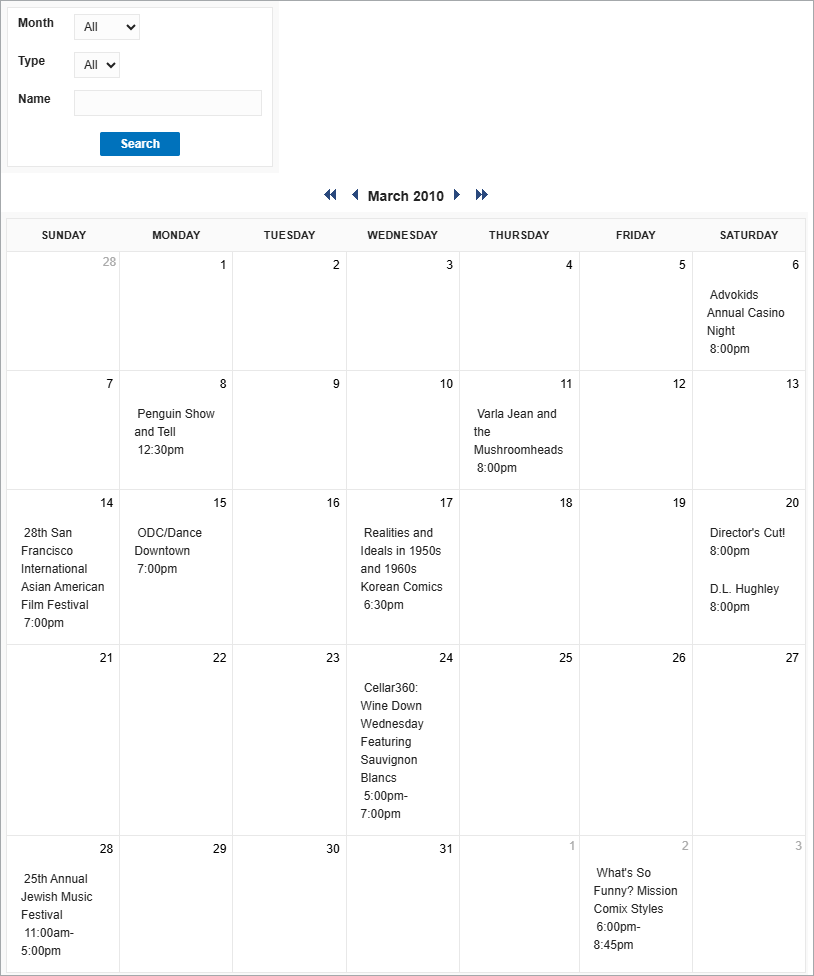
  9. On the Search Results Options screen you can customize the appearance and functionality of your Calendar page. You can configure the calendar options, display options, and interactive options.
    Calendars_9
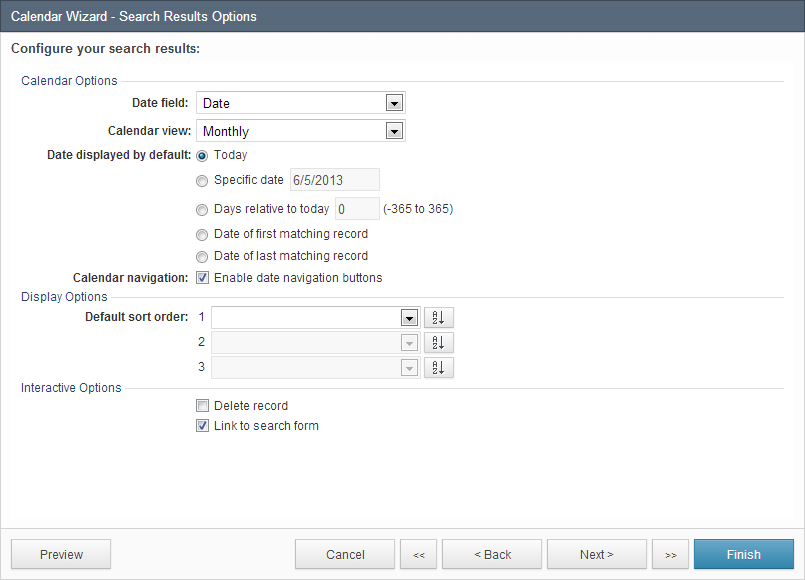
  10. In the Calendar Options section, you can apply the following:
    • Date field – Select the column in your table which will be used to place results within your Calendar.
    • Calendar view – Choose between a monthly and weekly view.
    • Date displayed by default – Select the date that should be visible on the default view of your Calendar.
      • Today – The current date is shown on your Calendar.
      • Specific date – The date you select is shown on your Calendar.
      • Days relative to today – This option will show a Calendar in the past or in the future based on the number of days you select.
      • Date of first matching record – The Calendar shows the earliest entry in your result set.
      • Date of latest matching record – The Calendar shows the most recent entry in your result set.
    • Enable date navigation buttons – These buttons allow your users to navigate to previous and future dates from your Calendar. In the monthly view, you can navigate by month and year. In the weekly view, you can navigate by week and month.
  11. In the Display Options section, you can configure the following:
    • Default sort order – Select which fields to sort and choose to sort by Ascending or Descending order with the toggle buttons. Up to three fields can be used for sorting. You have the option to sort search results by fields that are not selected to display on the results page.
  12. In the Interactive Options section, the following options can be checked:
    • Interactive sorting – Let users sort results in any column by clicking the column’s header or by customizing a list of specific sorting fields in a dropdown menu. If the second option is enabled, you can configure the dropdown label for each field, sort each field in ascending or descending order, order the fields in the dropdown, position the dropdown menu, and preview how the dropdown menu will be displayed.
    • Delete record – Allow users to delete records.
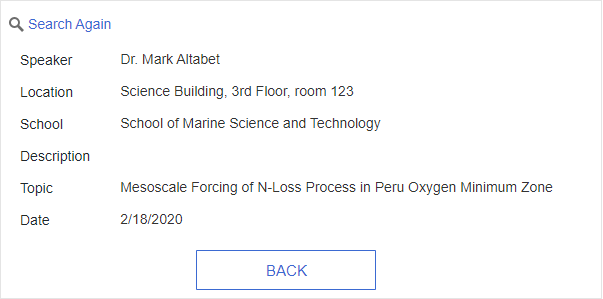
  13. In this scenario, all settings are left at default. You have the option to add a details page to your Calendar DataPage that is linked to each search result. The details page displays information for a specific record that was selected from the results page.
    Calendars_10
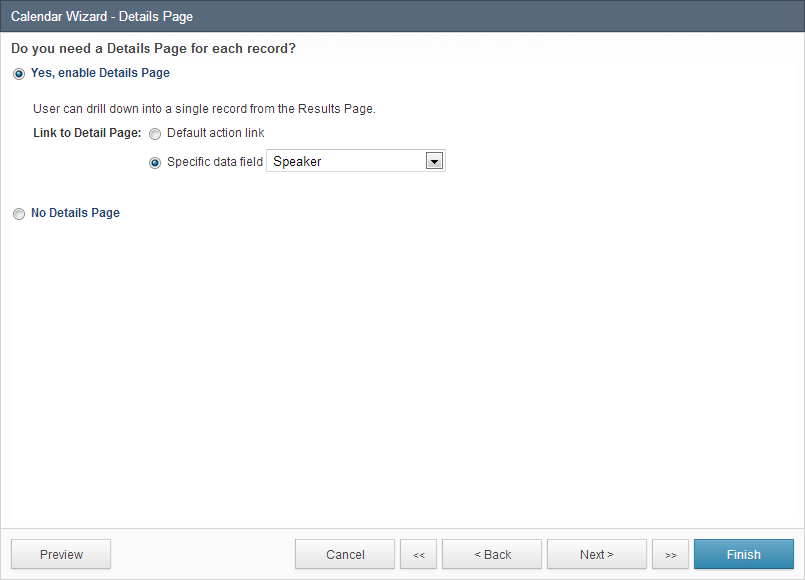
  14. To enable a details page, check Yes, enable Details Page. Select Default action link for Caspio to provide an additional link to each record or select Specific data field and select a field for the details page link to be embedded within the selected field.In this scenario, it is ideal for an end-user to click an event on the calendar page and view additional event information on the details page. Check Yes, enable Details Page. Check Specific data field and select Speaker from the dropdown.
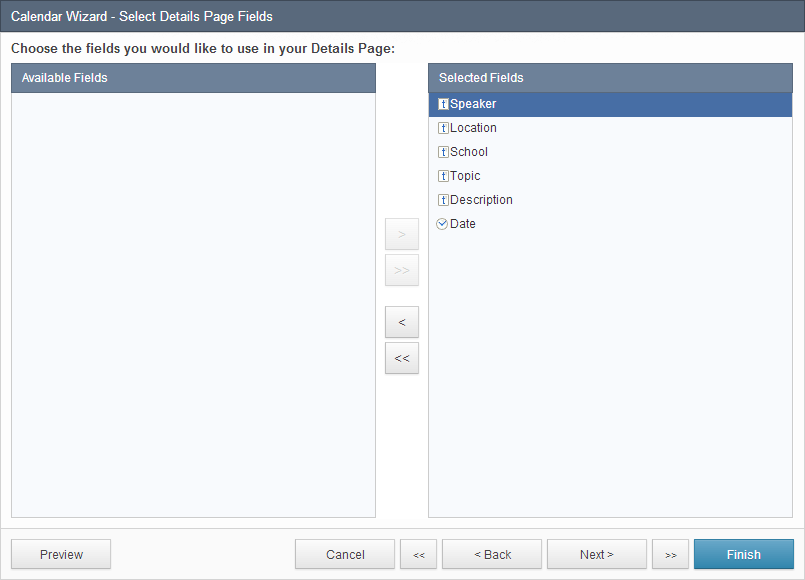
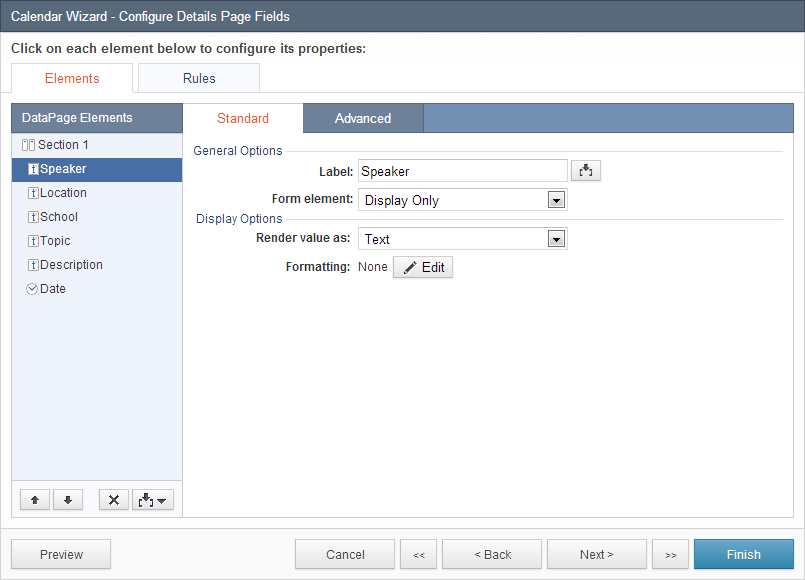
  15. On the Select Details Page Fields screen you can choose the fields you want to use in your details page. To select fields, move the fields from the Available Fields list to the Selected Fields list.
    Calendars_11
  16. On the Configure Details Page Fields screen you can configure how the fields will be displayed in your details page. Select a field from the DataPage Elements list to customize the field’s display and functionality properties. In this scenario, no customization options were configured.
    Calendars_12
  17. On the Details Page Options, you can choose to enable additional functionality in your details page. The options are described below:
    Calendars_13
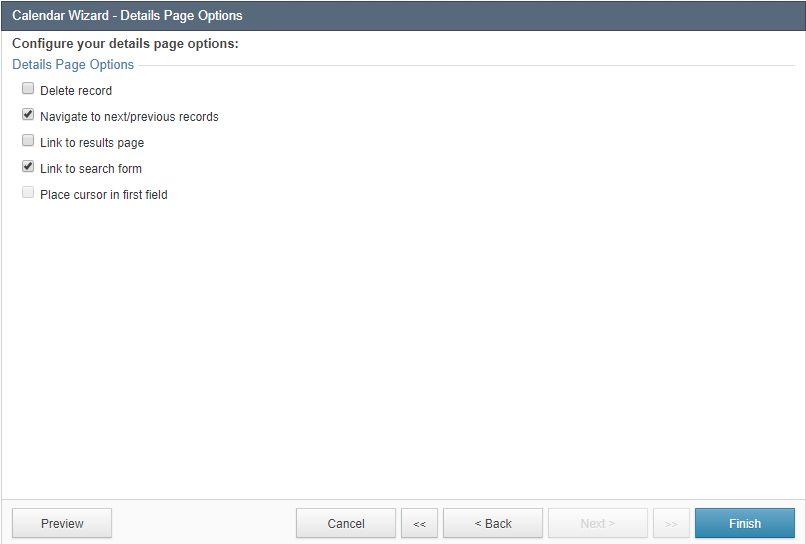
    • Delete record – Allow users to delete records. While this option is not recommended for publicly-accessible DataPages, you may consider enabling this for internal use. Deleted records are permanently removed from your table.
    • Navigate to next/previous records – Add controls on the details page to go to the next or previous record based on the order displayed in the search results. You can modify the color and styles in the Style associated with this DataPage.
    • Link to results page – Allows users to go to the results page.
    • Link to search form – Allow users to return to the search form with a provided link or button. You can customize the link into an icon in Styles or format the text link in Localizations.
    • Automatically focus cursor on the first field – Automatically place the cursor in the first field of the form when the page loads.

    In this scenario, only Link to search form is checked. Click Finish.

You have successfully created a Calendar DataPage with a search form, a results page, and a details page. Click Preview to view your calendar. It should appear with the search form first:

After clicking Search, events are displayed based on your search criteria. Click any speaker name to view the details page of the particular seminar.

Once a speaker name is clicked, you will be directed to the details page of the selected seminar.

  • PRODUCT

  • Platform Overview
  • Why Low Code
  • Case Studies
  • App Marketplace
  • Pricing
  • Get a Custom Demo
  • Free Trial
  • SOLUTIONS

  • Healthcare
  • Education
  • Government
  • Financial Services
  • Energy and Utilities
  • Nonprofits
  • Media
  • Consulting
  • RESOURCES

  • Resource Center
  • Blog
  • Free Training
  • Online Help
  • Onboarding
  • Get Certified
  • Professional Services
  • Support Center
  • COMPANY

  • Our Story
  • Careers
  • Leadership
  • News
  • Partner Programs
  • Referral Program
  • Academic Program
  • Discount Programs
  • Contact Us
  • TRENDING

  • Build Custom CRM
  • Create Web Dashboards
  • Best Online Database
  • Convert Excel to Web
  • Migrate MS Access Online
  • HIPAA Compliant Database
  • Create a Patient Portal
Caspio Logo

Caspio is the world’s leading cloud platform for building online database applications without coding.
Start a free trial today and experience the power of no-code.

Footer Partners

© 2025 Caspio, Inc. Sunnyvale, California. All rights reserved.

  • Privacy Statement
  • Terms of Use
  • Report Abuse
  • Feedback