Update Forms
9 minutes to readIf you have Authentication enabled you can provide an interface for your end-users to update or change their profile information. Using Record Level Security, you can create an Update Form that will return the user profile record of the currently logged-in user from the authentication table and make it available for updating.
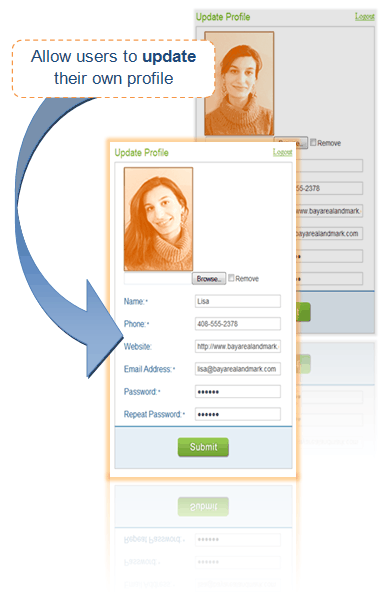
Single Record Update is particularly useful in two common scenarios:
- Users updating their own profile in your web app
- One to many DataPage relationships
Note: If you are looking to create an interface where the user will be able to update more than one record it is better to use a Report DataPage and make the fields editable in the details page. You can use a Single Record Update form to allow end users to update one record based on its unique ID or using Record Level Security.
The instructions in this article show how to create an Update form. This form will update existing records and trigger automatic emails.
Steps to Create a Single Record Update Form
Ensure that you already have an authentication table or view for this Update Form. If you are using a view, make sure one of the tables is editable.
On Caspio homepage, select an app or create a new app. In the App Overview page, click DataPages on the sidebar menu and click on New DataPage.
DataPage Type
On this screen, you can select the type of DataPage. By default, the cursor selects Submission Form as the first DataPage type. To create an Update Form, choose Single Record Update.
DataPage Data Source
On this screen, you can assign various objects that change the behavior of this DataPage. These options are listed below:
- Select an authentication Table or View that will be the primary data source for your DataPage.
- Name your DataPage or use the suggested name.
- Style determines the look and feel for your DataPage. Select a Style or use the default selections.
- Localization determines DataPage time zone, formatting for number, currency and date, and language of DataPage messages. Select a Localization or use the default selections.
- Check Advanced Options to enable additional options in the subsequent steps that are mostly for layouts, external associations, default values, and parameters.
- Check Parameters to give you the ability to use app parameters and parameters that are passed to this DataPage from other apps. Additionally it enables this DataPage to pass parameters to other apps. Learn more about Parameters.
- Restrict Access. Restrict access to this DataPage based on an Authentication or Connection. Without this option, the DataPage can be accessed without any restriction. Note the important difference between Authentication and Connection.
Identifying the record to be updated
The most important feature of an Update Form is to allow users to update a single record based on an identifying field which is achieved on this screen by finding the intended unique record that user wants to edit. This is done in one of two ways: a record id that is passed to the form as a parameter, or user identity field in the associated Authentication or Connection (Record Level Security).
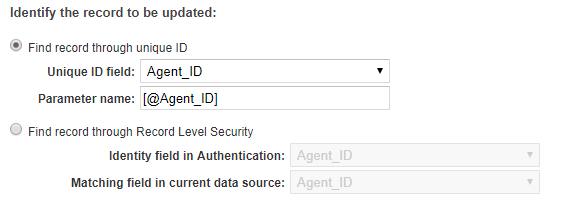
Find record through unique ID. Pass the identifying field to the form as a parameter. This option is available only if your data source contains a unique field.
- Unique ID field. Select a unique ID field and edit the default Parameter name to match the name you plan to use when passing the parameter.
- Find record through Record Level Security. Use Record Level Security to automatically identify the record to be presented. This option is available only if you have applied an Authentication or Connection to restrict access to this form.
- Identity field in authentication data source. Select the user identity field from your Authentication data source.
- Identity field in connection. Select from the user identity field from the list of available ID Service fields.
- Matching field in current data source. Select the identity field in the current data source. If the data source is also used in the Authentication, the field list will be the same.
Using these two dropdowns you must identify how your base table relates to your authentication table. Select a unique field such as an AutoNumber or Record ID to be sure that only one record is returned from Record Level Security.
Select Fields
On this screen you can move fields to include in this Update Form from the Available Fields list to the Selected Fields list. Users can edit values for these selected fields. An icon on the left of every field indicates the field’s data type. Check Place cursor in first field to automatically place the cursor on the first field of the form when the page loads.
Configure Fields
Now the fields you have chosen to use in your form and other form elements are shown in DataPage Elements list. You can select each element and configure its appearance, data validation and other properties on the right. By default all of the fields will be Display Only, so in this screen, you will need to change them to an input field such as a Text Field.
Buttons below the DataPage Elements list allow you to reorder the appearance of the elements on the form, remove elements or insert elements.
Use the Insert button at the bottom right DataPage Elements list to add new elements:
- New Section. Separate form fields into sections and assign different layout properties to each section.
- HTML Block. Add custom text, HTML, CSS, or JavaScript. You can also insert fields or parameters into HTML blocks and freely format them as you like.
- Virtual Field. Virtual fields look and act like any other field, but are not mapped to a database field and are not automatically stored in the database. They can be used for Display Only or parameter passing purposes.
- Header & Footer. Add custom text, HTML, CSS, or JavaScript. You can also insert fields or parameters.
- CAPTCHA. Verify human users and prevent SPAM submissions to your form.
On the Standard tab, you can configure the following properties:
General Options
- Label – This is the instructional text or field name which displays to the left or top of the field.
- Form element – The form element controls the visual display of the field and how its value is changed.
Field Options
Various field’s properties can be configured here, such as make the field Required in the form, adjust Field width, and define max/min number of characters for the field. Learn more about Field Configuration Options.
If Advanced Options is enabled, the Advanced tab will display. You can configure the following:
Layout Options
- By default, every form field starts on a new line. Check Continue next element on same line to place multiple fields on one line.
- You can override the default label position and specify another one using the Label Position dropdown.
External Associations and Defaults
- If the field is editable, you can choose to pass parameter to the next page, by enabling the On exit option and by checking Pass field value as parameter. Enter the parameter value. You need to follow the parameter structure as indicated in the gray text.
You can define conditional rules to show, hide, require, or disable fields based on the value or selection of other fields in the same form. Read the article on Conditional Forms to learn more.
On the Rules tab, you can define conditional behavior to hide, show, require or disable fields based on specific criteria. Learn more about Rules:
- Click the Add (+) button to create a new rule.
- In the Criteria section, click the New button to define a condition for the rule. Criteria can include editable fields, parameters or conditional values.
- To define Actions, click New in the Action section. Next, select an action type and the field or section to make conditional.
Destination and Messaging
On this screen, you can configure what happens after the Update form is submitted. The following options are available in the Destination and Messaging screen of the DataPage wizard.
- Same Form – Load the same form. This is useful for data entry purposes.
- Go to a new page – Redirect users to a confirmation web page (URL) on your own site. For the URL address, you can enter the full URL address or a relative path. To enable a relative path for your destination page, check Relative and enter a valid path in relation to the deployed DataPage. A confirmation page must be designed and accessible on your site.
- Display a message – By default, the destination is set to display a confirmation message. Compose a new message or use the default one. Use the Insert button to insert field values submitted through the form into the URL and confirmation message.
- Go to a DataPage – Load another DataPage.
- Close Window – Automatically close the current window.
When entering URLs into the above destinations, be sure to include a protocol (http:// or https://).
Email Options
In the Automatic Email Options section, you can also configure your app to send automatic acknowledgement or notification emails upon record update.
Acknowledgement Emails are emails that are sent to your users to confirm that a specific record is updated. If enabled, you need to select a field that contains your users’ email addresses.
Notification Emails are sent to fixed email addresses, normally within your organization, to notify designated people within your organization that a record was updated. You may assign a Table-driven value to the Reply-to field from the drop-down list or choose to use the same email address as the one in the From field.
Email Options screen will appear if the options to trigger automatic acknowledgement and/or notification emails have been checked in the previous screen.
You can click Preview to view your Update Form DataPage. Click Finish after you have configured automatic emails.
Learn more about email notifications.
SMS Options
In the Automatic SMS Options section, you can set up automatic acknowledgement or notification SMS messages upon record update.
Acknowledgement SMS messages are sent on your behalf to users who modify a DataPage.
Notification SMS messages are sent to fixed phone numbers to notify designated people (for example, administrators) that a record was modified.
Learn more about SMS notifications.
