You can connect a domain that you own to your Caspio application. This way, Caspio DataPages will be accessible from the custom domain that you map. Using a custom domain can help you resolve an issue with third-party cookies in browsers.

The custom domain does not impact directory URLs (such as the sign-in or sign-out URLs). 

Note: Domain verification that is required after setup should be performed by an administrator with domain configuration knowledge.

Mapping a custom domain

Follow these steps to map and verify your custom domain to the default domain of your Caspio account.
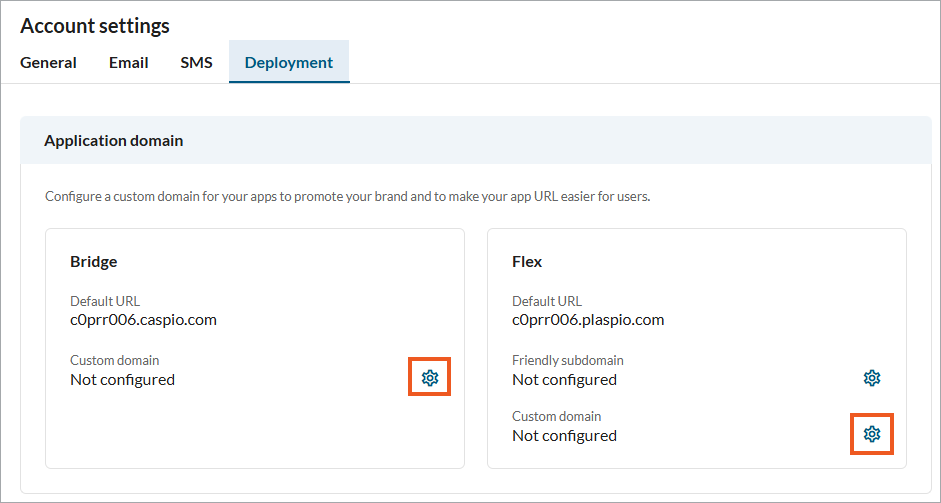
  1. In your account settings, on the Deployment tab, next to Custom domain, click the gear icon.
    Image showing the gear icon in Caspio interface.
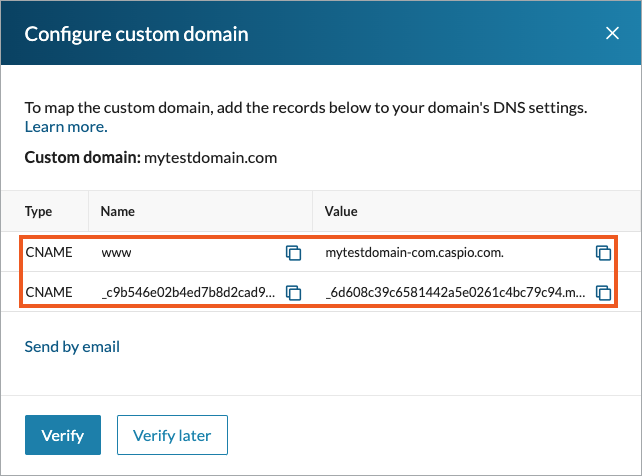
  2. In the modal that opens, enter your custom domain or subdomain name, and click Save.
    The domain you enter should not host any existing web content because it will stop working after you map the domain to Caspio. If your domain is already in use, use a subdomain instead.
    Example: If mydomain.com is hosting your website, map the subdomain.mydomain.com to Caspio.

    Note: Only one subdomain level is supported. For example, while sub1.mydomain.com is supported, sub2.sub1.mydomain.com is not.

    The same domain name cannot be used as a custom domain in different Caspio accounts. For example, sub1.mydomain.com and sub2.mydomain.com cannot be configured for two different accounts.

  3. Add the displayed CNAME records to your domain’s DNS settings:
    • To update your DNS configuration yourself, copy and paste the CNAME entries into the DNS records of your domain.
    • To email the DNS setup to have the entries added by your web admin, click Send by email. In the message window, provide the recipient address and send the email.
  4. Click Verify.

Image highlighting the DNS settings configuration modal.

Result: Your custom domain will be verified within 72 hours, when the DNS settings are propagated. Typically, it takes no more than a few hours, depending on the domain’s service provider.

During DNS settings propagation, you can monitor the verification status in the Deployment tab:

    • Unverifiedthe domain was not verified successfully or you decided to perform verification later.
    • Pending verificationthe verification process has  started but is not completed yet.
    • Verifiedthe custom domain is verified and the setup is completed. You can use the new deployment code for your DataPages.

DNS Setup – Example

Depending on your DNS provider, setting up DNS records might slightly differ. Here is an example of how to configure DNS records with GoDaddy.

Setting up records in GoDaddy 

  1. In your GoDaddy account, select your domain to access the Domain Settings view.
  2. Click Manage DNS under Additional Settings.
  3. Click Add to add a new record. 
  4. Select the CNAME record type. 
  5. Paste the CNAME values copied from Caspio. 
  6. Save the changes by clicking Add Record.
    Most DNS updates take effect within an hour, but it might take up to 48 hours. 

Deploying DataPages

After the custom domain verification is completed, you can deploy your DataPages using your newly mapped domain.
  1. In the DataPages view of your app, select a DataPage and click Deploy.
  2. In the dialog box that opens, copy and paste the code into the source of your web page.
Note: All DataPages deployed previously using the default Caspio domain will continue working.

Updating deployed DataPages

If you want existing DataPages to be accessible from the mapped domain, you can update their deployment codes. After a successful custom domain mapping, only the domain part changes in deployment codes. You can just replace the domain part with the custom domain in the existing deployments.

Example:

This DataPage is deployed using the deployment code snippet with the default Caspio domain:

<script type="text/javascript" src="https://c0abc123.caspio.com/dp/05FF40007828c5746f364f57a91d/emb"></script>

To start using your custom domain, replace the domain part:

<script type="text/javascript" src="https://mysubdomain.mydomain.com/dp/05FF40007828c5746f364f57a91d/emb"></script>

Resolving the issue with third-party cookies blocked in browsers by default

Using a custom domain helps you resolve the issue with the third-party cookies in browsers. Learn more.

You can deal with this issue by following these guidelines:

  • Your host pages and the custom domain mapped to the Caspio account should use the same domain name. The subdomain parts can be different, but the first-level domain must be the same.
    For example:
    • Host pages – blog.mydomain.com
    • Caspio DataPages – mysubdomain.mydomain.com
  • Your host pages should use the HTTPS protocol.