Fix the Width of the DataPage
3 minutes to readYou can set your Caspio DataPages to a default width by editing the DataPage Style. The DataPage will add line breaks to DataPage content such as data and labels to attempt to fit into that width. If the content cannot be confined to the width specified, the DataPage will overflow. This article also explains how you can use a div tag, or the Frame deployment model to create scroll bars if a DataPage overflows its fixed area.
Set the width of a DataPage using a Style:
The steps to set the width of a DataPage are:
- On the home page, click All assets.
- In the left panel, select Style, select the style that is applied to your DataPage, and then click Edit.
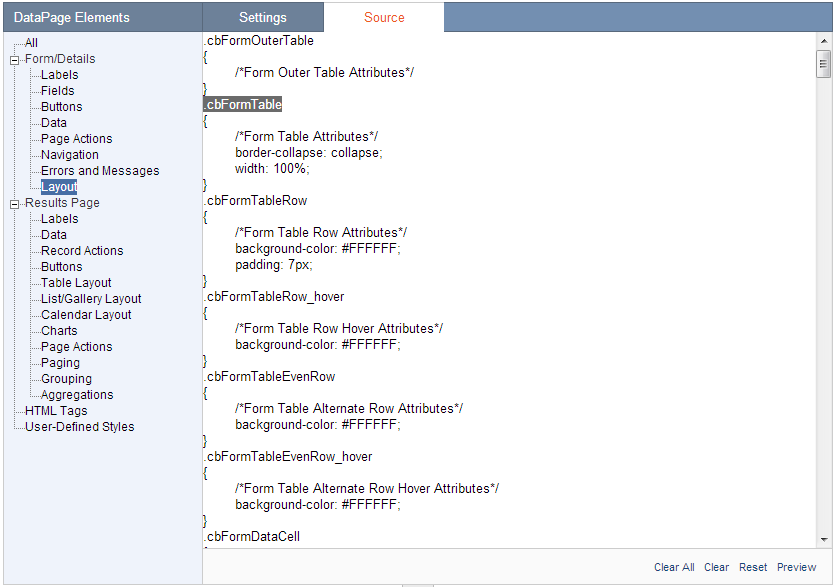
- Click on the Source tab to view the CSS source of your DataPage formatting.

In the DataPage Elements panel we are going to select the section of CSS that applies to your DataPage type:
- Forms and Details Pages – From the Forms/Details section choose the layout option. In the Source panel locate the .cbFormTable section.
- Results and Calendar Pages – From the Results Page section select Table, List/Grid, or Calendar Layout according to your DataPage type. In the Source panel find the section .cbResultSet + the DataPage type. The standard Caspio styles for these DataPage types already include a width attribute, so you will only need to adjust the current value.
- Charts – To set the size a Chart it is best to modify the appropriate values directly in the Chart DataPage wizard.
In the CSS section above we need to add a width attribute. Here are some sample attributes:
width: 200px;
width:50%;
Remember that for gallery style DataPages, this width is for the entire DataPage and not for each column.
Set the width of a DataPage using iFrame deployment:
Frame Deployment: If you are not using parameters to transfer data, you can deploy your DataPage using the frame method. Inside the deploy code you can set the values for the iFrame’s width and height. If the DataPage exceeds these values, scroll bars will be automatically generated. You can add the width and height attribute anywhere in the first iFrame tag. Here is an example of iFrame deploy code inlcuding width and height attribute:
<iframe name=”name of your page” title=”title of your page” src=”URL of your DataPage” width=”200px” height=”600px”>Sorry, but your browser does not support frames.</iframe>
Creating scroll bars if a DataPage overflows the fixed width:
If you are using parameters in your DataPages you can embed your DataPage into a div with a specific height and width. Write the div tags directly in your web page before and after the deploy code. The div section will create scroll bars if the DataPage content exceeds its bounds. Here is an example of a div section:
<div style=”width: 100px; height: 100px; overflow: auto”>
<!–Embedded Deploy Code–>
</div>

