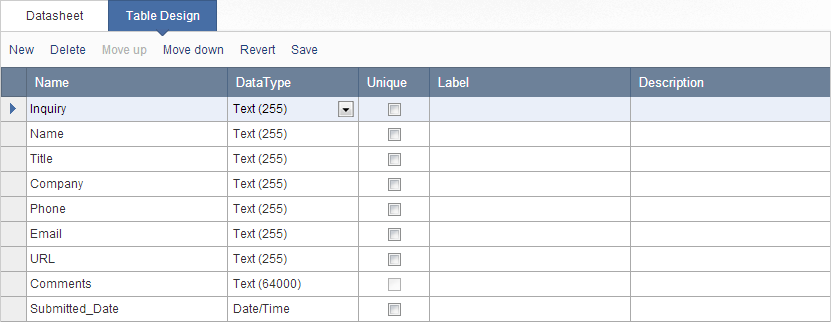
Caspio apps can automatically insert different kinds of data such as the current time and date or the web address (URL) of the hosting web page into a specific field whenever a record is created or modified. This article will guide you on how to: 

  • Add a timestamp to a DataPage 
  • Record a DataPage Web Address (URL) 
  • Capture User’s IP Address 

Adding a TimeStamp to a DataPage

A timestamp is a very easy way to add accurate date and time data whenever a record is created or updated. It only takes a few minutes to implement. These instructions show how to create a timestamp field on a Contact Us Submission form. 

Prerequisites:

Ensure that: 

  • You have a base table that contains at least one field with a Date/Time data type. In this scenario, inquiry records will be submitted into the Customer_Inquiries table presented below. 
  1. Create a  Submission Form. 
  2. On the DataPage Data Source screen, select how your end users can access this DataPage. In this scenario, Customer_Inquiries is the table used as the data source for this DataPage and the DataPage is named to “Contact Us Form”.  
  3. Move fields you wish to include in this Submission Form from the Available Fields list to the Selected Fields list. Check Place cursor in first field to automatically place the cursor in the first field of the form when the page loads. Select the Date/Time field and change the form element to TimeStamp. In this scenario, the Submitted_Date field is configured to become a TimeStamp type. You can configure the remaining fields to your preference. 
  1. Complete the next steps as usual. 


Sample output: 

stamp_3.png

Setting your time zone 

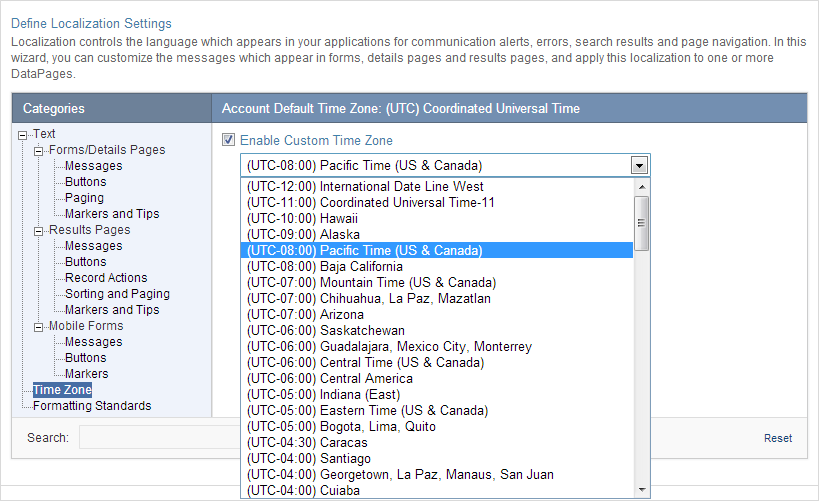
Does it look like your timestamps are returning the incorrect time? You may have to change your time zone settings. You can set the time zone of your DataPage(s) to your local time zone through Localizations. 

  1. From the app sidebar menu, select Localizations > Edit to open the Localization wizard. 
  2. Select Time Zone from the Categories panel on the left. Click the Enable Custom Time Zone checkbox and choose your time zone from the drop down menu. All future timestamps using this localization will now be in the local time of the time zone you’ve selected. 

Recording a DataPage Web Address (URL)

The steps to automatically record the URL of a DataPage are very similar to the steps to setup timestamps. Instead of using a Date/Time field you will use a Text(255) or a Text(64000) field to capture the data. If you do not have a field for this purpose, follow the steps above and add a Text(255) field to your base table. 

The following instruction shows how to record the URL of an existing DataPage. 

  1. Edit the DataPage that will record the URL. 
  2. Proceed to the Select Fields screen. If you are modifying a Search and Report DataPage, proceed to the Select Details Page Fields screen. Move a Text(255) field from the left to the right-hand panel using the arrow button. 
  3. On the next screen, select your new field from the DataPage Elements panel. Use the Form elements dropdown and select AutoValue under Special Elements. In the AutoValue Type dropdown, select DataPage Host. Finally, using the radio buttons, select which part of the web address you would like to record. 
stamp_5.png

The AutoValue options for the DataPage Host type are as follows: 

  • Complete URL (including parameters) – This setting will include the entire address as it appears in the end-user’s address bar including any parameters that were passed from the previous page. 
  • Page URL (no parameters) – This setting will drop the parameters but include the protocol, the domain, all of the subfolders, and the web page where the DataPage is hosted. 
  • Domain Name – This setting records the site’s domain only. 

Capturing User’s IP address  

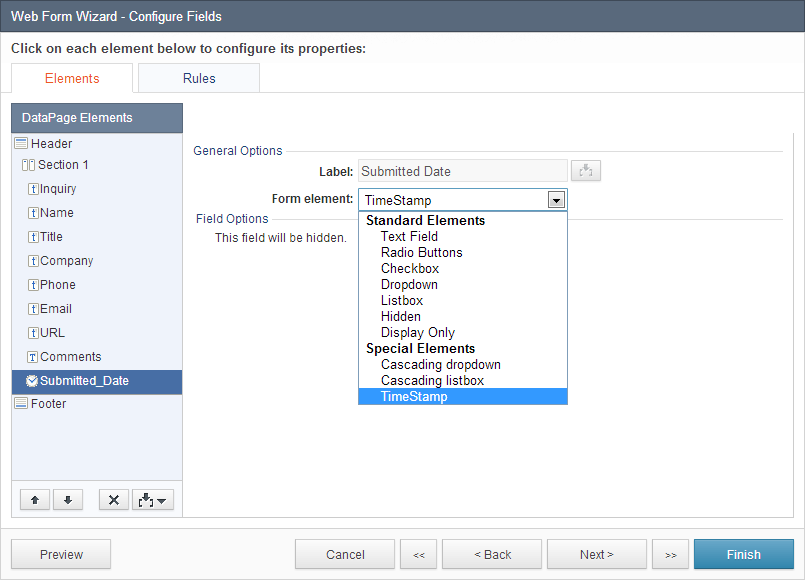
On the Configure Fields screen, select the field where you want to store the IP address. Using the Form element dropdown, select Hidden. In the Field Options > On load, pick System Parameters, Client IP.