Generating Personalized Email Reports
5 minutes to readLearn how to create a task to send emails with personalized content to each user so that they receive records that belong only to them. For example, you can schedule regular reports with a list of new records or status updates on existing records, both tailored to show only the data that applies to the user that receives the email.
In this article, we show how to configure a task send daily notifications with a list of tickets assigned to every customer support representative.
This use case requires two tables: one with user details (including their email addresses), and another one with tickets, each assigned to one user. The task that we want to create will automatically send daily email updates, each with records that belong only to the email recipient. To put it in context, you can think of this as applying record level security, but in a task, by using emails.
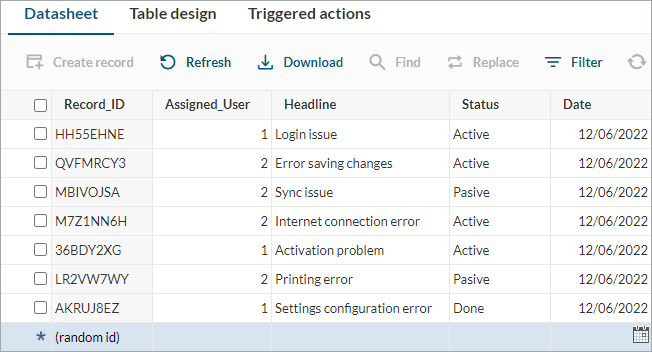
Tickets table:
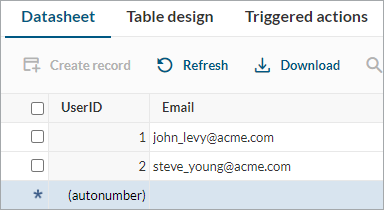
Users table:
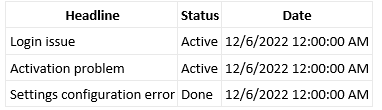
Based on the sample ticket data, the user with email john_levy@acme.com will receive a report with the following list:
In our example, we complete the followings steps:
- Create a table for storing user data. In the table, add a field for a unique ID (preferably, as the Autonumber data type) and a field for an email address.
The following image shows table nlt_users with the UserID and Email fields, which are required for this workflow: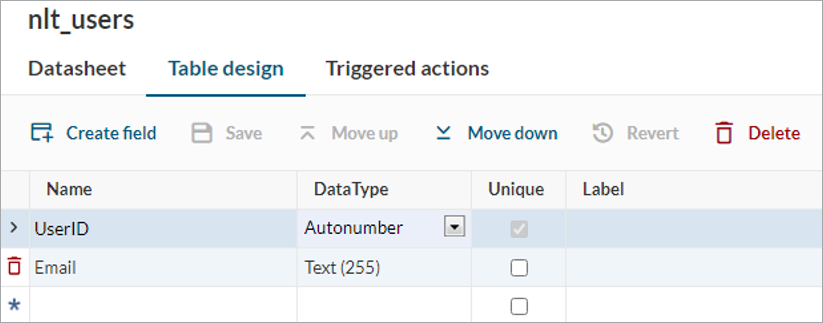 The UserID field will be the primary key to link the two tables.
 - Create a table for storing ticket data. In the table, add a field to store information on the assigned user as a data type that is compatible with the UserID field from the users table.
For example, you can create an nlt_tickets table with the Assigned_User field as an Integer because this datatype is compatible with Autonumber. This field will act as the foreign key.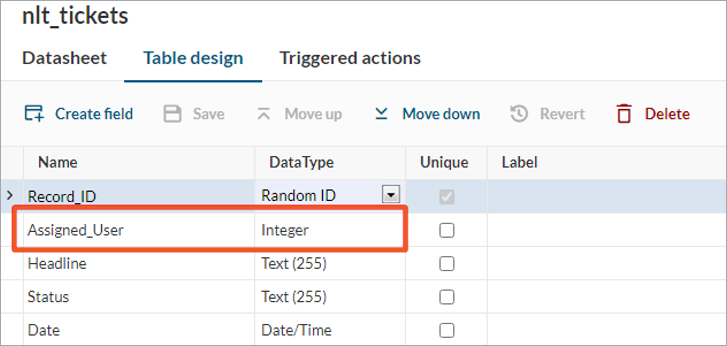
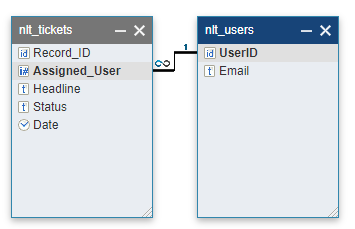
- Configure the following relationship between the two tables to make each record belong to a specific user:
- Create a task with the following structure for sending the email by importing this sample configuration or by completing the steps below:
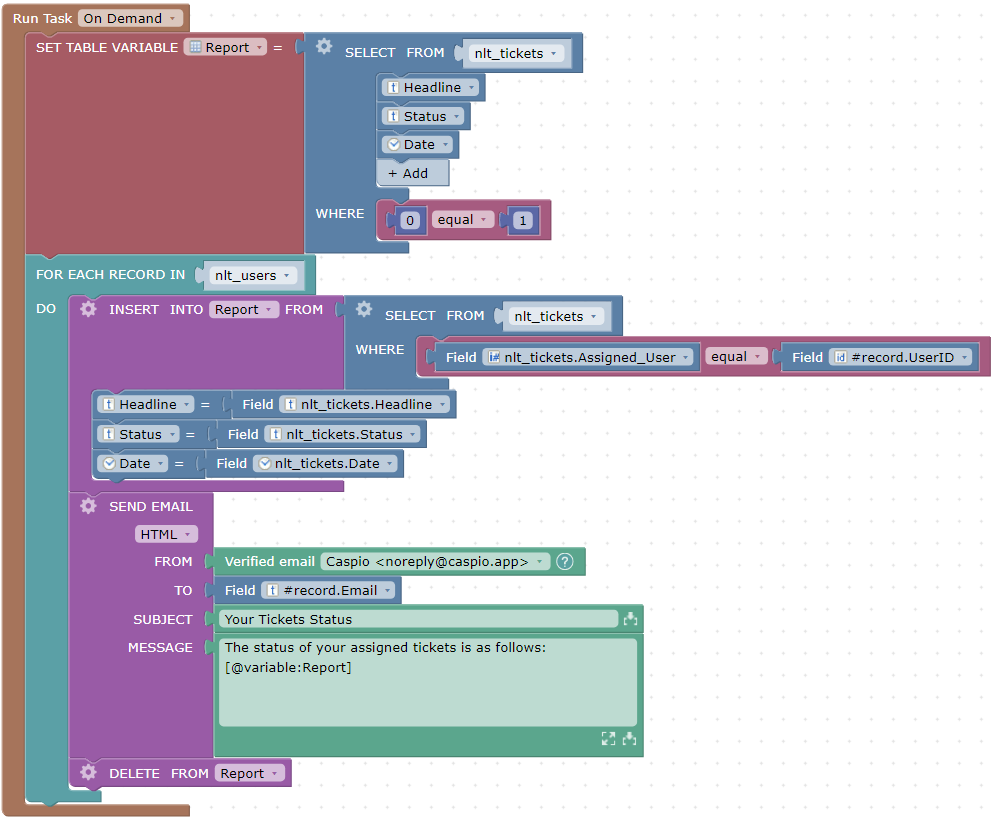
- In the task editor, on the left panel, click Variables, add a Table Variable, enter a name (for example, Report), and then click Save.
This variable will create the table structure for the email body and store the data for each user. - Drag the created table variable onto the task editor area.
- Set the SELECT FROM field to the tickets table (nlt_tickets), and then choose the fields that you want to include in your table.
- Set the WHERE clause to a condition that always equates to FALSE (for example, 0 = 1).
Note: This action is needed because the logic for this task requires only the table structure. The table variable does not need to store any value at this point.
- On the left panel, click Loops, drag a FOR EACH RECORD IN block onto the task editor area under the SET TABLE VARIABLE block for the table variable (Report), and then set it to loop through the users table (nlt_users).
This setting runs the blocks inside it in a loop until all records from the user table are analyzed. This action is key to sending one email per user. - Inside the FOR EACH RECORD IN block, add an INSERT INTO block, and then set the new block to the table variable (Report).
This setting populates the table variable with actual data from the tickets table (nlt_tickets). - In the INSERT INTO block, set the SELECT option to choose from the tickets table (nlt_tickets). In the WHERE option, set the following logic:
nlt_tickets.Assigned_User = #record.UserID
This setting maps the assigned tickets (nlt_tickets) to the users table (nlt_users). - Add the same fields that you included on the table variable (Report) from step 4a. to the INSERT INTO block.
This setting populates the table variable (Report) with the mapped ticket records for the current user. - Under the INSERT INTO block, add a SEND EMAIL block.
- On the left panel, click Data, drag the Field block onto the SEND EMAIL TO field, and then set the field to #record.Email.
- In the SEND EMAIL block, update the MESSAGE block to contain the table variable [@variable:Report].
You can add the variable with the field picker.
This setup sends the email to a single user, with the records that belong to that user only. - Under the SEND EMAIL block, insert a DELETE FROM block, and then set the new block to the table variable (Report).
- Remove the WHERE clause of the DELETE FROM block by clicking on the gear icon and clearing the checkbox for this option.
Note: This action deletes the data from your table variable (Report) to leave it empty for the next FOR EACH RECORD IN loop iteration, which will populate the table with new data for the next user.
- In the task editor menu, click Save.
- Enter a name for your task, and then click Save & Enable.
- In the task editor, on the left panel, click Variables, add a Table Variable, enter a name (for example, Report), and then click Save.
- Populate your tables with data and run the task to test the results.
