Creating a One to Many Relational DataPage
13 minutes to read
In any one-to-many relationships, there is a parent and a child table involved. The parent table consists of your primary or unique records. The primary field has either an AutoNumber data type or another data type that is set to unique. The child table can have one or more records associated with a primary field in the parent table.

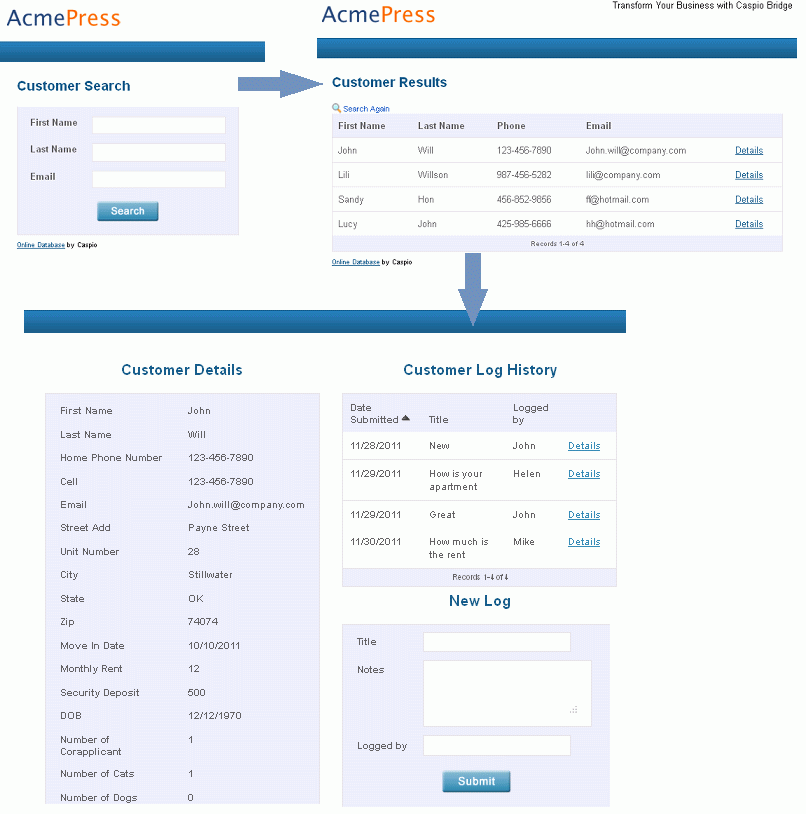
In the image shown below, each customer has multiple contact logs entered and displayed. Thus, more than one contact log history record can be associated for every single customer. The workflow for the app user is the user first enters filters in the search form, and then finds the list of matching customers on the results page, and then drill downs to a specific customer on the details page that allows them to view past contact logs or enter a new log.
In this article, you create one-to-many relational DataPages using the DataPage wizard. These instructions show how to create four different sample DataPages for apartment renters to search, view and log their notes for an apartment they are currently leasing:
- Renters Search – Search and Report Tabular DataPage
- Renter Details – Details Report DataPage
- Renter Contact Log – Tabular Report DataPage with a pre-defined filter
- New Log – Submission Form DataPage
Prerequisites:
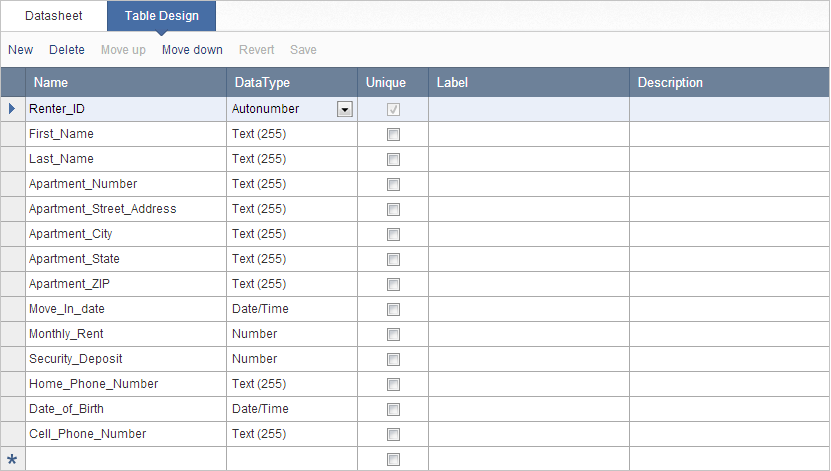
- A parent table. The parent table must be the primary table that includes a unique field, which may be called the ID field or primary key. This field can either have an AutoNumber data type or another data type that has been marked as unique in Table Design. In this scenario, a table of renters and their apartment information will be used to associate with a child table of renter logs. The key field is an AutoNumber field named Renter_ID. The table name is Rental_Application. The table design is displayed:
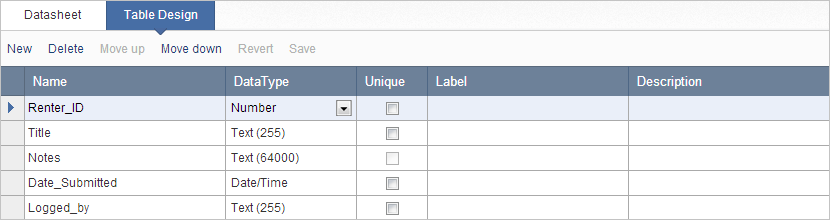
- A child table. The child table, where a field that is associated with a related field in the parent table, must not be unique. This allows multiple records in the child table to be associated with only one record in the parent table. A non-unique ID field must be created in the child table, so it can later be matched to the unique ID field in the parent table. In this scenario, a second table of renter log fields is created, where the same Renter_ID field is entered, but is set with a Number data type. The table name is Renter_Log. The table design is displayed:
Create the Renter Search DataPage
The first screen that end users see is a search form followed by the search results. In this scenario, a Tabular Report DataPage is created so renters can perform an interactive search to find their own renter information record on the results page.
- Click New DataPage and select Reports > Tabular.
- Select the parent table as a data source of this DataPage. In this scenario, the Renters_Information table is selected as the data source. No authentication is required.
- On the Search Type screen, you can customize how the search will be performed. You can allow users to use a search form to select and filter the Results page or automatically display results based on pre-defined criteria. In this scenario, allow users to select data by checking Search Form.
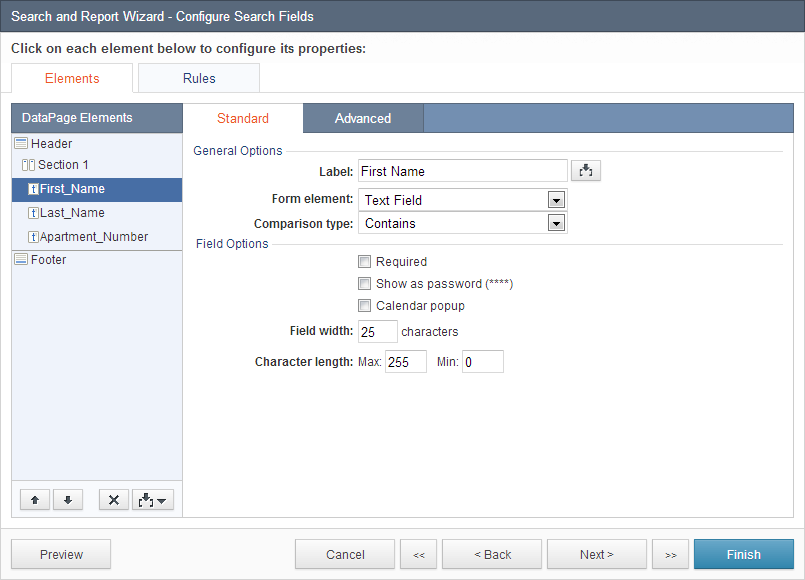
- You can select which fields are used in your search form. In this example, First_Name, Last_Name, and Apartment_Number fields are selected.
- On the Configure Search Fields screen, the Comparison Type for each field is set to Contains so that the end-user can enter any portion of a value or leave the field blank and still see results. Insert Header & Footer element to include a title at the top of the search form.
Configure your results page fields
You can select the desired fields from your data source to display in your results page. In this scenario, main fields are selected to display on the results page. All fields will be selected later for the details page.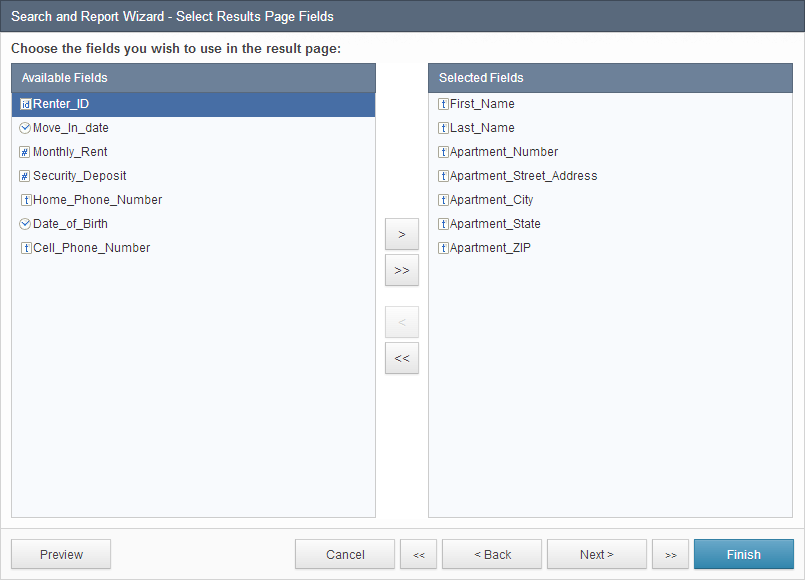
Add an HTML block to replace the default link to Details
On the Configure Results Page Fields screen, you can render the appearance, formatting and other properties for each field that was selected on the previous screen.
The typical Reports DataPages allows you to enable a Details page for data drill-down. However, the default Details page can only show the Parent record in the Details view. We need something more complex because we need to display not only the parent record but also a child report and a child form.
You will need to know the URL of where you will later be deploying the separate Details DataPage. You can configure your results page to link with a filler website address for now. You can later re-edit the link after you create a Details DataPage in the next section. In this scenario, add an HTML Block to replace the default link to another Details DataPage. Additionally, you need to configure your Results DataPage where this custom Details page is.
Insert an HTML Block by clicking the Insert button at the bottom right of the Element panel and click HTML Block. In the space provided, create an HTML link to the custom Details DataPage. At the end of the URL, insert the unique ID field used in the parent table, which is Renter_ID. This is how the unique ID of the parent table is passed to all child DataPages on the custom Details page. The HTML tag is following the below template:
<a href="http://www.mydomain.com/mypage.html?field_name=field_value">Details</a>
Here is what you need to know about the tag above:
- “http” could be “https” if you need SSL connection and have an SSL certificate on your site.
- The URL must be customized to have your site and page of the custom Details page. The page name could end in anything not just “.html”.
- Question mark is necessary.
- Field_name is your choice but whatever you use must be used to receive parameter on all child DataPages. We suggest using the actual name of the primary key field to avoid confusion. Equal sign after the field name is necessary.
- For the field_value, you will use Caspio’s External Parameters feature to dynamically insert the field’s value. Use the Insert button on the bottom right of the HTML block panel to insert your primary key. In this scenario, it will be Renter_ID in string format.

Remember that no spaces are allowed anywhere in the URL or in the parameter name. On the Search Results Options screen, you can configure the display options, interactive options, and advanced settings. In this scenario, the First_Name field is sort first in ascending order and Last_Name field is the next sort in ascending order. Check Interactive sorting.
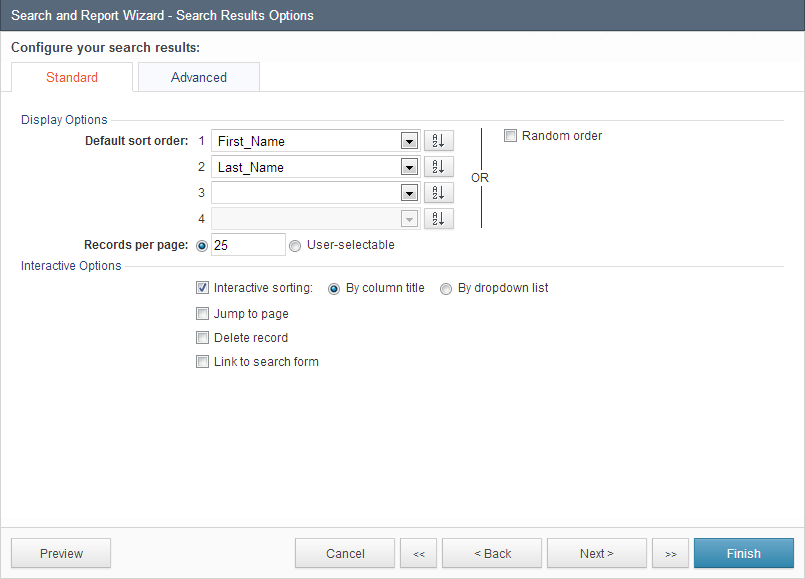
Select No Details Page
On the Search Results Options screen, you can choose the default sort order. Because we’ve already created a details link there is no need to include the default details link. Select No Details Page. Click Finish to save the DataPage. You have successfully created a search and report DataPage. Next, you create a details page. The child DataPages on the details web page will all receive the unique field parameter from the query string and use that value to display or submit information.
Create the Renter Details Report DataPage
In this section, you create a Details Page where apartment renters can find and view their own records. This DataPage will use the Renter_ID field as pre-defined criteria to locate and display related details about the apartment renter.
- Click New DataPage and select Reports on the left menu, and click Details.
- Select the parent table as the data source of this DataPage. In this scenario, the Renters_Information table is selected as the data source. No authentication is required.
- This details page will receive the primary unique field parameter from the Search and Report DataPage in order for the details page to display the correct information for a record selected on the results page. Check Filter data based on your pre-defined criteria. Because this DataPage does not require authentication or connection, options for Record Level Security are not displayed.
- You can select which fields are used to filter your data. In this example, only the Renter_ID field is selected.
- Configure the primary unique field to receive an external parameter. In the Advanced tab, select External Parameters from the dropdown and enter the default parameter name. Ensure it matches exactly to the field name you used in the query string.
- In the Configure Details Page Fields screen, you can render the appearance, formatting and other properties for each field that was selected on the previous screen. In this scenario, configure your fields to your preference.
Format the Details page
On the Details Page Options screen, you can enable additional functionality on your Details page. In this example, check Navigate to next/previous records. Click Finish.
You have successfully created a Details DataPage. As a reminder, the URL of where you will be deploying this apartment renter details page must be added to the HTML block of your Search and Report DataPage. If not already done so, you need to configure your Search and Report DataPage with the correct tag to locate all child DataPages that will later be on this Details DataPage.
Click Finish to save your DataPage.

Create the Log History Report Form
In this section, you create a child report that will later be embedded on the Details DataPage. These instructions show how to create a report log submitted by the apartment renter. This child report will be receiving the same unique field parameter as the Details Page.
- In the same app, click New DataPage.
- Select Reports on the left menu and click Tabular.
- Select the child table as the data source of this DataPage. In this scenario, the Renters_Log table is selected as the data source. No authentication is required.
- This child page will receive the unique field parameter from the Search and Report DataPage in order for it to display the correct information for a record selected on the results page. Check Filter data based on your pre-defined criteria. Because this DataPage does not require authentication or connection, options for Record Level Security are not displayed.
- You can select which fields are used to filter your data. In this example, only the Renter_ID field is selected.
- Configure the primary unique field to receive an external parameter. In the Advanced tab, select External Parameter from the dropdown and enter the default parameter name. Ensure it matches exactly to the field name you used in the query string.
- You can select which fields are used in the child page. In this example, all fields are selected.
- Refer to the earlier section for additional descriptions of the Search Results Options screen. In this scenario, all default selections remain unchanged.
- Click No Details Page and click Finish.
- You have successfully created a child report DataPage. Next, you will create a Submission Form DataPage so the end-user can add a new log to the Renter Log table.

Creating a New Log Submission Form
In this section, you create a Submission Form DataPage. This DataPage will receive the query string parameter and record it automatically. All new logs will be associated with the correct renter.
- In the same app, click New DataPage.
- By default, the cursor selects Submission Form as the first DataPage type.
- Select the child table as the data source of this DataPage. In this scenario, the Renters_Log table is selected as the data source. No authentication is required.
- You can select the desired fields from your data source to display in the Submission Form. In this scenario, all fields are selected.
- You can configure the functionality, appearance, data validations, and other properties for each field that was selected on the previous screen. In this scenario, select the Renter_ID field under the DataPage Elements panel and select Hidden from the Form element dropdown. This is done so your end-user cannot accidentally change the unique ID. In the On load assign dropdown, select External Parameter and enter the unique key field parameter, which is [@Renter_ID]. Now, this field will receive the parameter from the query string and record it automatically.
You can configure the remaining fields and functionality of the Submission Form to your preference.
- You can configure what happens after the form is submitted. In this scenario, the destination page is set to load the same form. This option allows the end-user to view a fresh, new Log Form available for another log entry after form submission. Click Finish.
- If you enabled Acknowledgement and/or Notification emails, an additional screen is included that allows you to configure each automatic email.

Deploy the DataPages
Now that the DataPages have been created we can deploy them into two web pages. The first Search and Report DataPage will go on its own web page. The Customer Details Search and Report, The Customer Contact History Search and Report, and the New Log Web Form will all be on the second web page.
Your DataPages should appear like this:

Testing and Formatting
Be sure to enter some data into your tables to make sure the parameters are being passed and received correctly. If you are having any trouble, be sure to ask:
- Are parameters enabled in all of my DataPages?
- Is the name of my parameter identical on both the passing and receiving pages?
- Does the details page link URL include “http://” at the beginning?
- Does my query string include a question mark, a fieldname, an equal sign, and a correctly formatted parameter from the Insert button?
Once the link between the two DataPages functions correctly, you can improve the look and feel of the DataPages to match the host website. In this example, we changed the style and added a header section to each DataPage to explain its functionality.
