• search
  • Contact Sales
  • Support
    • Online Help
    • Community Forum
    • Contact Support
  • Log in
Get a Demo Try Free
High Contrast
Caspio logo Help
Try Free
  • High Contrast
  • search
  • Contact Sales
  • Support
    • Online Help
    • Community Forum
    • Contact Support
  • Log in
Get a Demo Try Free
  • Help Center
  • Tech Tips
  • Separating Results and Details on Two Web Pages
  • Launch Your Caspio Journey
  • Create Applications
    • Applications Overview
    • Creating Apps With Bridge
      • Bridge App Overview
        • Creating a New App Container
        • Importing an App
        • Exporting an App
        • Deleting an App
        • Shared Objects
        • Backing Up Your Applications
        • Sharing an App with Another Account
        • App Parameters
          • Adding App Parameters
          • Managing App Parameters
          • Using App Parameters
      • Authentication
        • Setting Up User Permissions in Your App
        • Adding a Logout Link
        • Record Level Security
          • Create a Workflow using Record Level Security and Filtered Dropdown
          • Restrict Access to Data by User or Role
          • Filter Lookup Dropdown or Listbox Based on User or Role
        • Stamp a Record with User Profile Data
        • OpenID
        • Create a Standalone Login Screen
        • Hiding Multiple Login Forms
      • DataPages
        • What is a DataPage?
        • DataPage Types
        • Forms
          • Submission Forms
          • Update Forms
          • Password Recovery Forms
          • Form Element Types
          • Conditional Forms
          • Child Forms
          • Accepting Payments in Your Application
        • Reports
          • Creating a Report DataPage
          • Comparison Types in Report DataPages
          • Search by Distance
          • Report Page Results Layout
          • Interactive Reporting Options
          • Pivot Table Reports
          • Counting the Number of Times a Record Has Been Viewed
          • Display a Field Data as Hyperlink
          • Fixed Rows and Columns
          • Making the Search Results Downloadable as PDF
          • Editing Data Through My Details Page
          • Making the Details Downloadable for Users
          • Data Editing Options in Reports
          • Combined Chart and Report
          • Adding “Today” to “After Now” or “Next X Days” Criteria
          • Filtering Reports Based on an Expiration Date
          • Advanced Reporting
            • Calculations in Reports
            • Data Grouping
            • Totals and Aggregations
            • Calculated Fields and Datediff Function
        • Charts
        • Calendars
          • Calendar DataPage – Monthly Example
          • Calendar DataPage – Weekly Example
        • HTML Pages
        • DataPage Components
          • Dropdowns and Listboxes
          • Cascading Elements
          • Calculated Values
          • Field Configuration Options
            • Field and Column Width
            • Placeholder Text
            • Rollover Hints – Mouse-Over Help Icon
            • Image Auto-Rotation
          • DataPage Header and Footer
          • HTML Blocks
          • Disabling HTML Editor in DataPage Header/Footer and HTML Blocks
          • Field Formatting Options
          • Custom Date Formatting
          • Multi-column and Sections
          • CAPTCHA
          • Virtual Fields
          • Setting up Default Values
          • AutoComplete
        • Managing DataPages
          • Modifying DataPages
          • Previewing DataPages
          • Moving DataPages
          • Copying DataPages
          • DataPage Revisions
          • DataPage Folders
          • Exporting and Importing DataPages
          • Moving Existing DataPages To a New App
        • Responsive DataPages
          • Responsive DataPage Prerequisites
          • Responsive Behavior on Tablet and Mobile
          • Modifying Styles for Tablet and Mobile
        • AJAX Loading
        • PDF Download
          • Adding a text watermark
          • Adding an image watermark
          • Adding page breaks to details page
          • Adding header and footer
        • Best Practices in Creating Caspio Applications
      • Notifications
        • Email Notifications
          • Verifying Email and Domain
          • Configuring Email
          • Setting Up Dynamic or Conditional Notification Emails
        • SMS Notifications
          • Configuring the SMS-enabled Countries
          • Configuring SMS
          • Adding SMS Sender Name
      • Parameters
        • Parameter Types
        • System Parameters
        • Passing Parameters through Caspio
        • Displaying Parameters
        • Parameters as Query String Values
        • Receiving Parameters
        • Resetting Parameters
        • Passing Multiple Values in One Parameter
        • Formatting Parameters in Email Body and HTML Blocks
        • Parameters in Dropdowns, Listboxes and Radio Buttons
        • Custom Filter Elements
      • Connections
        • SAML Single Sign-On
        • Setting Up ID Services
      • Styles
        • Creating or Editing a Style
        • Layout Options
        • Fix the Width of the DataPage
        • Button Alignment
        • Field Alignment
        • Border Options
        • Using Google Web Fonts
        • Glossy Heading Text
        • Gradient Backgrounds for DataPages
        • Gradient Backgrounds for Fields
        • Replace Links to Records with Images
        • Replace Standard Buttons with Images
        • Change the Color of Field Error Labels
        • Change Text on a Button
        • Put Multiple Fields on One Line
        • Styling Advanced Reports
        • Add Rounded Borders to the Form and Fields
        • Use an Image as Form Background
        • Fix the Width of Labels and Data in List and Gallery Reports
        • Customize the ID Service Icon of the Login Screen
      • Localizations
        • Creating or Editing a Localization
        • Handling Arabic, Hebrew and Other Right-to-Left Languages
        • Formatting Options
        • Using Localization Feature to Improve Usability
        • Format Types
      • Files and Images
        • Uploading Files and Images
        • FileStor CDN
        • Managing Files
        • Bulk File Import and Export
        • Creating Thumbnails with the Image Resizer
        • Using Files in DataPages
        • Orphan File Cleanup
    • Creating Apps With Flex
      • Flex Overview
      • Roles
        • Creating New Roles
        • Adding Users and Groups to Roles
        • DataPart Display Based on the User Role
        • Editing Role Permissions
          • User’s Own Records
          • Custom Access
        • Removing Users and Groups from Roles
        • Deleting Roles
      • Application Design
        • Segments
          • Editing Segment Settings
          • Themes and Widgets
        • Adding AppPages
        • AppPage Types
        • Moving DataParts
        • Resizing DataParts
        • Adding DataParts
        • Forms
          • Form Elements
          • Search Form
          • Submission Form
          • Details/Update Form
        • Reports
          • Tabular Report
          • Card Report
          • Pivot Table
        • Sign-up Form
        • Charts
          • Creating and Configuring Charts
          • Chart Display Options
        • Text/HTML
        • Data Filters
          • Creating Filters
        • Calculated Values in Flex DataParts
        • Communication Between DataParts
        • Designing User-Friendly Navigation Between AppPages
      • Parameters
        • Inserting Parameters
        • Application Parameters
        • Adding Support for Lookup Values in Data Source Parameters
        • Stamping Records with User ID
      • Branding
      • Flex FAQ
  • Manage Users and Groups
    • Directories Overview
      • User Authentication in Directories
      • Converting Tables to Directories
      • Creating Directories
    • Directory Users
      • User Status Overview
      • Creating Users
      • Activating Users
      • Adding Users to Groups
      • Resetting User Passwords
      • Resetting Two-Factor Authentication
      • Suspending and Unsuspending Users
      • Changing User Sign-In Method
    • Directory Groups
      • Creating Groups
      • Modifying Groups
      • Deleting Groups
    • Directory Security
      • Session Management
      • Turning On Two-Factor Authentication
      • Customizing Directory Security Policy
      • Redirecting to Custom URLs After Sign-in and Sign-out
    • Directory User Portal
    • Directory Emails
    • Identity Providers
      • Adding Identity Providers
        • Tutorial: Adding Microsoft Entra ID (formerly Azure AD) Identity Provider
        • Tutorial: Adding Okta Identity Provider
        • Tutorial: Adding OneLogin Identity Provider
      • Editing Identity Providers
      • Deleting and Disabling Identity Providers
      • Configuring Single Logout
    • App Connections
      • Creating App Connections 
        • Authenticating Users to Caspio Apps in Multiple Accounts Using a Single Directory
        • Tutorial: Adding HubSpot App Connection
        • Tutorial: Adding BambooHR App Connection
        • Tutorial: Adding Slack App Connection
      • Managing App Connections 
      • Deleting and Disabling App Connections
  • Manage and Organize Your Data
    • Data Management Overview
    • Tables and Views
      • Creating Tables
      • Modifying a Table’s Design
      • Removing Blanks From a Dropdown or Listbox
      • Lookup Tables
      • Views
        • Creating a View to Filter Data
        • Creating a View to Join Tables
        • Self-Join Views
        • Modifying Views
        • Importing and Exporting Views
    • Data Types
      • List Data Types
      • Function Reference
      • Adding a Formula Field in a Table
      • Managing Files With the Attachment Data Type
    • Managing Data in Datasheet
      • Find and Replace Specific Values
      • Filtering Data
      • Downloading Table or View Data
    • Database Relationships
      • Relationship Settings
    • Importing Data
    • Exporting Data
    • Sharing Data Between Apps
    • Best Practices for Designing Databases and Tables
    • Logs
      • Managing Logs
        • Logs Retention Period
      • App Access Logs
      • Directory Logs
      • Email Logs
      • Integrations Logs
      • Payment Logs
      • SMS Logs
  • Leverage AI
    • AI Assistant Overview
  • Automate Tasks and Workflows
    • Automations Overview
    • Triggered Actions
      • Creating a Triggered Action
        • Actions
          • UPDATE
          • DELETE
          • INSERT INTO
          • SEND EMAIL
          • SEND SMS
        • Data
          • SELECT
        • Logic
        • Loops
        • Text
        • Number
        • Date
        • Variables
    • Tasks
    • Data Import/Export Tasks
      • Data Import Tasks
      • Data Export Tasks
      • Configuring a Repository Site
      • IP Addresses for Data Import/Export Tasks
      • Data Import/Export Tasks Tips and Best Practices
  • Generate PDF Documents
    • Document Generation Overview
    • Creating Templates
    • Mapping Fields in Templates
    • Template Field Types
    • Configuring Template Settings
      • Formatting Field Values
      • Adding Watermarks
      • Encrypting PDF Documents
      • Configuring PDF Document Properties
      • Changing PDF File for a Template
    • Enabling Document Generation in Applications
    • Managing Templates
  • Integrate and Extend Your Apps
    • Integrations Overview
    • Webhooks
      • Getting Started with Webhooks in Caspio
      • Webhooks Rules and Limitations
      • IP Addresses for Webhooks
      • Creating and Managing Webhooks
        • Configuring Call Throttling
      • Creating and Managing Events
        • Event Types
        • Activating or Deactivating Events
      • Testing Webhooks
    • Extensions
      • AI-Powered GPT Connect
      • Extension for Slack
      • QR Code Generator
      • Barcode Generator
    • Web Services API
      • Creating a Web Services API Profile
      • Authenticating REST API
      • Important Header Parameters
      • Special Considerations
      • Error Handling
      • Swagger UI
      • Migration from REST API v2 to v3
    • Integration with Make
    • Integration with Zapier
  • Deploy Your Apps
    • Deploying Bridge Apps
      • General Deployment Guide
      • Remove iFrame Border and Change Size
      • Block Access to DataPages by IP Address
    • Deploying Flex Apps
      • Mapping a Friendly Subdomain
  • Manage Account and Billing
    • Account Settings
    • Account Users, Groups and API Profiles
      • Inviting New Account Users
      • Creating Groups for Account Users
      • Managing Permissions
      • Changing Account Owner
    • Changing Your Plan
    • Updating Payment Information
    • Payment History
    • Custom Domain
    • Account Notifications
    • Resource Usage
    • Caspio ID
      • Managing Your Caspio ID
      • Forgot Your Password
      • Getting Support PIN
    • Support Login
    • Search for Objects
  • Videos
    • Bridge Videos
      • Build Your First App
      • Recorded Training
      • Customize Your Apps
      • Advanced Topics
      • Full App Implementation
      • Tips and Tricks
    • Flex Videos
      • Build Your First App
      • Recorded Training
  • Resources and Best Practices
    • Frequently Asked Questions (FAQ)
    • Tech Tips
    • Troubleshooting
      • Troubleshooting SMS Delivery
      • Troubleshooting Email Delivery and Domain Verification
      • Cannot Log in to My Caspio Account
      • Issue with Login to Apps or DataPages
      • Issue with Redirection After Logout
      • Acknowledgement Emails Are Not Received
      • Issues with Email Verification Code
      • JavaScript Does Not Work with Multiple DataPages
      • Cannot See an SSL Lock Icon for My Web Page
      • Responsive UI Does Not Display Properly
      • Date Fields from Excel Import Incorrectly
      • Troubleshooting Custom PDF Generator
      • Troubleshooting Data Import Speed
      • System Limitations
      • Errors and Messages
    • System Requirements
    • Deprecations
      • Deprecation of Twitter as an ID Service in Authentications and Connections
      • Deprecation of Google Drive for Data Import/Export Tasks
      • Deprecation of HTTP Deployment
      • Deprecation of the Option to Disable AJAX Loading
      • Deprecation of MS Access for Import/Export
      • Deprecation of Cb_ErrorLog Tables
      • Deprecation of Google Map Mashup Generator
      • Deprecation of Frame Deployment
      • Deprecation of .xls Excel Format for Data Import
      • Deprecation of SEO Deployment Method
      • Deprecation of WordPress Deployment
      • Deprecation of Unverified Email Addresses
      • Deprecation of SOAP Web Service
      • Deprecation of Internet Explorer 11 and Microsoft Edge Legacy Browsers
  • Release Notes
    • Caspio 60.0
    • Caspio 59.0
    • Caspio 58.0
    • Caspio 57.0
    • Caspio 56.0
    • Caspio 55.0
    • Caspio 54.0
    • Introducing Flex
    • Caspio 53.0
    • Caspio 52.0
    • Caspio 51.0
    • Caspio 50.0
    • Caspio 49.0
    • Caspio 48.0
    • Caspio 47.0
    • Caspio 46.0
    • Caspio 45.0
    • Caspio 44.0
    • Caspio 43.0
    • Caspio 42.0
      • Known Issue: Scrolling on macOS Devices
    • Caspio 41.0
    • Caspio 40.0
    • Caspio 39.0
    • Caspio 38.0
    • Caspio 37.0
      • Impacted Areas 37.0
    • Caspio 36.0
    • Caspio 35.0
    • Caspio 34.0
      • Impacted Areas 34.0
    • Caspio 33.0
    • Caspio 32.0
    • Caspio 31.0
      • Impacted Areas 31.0
    • Caspio 30.0
    • Caspio 29.0
    • Caspio 28.0
    • Caspio 27.0
    • Caspio 26.0
    • Caspio 25.0
    • Caspio 24.0
    • Caspio 23.0
    • Caspio 22.0
    • Caspio 21.5
    • Caspio 21.0
      • Impacted Areas 21.0
    • Caspio 20.0
    • Caspio 19.0
      • Impacted Areas 19.0
      • Security Patch 19.5
    • Caspio 18.0
    • Caspio 17.0
    • Caspio 16.0
    • Caspio 14.0
      • Impacted Areas 14.0
    • Caspio 15.0
    • Caspio 13.0
      • Caspio 13.0
      • Impacted Areas 13.0
    • Caspio 12.0
      • Impacted Areas 12.0
    • Caspio 11.0
      • Impacted Areas 11.0
    • Caspio 10.0
    • Caspio 9.9
      • Impacted Areas 9.9
    • Caspio 9.8
    • Caspio 9.7
    • Caspio 9.6
      • Impacted Areas 9.6
    • Caspio 9.5
      • Impacted Areas 9.5
    • Caspio 9.4
      • Impacted Areas 9.4
    • Caspio 9.3
      • Impacted Areas 9.3
      • Caspio 9.3
    • Caspio 9.2
      • Impacted Areas 9.2
    • Caspio 9.1
      • Impacted Areas 9.1
    • Caspio 9.0
      • Known Issues 9.0
      • Impacted Areas 9.0

Separating Results and Details on Two Web Pages

7 minutes to read

You can separate your results and details pages into two different web pages. Additionally, in one-to-many relationships it is sometimes necessary to link directly between a single record in a results page and all associated records in another results page. 

This article shows how you can use a hyperlink and an AutoNumber parameter to link to between a single record in one results page and another results page displaying all associated records from a second table.

It also takes you through the process of creating a separate DataPage for results and details pages and connecting the two DataPages using a hyperlink with a query string parameter.   

Prerequisites: 

Your base table must include a unique ID field such as an Autonumber. 

Steps to separate results and details on two web pages:

  1. Create a Details Report. Apply the following configuration:
    • On the Search Type screen, select Filter data based on your pre-defined criteria. 
    • On the Selecting Filtering Fields screen, move your unique ID field to the right-hand panel. 
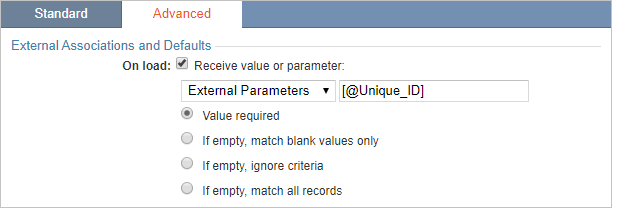
    • On the Configure Filtering Fields > Advanced, select Receive value or parameter. Configure the field to load an external parameter named after the fieldname. In this example, the fieldname is ” Unique_ID”.  
    • Now you can configure your details page as normal.  Deploy your Details Report to a web page and note the host URL as you will need it later. 
  1. Create Reports as the DataPage Type and choose a tabular, gallery, or list layout.
    • Set up your search and results pages as usual. Before moving past the Configure Results Page Fields screen, create a link to the Details Report. 
    • Insert an HTML block and create a hyperlink to the URL of the Details Report’s host page. At the end of the host page’s URL add a query string that passes the parameter for your record’s unique ID. 
  1. Create a hyperlink to the Details Report. Insert an HTML block and create a hyperlink to the URL of the Details Report’s host page.  At the end of the host page’s URL, add a query string that passes the parameter for your record’s unique ID. Here is a reference for the hyperlink you will need to create:
    1. Replace URL with the host page URL.
    2. Replace Fieldname with the fieldname of your unique ID field. For Example:
    • The rest of the Results page can be formatted as usual. Select No Details Page when prompted.
    • Save the changes and deploy this details page.

Now when your user clicks on the details link, they will be redirected to the second webpage and see the correct record details.

Steps to link a results page to a results page:

Some examples where results to results links may be useful:

  • Link to all log entries associated with a specific record (support ticket action logs, customer contact records, etc.)
  • View all user records associated with a specific event record (attendees, signups, etc.)

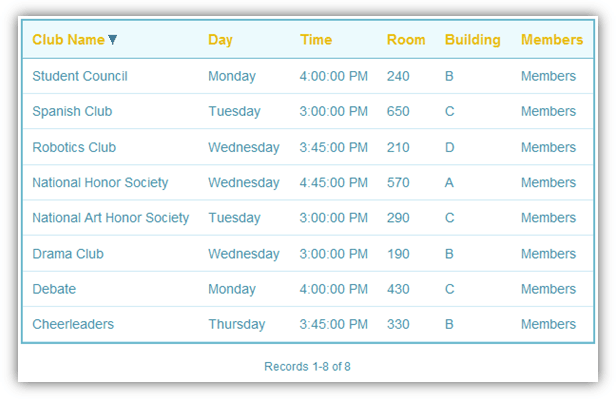
The example used in this article shows a searchable listing of club members. Each club has multiple members.  Clicking on the “Members” link for each club record will display another Report DataPage listing all of the members in that club.

Prerequisites:

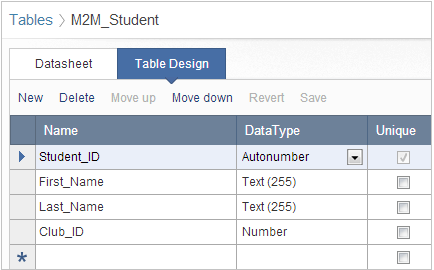
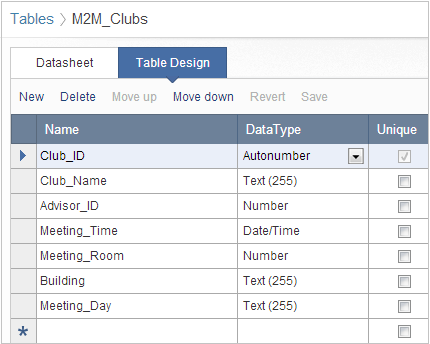
You will need two tables associated with one field. In our example, we use tables named M2M_Student and M2M_Clubs. These tables are associated with the Club_ID field.  The Club_ID field is the primary key of the Clubs table and is a foreign key in the Students table.  It creates a one-to-many relationship because one club may have many students.  For simplicity, each student can only belong to one club.

  1. Create the Club Report DataPage with M2M_Clubs table as your data source.
    1. You can configure the search functionality, results display, and details fields to your preference.
    2. In the Configure Results Page Fields screen, insert an HTML block using the Insert button at the lower right of the DataPage Element panel. This HTML block is going to hold the link to the Student Members Report. For now, just type “Members” in the HTML Block panel as a placeholder for the future link.
    3. Finish creating the Report DataPage and preview it inside of Caspio.
  1. Create the Student Report DataPage with M2M_Student table as your data source. This Report is different from the previous Clubs Report because it will not have a search page.
    1. On the Search Types screen select the radio button marked Filter data based on your pre-defined criteria.
    2. On the Select Filtering Fields screen, include the Club_ID field as the filtering field by moving it to the right-hand panel.
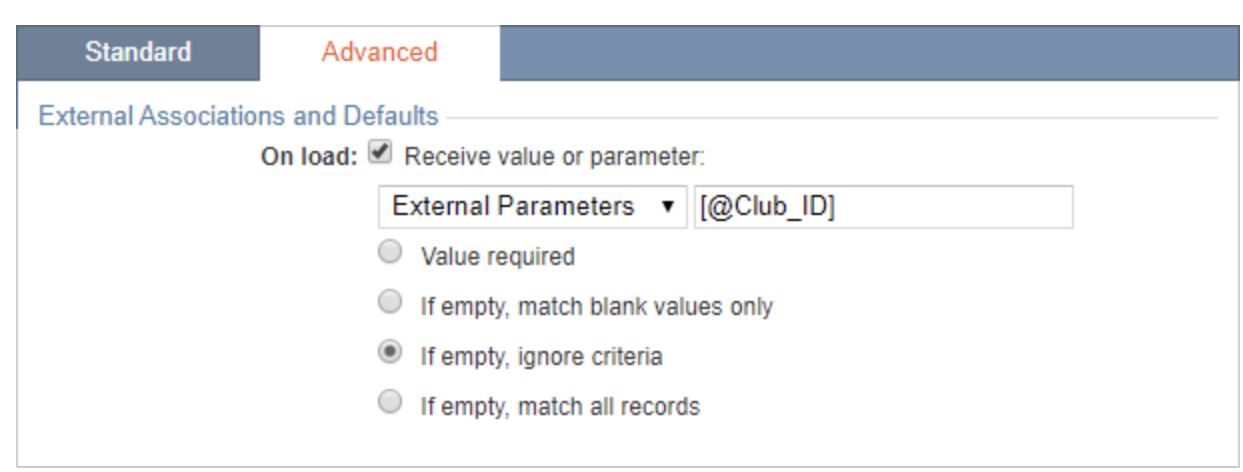
    3. On the Configure Filtering Fields screen, select the Club_ID field and click the Advanced  Select Receive value or parameter, select the External Parameter option from the dropdown and enter the parameter name. Be sure to note the parameter name (in this case @Club_ID). The parameter name in the Club Report must match this parameter name exactly. Check If empty, ignore criteria so if an end-user leaves one or several options blank, they will still be able to see results.
    4. You can configure the rest of the Report as needed. Click Finish when complete.
  1. Link the DataPages.
    Now that the DataPages are complete, we can link them together by changing the placeholder members link text from earlier into a hyperlink to the Student Members Report.  First, we need the URL of the Students Member Report.  To get a location we will deploy the DataPage.
    For this example, we are going to use the URL  method to deploy our DataPages.   You can use this same technique with the embedded method.  Just use the URLs of your host pages instead of the link from the URL method of deployment.
    1. Click on Deploy and, for the deployment method select URL.  Click on the Link tab, copy the deploy code and click Close.
    2. Open the DataPage wizard again by selecting the Clubs Report and clicking Edit. If you haven’t already, make sure that both advanced options and parameters are enabled in this DataPage.
    3. Proceed to the Configure Results Page Fields Select the HTML block that contains your member’s link placeholder. Paste in the deploy code link from the Students Report. If you are using the Direct from Caspio method, the default link text will be the DataPage name. Update the hyperlink text to say “Members”.
    4. Pass the Club_ID field as a parameter. Because you are using the Direct from Caspio deployment method, use an and symbol (&) to create a query string instead of a question mark. With the Direct from Caspio deployment, the first query string is always the AppKey of your DataPage.
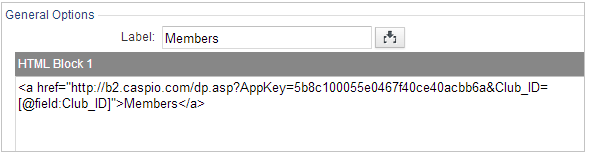
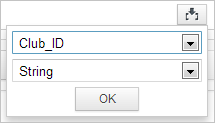
    5. After the AppKey (the long series of numbers and letters) add an and symbol (&). Enter Club_ID (make sure it is spelled the same as the receiving parameter in the student Report DataPage. Now add an equal sign. Then, using the Parameter Insert button at the lower right hand of the HTML panel, insert the Club_ID parameter in string format.
    6. If you are using the embedded method and the Club_ID is your first parameter, use a question mark (?) as your query string signifier.
    7. Click Finish when complete.

Now your two DataPages should be connected. You can test the link right inside of Caspio.

code1
<a href="URL?Fieldname=[@field:Fieldname]">Details</a> 
code2
<a href="http://www.yourdomain.com/page.htm?Unique_ID=[@field:Unique_ID]">Details</a> 
  • PRODUCT

  • Platform Overview
  • Why Low Code
  • Case Studies
  • App Marketplace
  • Pricing
  • Get a Custom Demo
  • Free Trial
  • SOLUTIONS

  • Healthcare
  • Education
  • Government
  • Financial Services
  • Energy and Utilities
  • Nonprofits
  • Media
  • Consulting
  • RESOURCES

  • Resource Center
  • Blog
  • Free Training
  • Online Help
  • Onboarding
  • Get Certified
  • Professional Services
  • Support Center
  • COMPANY

  • Our Story
  • Careers
  • Leadership
  • News
  • Partner Programs
  • Referral Program
  • Academic Program
  • Discount Programs
  • Contact Us
  • TRENDING

  • Build Custom CRM
  • Create Web Dashboards
  • Best Online Database
  • Convert Excel to Web
  • Migrate MS Access Online
  • HIPAA Compliant Database
  • Create a Patient Portal
Caspio Logo

Caspio is the world’s leading cloud platform for building online database applications without coding.
Start a free trial today and experience the power of no-code.

Footer Partners

© 2025 Caspio, Inc. Sunnyvale, California. All rights reserved.

  • Privacy Statement
  • Terms of Use
  • Report Abuse
  • Feedback