• search
  • Contact Sales
  • Support
    • Online Help
    • Community Forum
    • Contact Support
  • Log in
Get a Demo Try Free
High Contrast
Caspio logo Help
Try Free
  • High Contrast
  • search
  • Contact Sales
  • Support
    • Online Help
    • Community Forum
    • Contact Support
  • Log in
Get a Demo Try Free
  • Help Center
  • Tech Tips
  • 5 Ways to Customize the Look of Your DataPages
  • Launch Your Caspio Journey
  • Create Applications
    • Applications Overview
    • Creating Apps With Bridge
      • Bridge App Overview
        • Creating a New App Container
        • Importing an App
        • Exporting an App
        • Deleting an App
        • Shared Objects
        • Backing Up Your Applications
        • Sharing an App with Another Account
        • App Parameters
          • Adding App Parameters
          • Managing App Parameters
          • Using App Parameters
      • Authentication
        • Setting Up User Permissions in Your App
        • Adding a Logout Link
        • Record Level Security
          • Create a Workflow using Record Level Security and Filtered Dropdown
          • Restrict Access to Data by User or Role
          • Filter Lookup Dropdown or Listbox Based on User or Role
        • Stamp a Record with User Profile Data
        • OpenID
        • Create a Standalone Login Screen
        • Hiding Multiple Login Forms
      • DataPages
        • What is a DataPage?
        • DataPage Types
        • Forms
          • Submission Forms
          • Update Forms
          • Password Recovery Forms
          • Form Element Types
          • Conditional Forms
          • Child Forms
          • Accepting Payments in Your Application
        • Reports
          • Creating a Report DataPage
          • Comparison Types in Report DataPages
          • Search by Distance
          • Report Page Results Layout
          • Interactive Reporting Options
          • Pivot Table Reports
          • Counting the Number of Times a Record Has Been Viewed
          • Display a Field Data as Hyperlink
          • Fixed Rows and Columns
          • Making the Search Results Downloadable as PDF
          • Editing Data Through My Details Page
          • Making the Details Downloadable for Users
          • Data Editing Options in Reports
          • Combined Chart and Report
          • Adding “Today” to “After Now” or “Next X Days” Criteria
          • Filtering Reports Based on an Expiration Date
          • Advanced Reporting
            • Calculations in Reports
            • Data Grouping
            • Totals and Aggregations
            • Calculated Fields and Datediff Function
        • Charts
        • Calendars
          • Calendar DataPage – Monthly Example
          • Calendar DataPage – Weekly Example
        • HTML Pages
        • DataPage Components
          • Dropdowns and Listboxes
          • Cascading Elements
          • Calculated Values
          • Field Configuration Options
            • Field and Column Width
            • Placeholder Text
            • Rollover Hints – Mouse-Over Help Icon
            • Image Auto-Rotation
          • DataPage Header and Footer
          • HTML Blocks
          • Disabling HTML Editor in DataPage Header/Footer and HTML Blocks
          • Field Formatting Options
          • Custom Date Formatting
          • Multi-column and Sections
          • CAPTCHA
          • Virtual Fields
          • Setting up Default Values
          • AutoComplete
        • Managing DataPages
          • Modifying DataPages
          • Previewing DataPages
          • Moving DataPages
          • Copying DataPages
          • DataPage Revisions
          • DataPage Folders
          • Exporting and Importing DataPages
          • Moving Existing DataPages To a New App
        • Responsive DataPages
          • Responsive DataPage Prerequisites
          • Responsive Behavior on Tablet and Mobile
          • Modifying Styles for Tablet and Mobile
        • AJAX Loading
        • PDF Download
          • Adding a text watermark
          • Adding an image watermark
          • Adding page breaks to details page
          • Adding header and footer
        • Best Practices in Creating Caspio Applications
      • Notifications
        • Email Notifications
          • Verifying Email and Domain
          • Configuring Email
          • Setting Up Dynamic or Conditional Notification Emails
        • SMS Notifications
          • Configuring the SMS-enabled Countries
          • Configuring SMS
          • Adding SMS Sender Name
      • Parameters
        • Parameter Types
        • System Parameters
        • Passing Parameters through Caspio
        • Displaying Parameters
        • Parameters as Query String Values
        • Receiving Parameters
        • Resetting Parameters
        • Passing Multiple Values in One Parameter
        • Formatting Parameters in Email Body and HTML Blocks
        • Parameters in Dropdowns, Listboxes and Radio Buttons
        • Custom Filter Elements
      • Connections
        • SAML Single Sign-On
        • Setting Up ID Services
      • Styles
        • Creating or Editing a Style
        • Layout Options
        • Fix the Width of the DataPage
        • Button Alignment
        • Field Alignment
        • Border Options
        • Using Google Web Fonts
        • Glossy Heading Text
        • Gradient Backgrounds for DataPages
        • Gradient Backgrounds for Fields
        • Replace Links to Records with Images
        • Replace Standard Buttons with Images
        • Change the Color of Field Error Labels
        • Change Text on a Button
        • Put Multiple Fields on One Line
        • Styling Advanced Reports
        • Add Rounded Borders to the Form and Fields
        • Use an Image as Form Background
        • Fix the Width of Labels and Data in List and Gallery Reports
        • Customize the ID Service Icon of the Login Screen
      • Localizations
        • Creating or Editing a Localization
        • Handling Arabic, Hebrew and Other Right-to-Left Languages
        • Formatting Options
        • Using Localization Feature to Improve Usability
        • Format Types
      • Files and Images
        • Uploading Files and Images
        • FileStor CDN
        • Managing Files
        • Bulk File Import and Export
        • Creating Thumbnails with the Image Resizer
        • Using Files in DataPages
        • Orphan File Cleanup
    • Creating Apps With Flex
      • Flex Overview
      • Roles
        • Creating New Roles
        • Adding Users and Groups to Roles
        • DataPart Display Based on the User Role
        • Editing Role Permissions
          • User’s Own Records
          • Custom Access
        • Removing Users and Groups from Roles
        • Deleting Roles
      • Application Design
        • Segments
          • Editing Segment Settings
          • Themes and Widgets
        • Adding AppPages
        • AppPage Types
        • Moving DataParts
        • Resizing DataParts
        • Adding DataParts
        • Forms
          • Form Elements
          • Search Form
          • Submission Form
          • Details/Update Form
        • Reports
          • Tabular Report
          • Card Report
          • Pivot Table
        • Sign-up Form
        • Charts
          • Creating and Configuring Charts
          • Chart Display Options
        • Text/HTML
        • Data Filters
          • Creating Filters
        • Calculated Values in Flex DataParts
        • Communication Between DataParts
        • Designing User-Friendly Navigation Between AppPages
      • Parameters
        • Inserting Parameters
        • Application Parameters
        • Adding Support for Lookup Values in Data Source Parameters
        • Stamping Records with User ID
      • Branding
      • Flex FAQ
  • Manage Users and Groups
    • Directories Overview
      • User Authentication in Directories
      • Converting Tables to Directories
      • Creating Directories
    • Directory Users
      • User Status Overview
      • Creating Users
      • Activating Users
      • Adding Users to Groups
      • Resetting User Passwords
      • Resetting Two-Factor Authentication
      • Suspending and Unsuspending Users
      • Changing User Sign-In Method
    • Directory Groups
      • Creating Groups
      • Modifying Groups
      • Deleting Groups
    • Directory Security
      • Session Management
      • Turning On Two-Factor Authentication
      • Customizing Directory Security Policy
      • Redirecting to Custom URLs After Sign-in and Sign-out
    • Directory User Portal
    • Directory Emails
    • Identity Providers
      • Adding Identity Providers
        • Tutorial: Adding Microsoft Entra ID (formerly Azure AD) Identity Provider
        • Tutorial: Adding Okta Identity Provider
        • Tutorial: Adding OneLogin Identity Provider
      • Editing Identity Providers
      • Deleting and Disabling Identity Providers
      • Configuring Single Logout
    • App Connections
      • Creating App Connections 
        • Authenticating Users to Caspio Apps in Multiple Accounts Using a Single Directory
        • Tutorial: Adding HubSpot App Connection
        • Tutorial: Adding BambooHR App Connection
        • Tutorial: Adding Slack App Connection
      • Managing App Connections 
      • Deleting and Disabling App Connections
  • Manage and Organize Your Data
    • Data Management Overview
    • Tables and Views
      • Creating Tables
      • Modifying a Table’s Design
      • Removing Blanks From a Dropdown or Listbox
      • Lookup Tables
      • Views
        • Creating a View to Filter Data
        • Creating a View to Join Tables
        • Self-Join Views
        • Modifying Views
        • Importing and Exporting Views
    • Data Types
      • List Data Types
      • Function Reference
      • Adding a Formula Field in a Table
      • Managing Files With the Attachment Data Type
    • Managing Data in Datasheet
      • Find and Replace Specific Values
      • Filtering Data
      • Downloading Table or View Data
    • Database Relationships
      • Relationship Settings
    • Importing Data
    • Exporting Data
    • Sharing Data Between Apps
    • Best Practices for Designing Databases and Tables
    • Logs
      • Managing Logs
        • Logs Retention Period
      • App Access Logs
      • Directory Logs
      • Email Logs
      • Integrations Logs
      • Payment Logs
      • SMS Logs
  • Leverage AI
    • AI Assistant Overview
  • Automate Tasks and Workflows
    • Automations Overview
    • Triggered Actions
      • Creating a Triggered Action
        • Actions
          • UPDATE
          • DELETE
          • INSERT INTO
          • SEND EMAIL
          • SEND SMS
        • Data
          • SELECT
        • Logic
        • Loops
        • Text
        • Number
        • Date
        • Variables
    • Tasks
    • Data Import/Export Tasks
      • Data Import Tasks
      • Data Export Tasks
      • Configuring a Repository Site
      • IP Addresses for Data Import/Export Tasks
      • Data Import/Export Tasks Tips and Best Practices
  • Generate PDF Documents
    • Document Generation Overview
    • Creating Templates
    • Mapping Fields in Templates
    • Template Field Types
    • Configuring Template Settings
      • Formatting Field Values
      • Adding Watermarks
      • Encrypting PDF Documents
      • Configuring PDF Document Properties
      • Changing PDF File for a Template
    • Enabling Document Generation in Applications
    • Managing Templates
  • Integrate and Extend Your Apps
    • Integrations Overview
    • Webhooks
      • Getting Started with Webhooks in Caspio
      • Webhooks Rules and Limitations
      • IP Addresses for Webhooks
      • Creating and Managing Webhooks
        • Configuring Call Throttling
      • Creating and Managing Events
        • Event Types
        • Activating or Deactivating Events
      • Testing Webhooks
    • Extensions
      • AI-Powered GPT Connect
      • Extension for Slack
      • QR Code Generator
      • Barcode Generator
    • Web Services API
      • Creating a Web Services API Profile
      • Authenticating REST API
      • Important Header Parameters
      • Special Considerations
      • Error Handling
      • Swagger UI
      • Migration from REST API v2 to v3
    • Integration with Make
    • Integration with Zapier
  • Deploy Your Apps
    • Deploying Bridge Apps
      • General Deployment Guide
      • Remove iFrame Border and Change Size
      • Block Access to DataPages by IP Address
    • Deploying Flex Apps
      • Mapping a Friendly Subdomain
  • Manage Account and Billing
    • Account Settings
    • Account Users, Groups and API Profiles
      • Inviting New Account Users
      • Creating Groups for Account Users
      • Managing Permissions
      • Changing Account Owner
    • Changing Your Plan
    • Updating Payment Information
    • Payment History
    • Custom Domain
    • Account Notifications
    • Resource Usage
    • Caspio ID
      • Managing Your Caspio ID
      • Forgot Your Password
      • Getting Support PIN
    • Support Login
    • Search for Objects
  • Videos
    • Bridge Videos
      • Build Your First App
      • Recorded Training
      • Customize Your Apps
      • Advanced Topics
      • Full App Implementation
      • Tips and Tricks
    • Flex Videos
      • Build Your First App
      • Recorded Training
  • Resources and Best Practices
    • Frequently Asked Questions (FAQ)
    • Tech Tips
    • Troubleshooting
      • Troubleshooting SMS Delivery
      • Troubleshooting Email Delivery and Domain Verification
      • Cannot Log in to My Caspio Account
      • Issue with Login to Apps or DataPages
      • Issue with Redirection After Logout
      • Acknowledgement Emails Are Not Received
      • Issues with Email Verification Code
      • JavaScript Does Not Work with Multiple DataPages
      • Cannot See an SSL Lock Icon for My Web Page
      • Responsive UI Does Not Display Properly
      • Date Fields from Excel Import Incorrectly
      • Troubleshooting Custom PDF Generator
      • Troubleshooting Data Import Speed
      • System Limitations
      • Errors and Messages
    • System Requirements
    • Deprecations
      • Deprecation of Twitter as an ID Service in Authentications and Connections
      • Deprecation of Google Drive for Data Import/Export Tasks
      • Deprecation of HTTP Deployment
      • Deprecation of the Option to Disable AJAX Loading
      • Deprecation of MS Access for Import/Export
      • Deprecation of Cb_ErrorLog Tables
      • Deprecation of Google Map Mashup Generator
      • Deprecation of Frame Deployment
      • Deprecation of .xls Excel Format for Data Import
      • Deprecation of SEO Deployment Method
      • Deprecation of WordPress Deployment
      • Deprecation of Unverified Email Addresses
      • Deprecation of SOAP Web Service
      • Deprecation of Internet Explorer 11 and Microsoft Edge Legacy Browsers
  • Release Notes
    • Caspio 60.0
    • Caspio 59.0
    • Caspio 58.0
    • Caspio 57.0
    • Caspio 56.0
    • Caspio 55.0
    • Caspio 54.0
    • Introducing Flex
    • Caspio 53.0
    • Caspio 52.0
    • Caspio 51.0
    • Caspio 50.0
    • Caspio 49.0
    • Caspio 48.0
    • Caspio 47.0
    • Caspio 46.0
    • Caspio 45.0
    • Caspio 44.0
    • Caspio 43.0
    • Caspio 42.0
      • Known Issue: Scrolling on macOS Devices
    • Caspio 41.0
    • Caspio 40.0
    • Caspio 39.0
    • Caspio 38.0
    • Caspio 37.0
      • Impacted Areas 37.0
    • Caspio 36.0
    • Caspio 35.0
    • Caspio 34.0
      • Impacted Areas 34.0
    • Caspio 33.0
    • Caspio 32.0
    • Caspio 31.0
      • Impacted Areas 31.0
    • Caspio 30.0
    • Caspio 29.0
    • Caspio 28.0
    • Caspio 27.0
    • Caspio 26.0
    • Caspio 25.0
    • Caspio 24.0
    • Caspio 23.0
    • Caspio 22.0
    • Caspio 21.5
    • Caspio 21.0
      • Impacted Areas 21.0
    • Caspio 20.0
    • Caspio 19.0
      • Impacted Areas 19.0
      • Security Patch 19.5
    • Caspio 18.0
    • Caspio 17.0
    • Caspio 16.0
    • Caspio 14.0
      • Impacted Areas 14.0
    • Caspio 15.0
    • Caspio 13.0
      • Caspio 13.0
      • Impacted Areas 13.0
    • Caspio 12.0
      • Impacted Areas 12.0
    • Caspio 11.0
      • Impacted Areas 11.0
    • Caspio 10.0
    • Caspio 9.9
      • Impacted Areas 9.9
    • Caspio 9.8
    • Caspio 9.7
    • Caspio 9.6
      • Impacted Areas 9.6
    • Caspio 9.5
      • Impacted Areas 9.5
    • Caspio 9.4
      • Impacted Areas 9.4
    • Caspio 9.3
      • Impacted Areas 9.3
      • Caspio 9.3
    • Caspio 9.2
      • Impacted Areas 9.2
    • Caspio 9.1
      • Impacted Areas 9.1
    • Caspio 9.0
      • Known Issues 9.0
      • Impacted Areas 9.0

5 Ways to Customize the Look of Your DataPages

10 minutes to read

Now that your DataPages are fully functional how about taking a few moments to customize their look and feel? Let’s take a look at the five most popular customizations Caspio users are making everyday to improve the look of their DataPages.

Style customizations you can make today:

  • Choose a New Style
  • Insert a Header and Footer
  • Add your company logo
  • Personalize your DataPage messages
  • Cascade your website CSS
  1. Choose a New Style

    There’s no faster way to dramatically change the look of your DataPages. Caspio recently added new professionally-designed styles into every account to give you new cutting edge alternatives. Best of all, predefined styles don’t change the functionality of your DataPages, so your apps retain the layout your users have already learned.

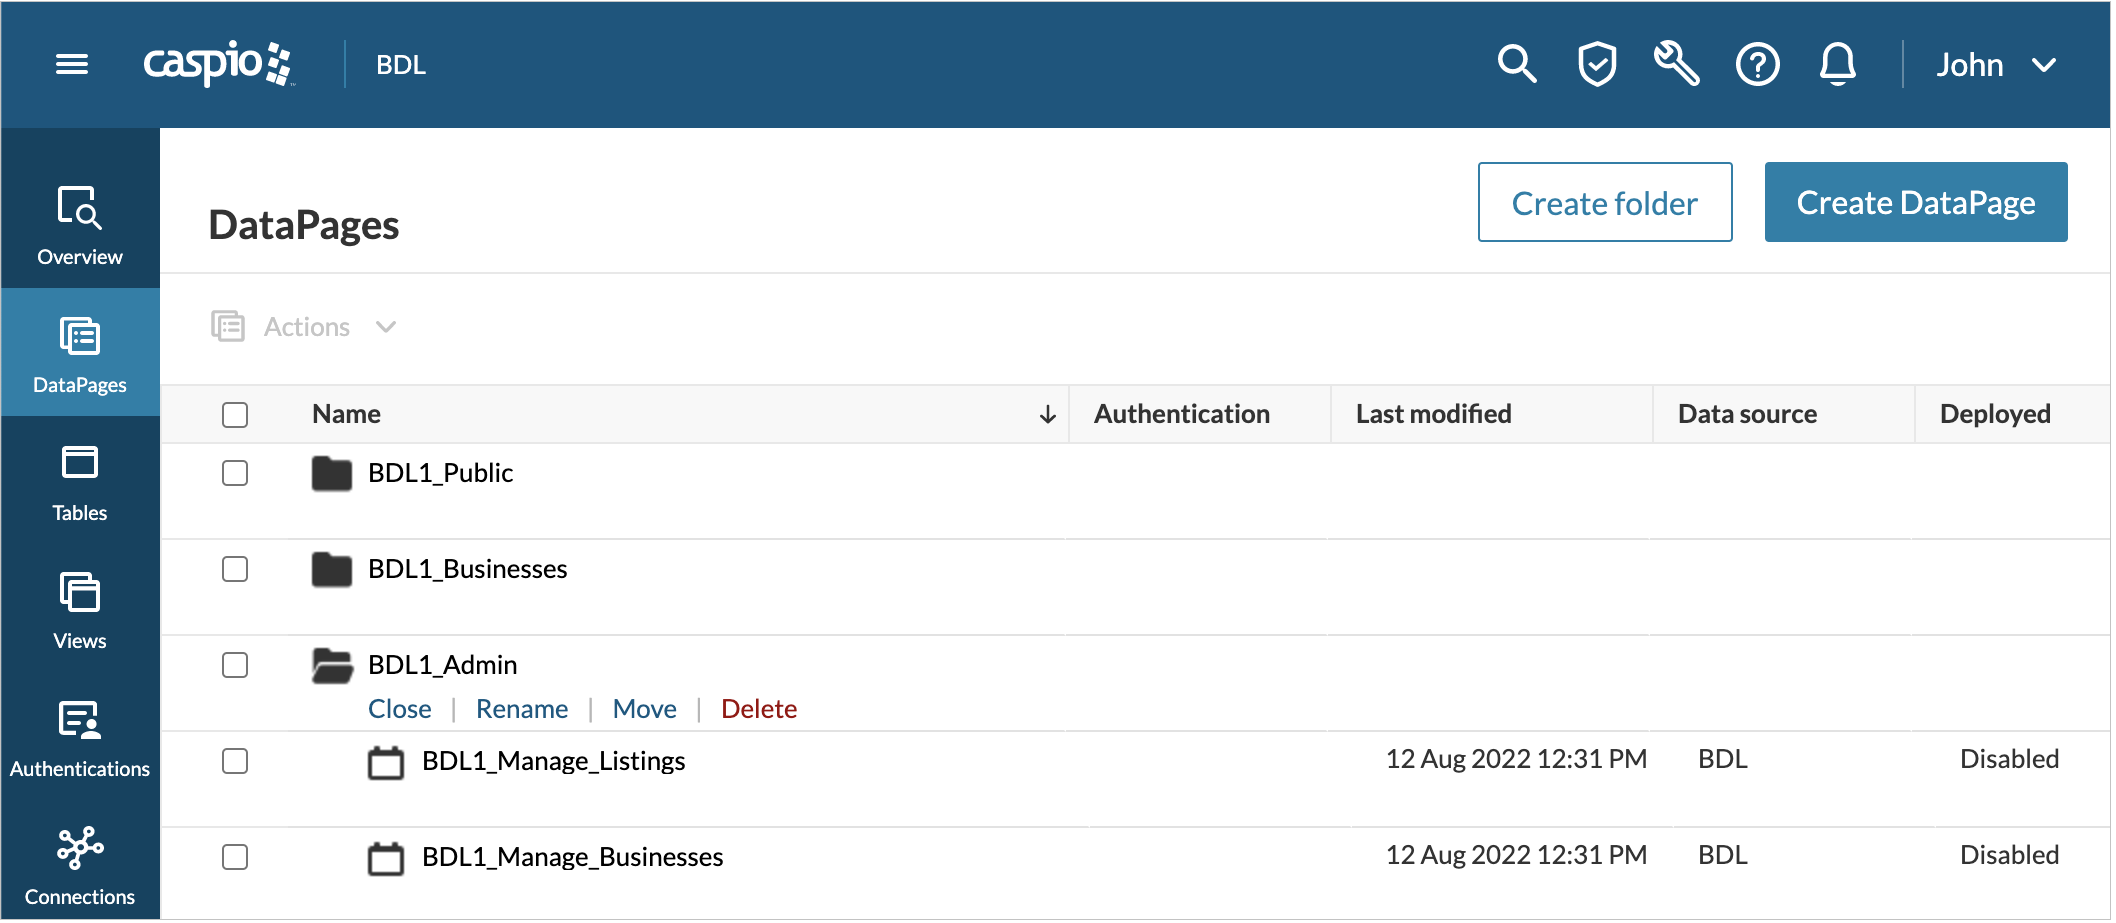
    Select your DataPage and open the DataPage wizard:

    • Navigate to the DataPages listing of an app, select the DataPage you would like to add a Style and click Edit. Preferably this DataPage should be published to your website so you can see what the style looks like when presented with your other website formatting.
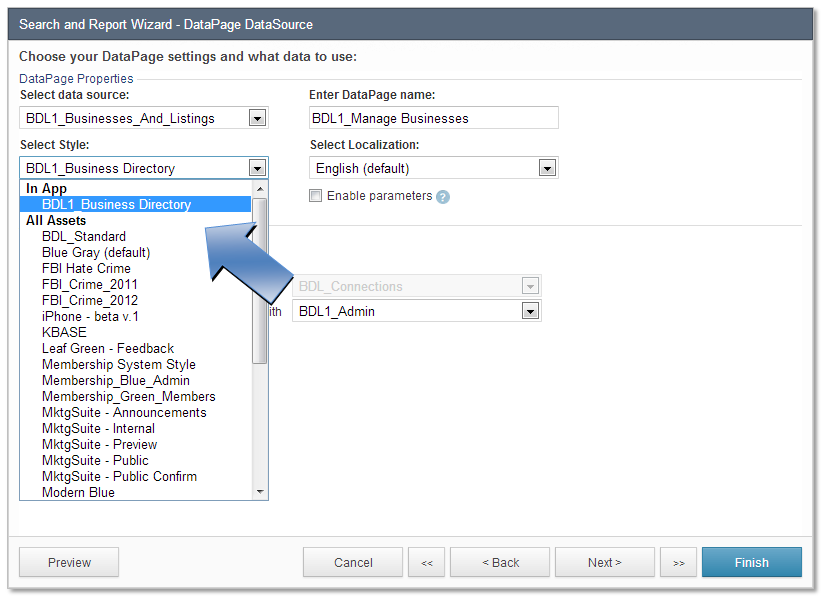
    • Choose a new style from the Select Style dropdown. The Select Style dropdown is automatically populated with all of the styles in your account. Select a style from this menu.
    • You can preview your new style in real-time. Select Preview located on the bottom left hand corner of any screen of the DataPage wizard. A new tab will open as a temporary DataPage.
    • Now, you can go to the webpage where the DataPage is deployed and see the new style against your other website formatting. You can repeat the previous steps until you find a style that improves the overall look of your website.

    Go to the Styles section and apply this style to multiple DataPages:

    Navigate to the Styles listing, select the Style of your DataPage and click Edit.
    Under the Apply Style to DataPages, you can apply this style to each DataPage individually, or click the Select All checkbox in the column header. You’ve just updated the look of your Caspio apps in practically no time at all.

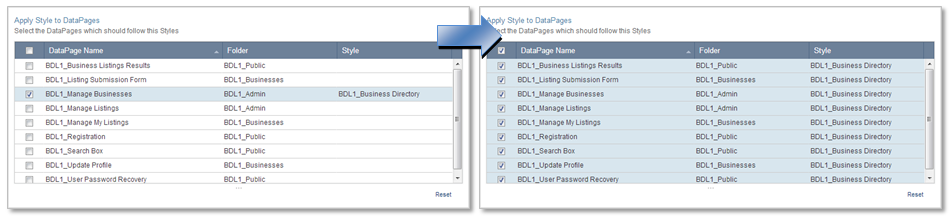
    Now, you can adjust the style as needed. The Define Style Settings section allows you to customize individual element formatting settings. If you’d like to further customize your DataPages, take a look at the options under this section. If you need special formatting for a single DataPage you can copy this style, edit it, and apply the adjusted version as needed.
    Click Save when done.

  2. Insert a Header and Footer

    Headers and footers are a great way to add consistency across your DataPages. You can customize these regions to add a title, give your users quick contact methods, or add instructions and other information. These extra details provide a unified experience that is appreciated by end-users. It is particularly useful to give a subtitle to the various screens of DataPage. For example, you can add a DataPage title header in H1 tags and, in H2 tags, include specific page location titles for the search, results and details pages.
    The footer can contain links back to the search page from the results or details page, a direct link to your “contact-us” page, legal notes, copyright information, etc.

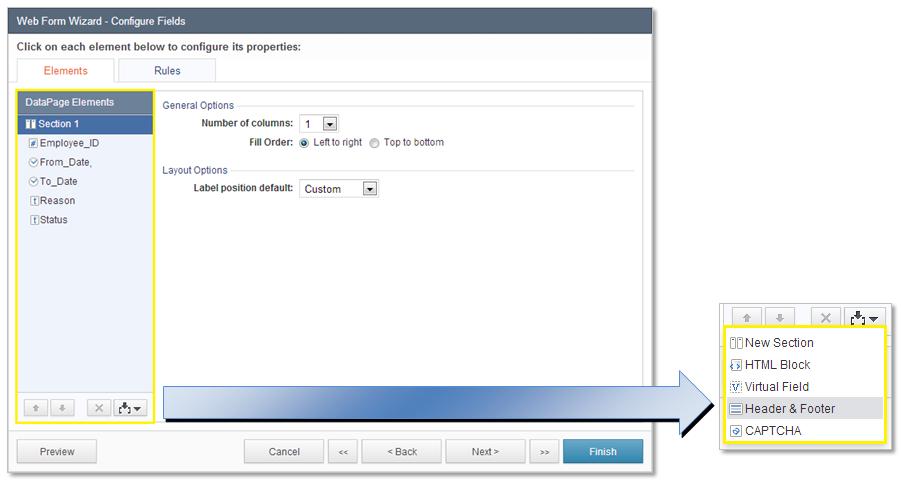
    • Navigate to the DataPages listing, select a DataPage you would like to add headers or footers and click Edit.
    • Proceed to a Configure Fields screen. Web Forms have one Configure Fields screen whereas Search and Report DataPages have three (search, results & details pages). Once you have navigated to one of these pages, locate the Insert button. The Insert button is just below the bottom right corner of the DataPage Elements panel. The button displays an icon of a cyan colored arrow pointing downwards into two brackets. Select the Header & Footer option to add header and footer sections to your DataPage elements
    • Use HTML to create your header and footer.
    • You can preview your work on your web page or in the DataPage wizard. You can then copy and paste your new HTML into your other DataPages.
    • You have successfully created a standard header and/or footer.
  3. Add your company logo

    You can display any image that’s hosted on your sever inside of your Caspio apps.  This is especially useful if you’d like to add a company logo or other images when using the “URL” deployment method.

    Steps to adding an image from your server:

    Copy the image location

    Chances are, you’re already using your company logo somewhere on your website.  You can copy the location of this image directly from your browser.  Go to the page where you see the image.  Right click.  In Firefox choose Copy Image Location.  In Internet Explorer choose Properties and copy the address(URL) information.

    Now you can add the image into your DataPages.

    1. In the DataPages listing in an app, select a DataPage on which you can test some of the new predefined styles and click Edit. Preferably this DataPage should be published to your website so you can see what the style looks like when presented with your other website formatting.
    2. Proceed to a Configure Fields screen of the DataPage wizard. Web Forms have one Configure Fields screen whereas Search and Report DataPages have three (search, results and details pages). The Insert button is located on the bottom right of the DataPage Elements panel. The button shows an icon of a cyan colored arrow pointing downwards into two brackets. Select the Insert button and select the Header & Footer option to add a Header & Footer.
    3. Next, you create the HTML image tag. HTML image tags are written using the following syntax: < img src=”Image Location URL” alt=”Company Logo” />
    4. Replace Image Location URL with the image location you copied earlier. You can also replace the alternative text (Company Logo) to better describe your image.
    5. Now you can preview, copy and apply to other DataPages.

    Once you’ve formatted your logo correctly you can repeat this process for any DataPage you would like. Since the image is hosted on your server it doesn’t affect your monthly data transfer limits.

  4. Personalize your DataPage messages

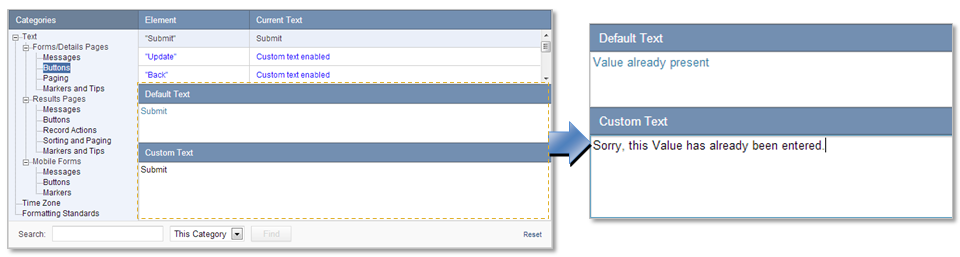
    Did you know that all of the messages in your Caspio DataPages are customizable?  You can adapt the language and tone of your DataPages to better match your website or company.  For example, the default message when a user tries to enter duplicate information into a Unique field is, “Value already present.”  You can change this to be more specific for your public users, perhaps something like, “Sorry, an account already exists under this email.  Please use a different email address.” You can even translate all of the messages into another language.

    To personalize your DataPage messages, you need to edit a Localization. This object stores the settings relating to language and time zone. You can easily change the language or wording used in your DataPage messages.

    • Navigate to the Localizations listing, select the Localization you wish to customize messages and click Copy. You make a copy of your current localization, so you have a back-up copy of the original settings in case you would like to use them later.
    • Once you have named and saved your copied Localization, click Edit. Under the Define Localization Settings section, you can change all of the default messages. The first three subcategories under the Text section include all of the messages that are displayed in Caspio DataPages. The original default (English) message always appears above your custom text for easy reference. Change as many messages as you’d like.
    • You can apply a localization to every DataPage in your account in the same way you can apply a style. Under the Apply Localization to DataPages section, there is a list of all the DataPages currently in your account (if you are in All Assets) or all DataPages in your application (if you are in a specific app). You can check individual DataPages or use the checkbox in the column header to select all of them. Click Save when done.
  5. Cascade your website CSS

    One trend in website design is Cascading Style Sheets (CSS).  If you are a web designer using this technique, your Caspio DataPages are already configured to perfectly match your website.  To catch your CSS code you can create and apply an empty Style.  This is an advanced method which requires an understanding of CSS.

    To create a blank style, you make a copy of your current Style and make changed from there.

    1. Navigate to the Styles listing, select a Style you wish to copy, and click Copy. Make a copy of your current style so that you can revert to the original style in the future.
    2. Once you have named and saved your copied Style, click Edit.
    3. Now, you delete all of the CSS code on the Source tab. This tab gives you access to all of the CSS code used to create this particular style. To create an empty style, remove all of this CSS code. Select All from the top of the Data Page Elements panel. Highlight all of the code in the right panel by clicking and dragging or pressing “Ctrl + A”. Now click Delete. Don’t worry; if you’ve completed the first step, you have a back-up copy of this style saved already.
    4. Add your custom HTML style code. Click Save.

    You can apply this new style and preview the results in real-time in the DataPage wizard.

    1. Navigate back to the DataPage section and select a DataPage to apply this new blank style. You can preview the Style in any screen of the DataPage wizard. A new tab will appear as a temporary DataPage.
    2. Next, go to the webpage where this DataPage is deployed. If you have a functioning style sheet your DataPage formatting will now match the rest of your page.

    Customize individual fields as needed

    Because DataPages are often the only interactive feature on a webpage, you may want to alter their appearance slightly to make them more noticeable.  The last page of the Style wizard allows you to customize the format of the various, individual parts of your DataPages.  Any changes you make will be added back as CSS code into the section you previously deleted.  This way you can tweak the sizes, fonts, and colors in your forms to attain the desired appearance.

    Go to the styles section and apply this style to multiple DataPages

    Now you can apply this empty style to as many DataPages as you would like, simultaneously.

    1. Select the empty Style and click Edit.
    2. Under the Apply Style to DataPages, you will see a list of all of your DataPages in your account (if you are in All Assets) or all DataPages in an application (if you are in a specific app). You can use the checkbox column on the left to apply this style to each DataPage individually, or click the checkbox in the column header to select all of your DataPages.
    3. Click Save.

    Be sure to go through all of your web pages to make sure the formatting changes have had the desired effect.

  • PRODUCT

  • Platform Overview
  • Why Low Code
  • Case Studies
  • App Marketplace
  • Pricing
  • Get a Custom Demo
  • Free Trial
  • SOLUTIONS

  • Healthcare
  • Education
  • Government
  • Financial Services
  • Energy and Utilities
  • Nonprofits
  • Media
  • Consulting
  • RESOURCES

  • Resource Center
  • Blog
  • Free Training
  • Online Help
  • Onboarding
  • Get Certified
  • Professional Services
  • Support Center
  • COMPANY

  • Our Story
  • Careers
  • Leadership
  • News
  • Partner Programs
  • Referral Program
  • Academic Program
  • Discount Programs
  • Contact Us
  • TRENDING

  • Build Custom CRM
  • Create Web Dashboards
  • Best Online Database
  • Convert Excel to Web
  • Migrate MS Access Online
  • HIPAA Compliant Database
  • Create a Patient Portal
Caspio Logo

Caspio is the world’s leading cloud platform for building online database applications without coding.
Start a free trial today and experience the power of no-code.

Footer Partners

© 2025 Caspio, Inc. Sunnyvale, California. All rights reserved.

  • Privacy Statement
  • Terms of Use
  • Report Abuse
  • Feedback