SAML Single Sign-On
6 minutes to readSingle sign-on (SSO) is an user authentication process that allows your users to enter one username and password in order to access multiple applications. Single sign-on allows you to use your corporate identity management for your authentication of your Caspio application users. This allows your users to remember only their corporate password.
Caspio provides SAML (Security Assertion Markup Language) single sign-on integration. SAML is an XML-based standard for web browser single sign-on. It allows exchanging authentication and authorization data between an identity provider (IdP) and a service provider, Caspio.
If your organization is using a supported SAML 2.0 IdP, you can configure your Caspio apps to use single sign-on. This document is a guide for your company’s systems administrator to setup IdP for access by Caspio.
How SAML Works
The process involves three parties: the user, the identity provider and the cloud service provider (Caspio-powered apps). The user accesses a Caspio -powered application and attempts to authenticate. If Caspio recognizes the username, it delegates authentication to the IdP. The IdP validates the user against its user database and sends a confirmation to Caspio to give the user access to the application.
Note that the SSO only applies to Caspio web applications and does not apply for Caspio platform admin and users logins.
Benefits of Using Single Sign-On
The main benefits of using single sign-on are the additional security resulted from not storing user passwords in multiple places, and the convenience of fewer usernames and passwords which lowers the cost of IT help. In addition, your corporate password policies are extended to your cloud apps.
Supported SAML-based Identity Providers
Caspio SSO is based on SAML 2.0 specifications. SAML 2.0 is supported by several well-known IdPs listed below that can be used to set up SSO with Caspio. Other SAML-based IdPs can also be used but they are not tested and verified by Caspio.
- Active Directory Federation Services (ADFS) 2.0 and 3.0
- Microsoft Entra ID (formerly Azure AD)
- OneLogin
- Okta
- PingOne (PingIdentity)
- Auth0
- Salesforce
Setting Up Your Single Sign-On
The majority of the work to set up single sign-on will take place with your identity provider explained in the first step below. Each step is documented in detail in the sections below.
- Configure SAML settings with your identity provider.
- Construct your Caspio users table.
- Configure Caspio authentication to set up single sign-on.
- Test your single sign-on connection.
Configuring SAML Settings
Your organization’s system administrator will be able to set up the SAML settings referring to the information below.
Ensure that your identity provider uses SAML 2.0. In this step, you are telling your IdP about Caspio as a service provider. This process is called creating “relying party trust” between your IdP and Caspio. The exact process depends on what IdP you are using. For details, see the documentation for your identify management provider.
Provide the following Caspio information to your identity provider as appropriate. Each IdP may require some or all of the information below and may use different terminology:
- SP Identifier / Entity ID (also known as Caspio Site URL, Issuer URL, Audience and Recipient URL). For example if your account is on site 1, your site URL is https://b1.caspio.com.
- SP metadata URL (also known as Federation metadata address in ADFS): https://site.caspio.com/saml2/metadata
- Assertion Consumer Service (ACS) URL (also known as Single Sign-On, Application Callback, Reply, and Destination URL): https://site.caspio.com/saml2/sso
- Single Logout URL: https://site.caspio.com/saml2/slo
While configuring your IdP settings, you will need to gather the following information that are required to configure your Caspio authentication in the next step.
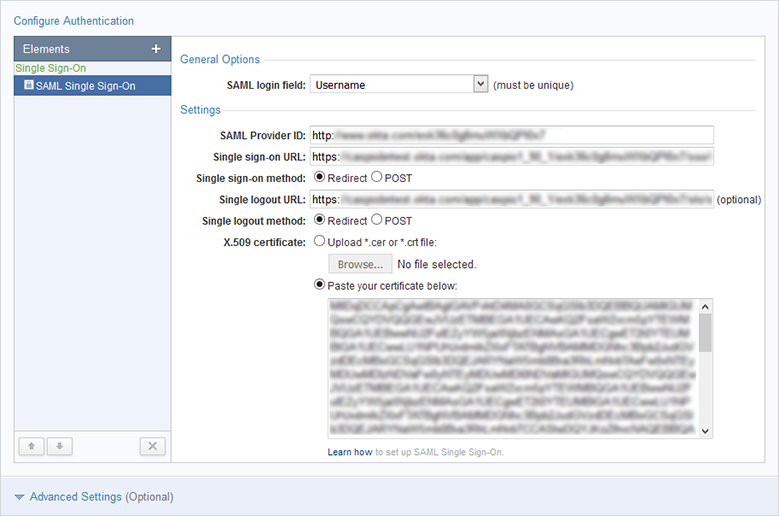
- SAML Provider ID – The entity ID of the identity provider (also known as issuer).
- Single sign-on URL – The provider’s endpoint that accepts authentication requests. This is also known as the start page where Caspio sends authentication request to the provider to start the login process.
- Single sign-on method – The provider’s supported binding method. Method can be Redirect or Post.
- Single logout URL (optional) – The provider’s logout page when a user clicks logout or the session expires. This is a single logout option which is only supported by some IdPs, therefore it is optional in Caspio.
- Logout Method – If your provider supports single logout, you will also need to find out which logout method they support. Method can be Redirect or Post.
- 509 certificate – The authentication certificate provided by the provider. You can upload it as a file or copy and paste as text.
Constructing Caspio Users Table
Caspio data source where you store your users’ information must have a Unique field that stores usernames in this format SAML: username where username is user’s login id.
Username format for Active Directory IdPs are:
| Provider | Username format in Caspio |
|---|---|
| ADFS 2/3 | User principal name in format SAML:username@domainname |
| Microsoft Entra ID (login with Microsoft account) | SAML:user_mail.com#EXT#@directoryname.onmicrosoft.com (replace ‘@’ symbol with ‘_’ for user email) Example: myname@hotmail.com Caspio format: myname_hotmail.com#EXT#@yourdirectoryname.onmicrosoft.com |
| Microsoft Entra ID (login with Microsoft Entra ID account) | SAML:username@directoryname.onmicrosoft.com |
Configuring Caspio Authentication Settings
When you configured your SAML IdP settings, you’ve told the IdP about Caspio as a service provider. In this step, you will tell Caspio about your identity provider to establish trust between the two parties.
When you have gathered the IdP information from the Configuring SAML Settings step above and constructed your users table, create an Authentication object in your Caspio account and follow the steps below:
- Select your authentication data source.
- In Setup Options choose Custom.
- In “Validate with” choose SAML Single Sign-On.
- Fill SAML Authentication settings with values obtained in Configuring SAML Settings step discussed above.
- Configure the advanced options as required.
- Enable cross-app login: This option enables cross-app login when users have an active session with another Caspio-powered app that uses the same SAML provider and users table.
- Auto-redirect to SAML login screen: If this option is enabled, unauthenticated users are automatically redirected to the IdP login page when the application is accessed. This option works only for Embed and .NET deployments.
Firefox does not support this option. In other browsers, it works only with third-party cookies enabled. Learn more.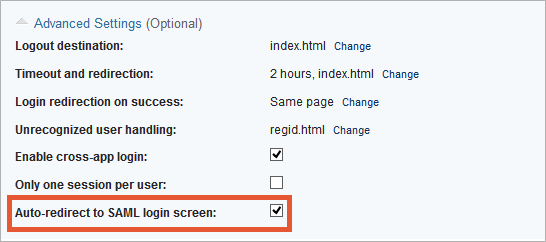
- Complete your authentication configuration and click Create.
Test your Single Sign-On Connection
Once you have completed the steps above, and you have added a few users to your authentication source table, you can test your setup by opening your authenticated Caspio web application. You should be directed to your IdP login page or access the application if you are already logged in to your corporate site.
