Setting up Default Values
4 minutes to readDefault values make filling out fields on forms faster and more convenient. If the user accepts the default value that’s in the field, they no longer need to select an option or enter any value. In Caspio, there are three methods for defining default values:
- For almost all Standard fields, you can use the Advanced tab in the Configure Fields screen of the DataPage wizard.
- For Listbox and Dropdown fields, you can define default choices using Custom Values in the Configure Fields screen in your DataPage wizard.
- For all field types, you can create Triggered Actions which automatically fill out the Value field.
Advanced tab
Setting default values in the Advanced tab on Submission form is available for all Standard fields with the exception of the File DataType. To set up a default value:
- Go to the Configure Fields screen in your DataPage wizard.
- Select a field in the DataPage Elements panel and click on the Advanced tab.
- Check the Receive value or parameter check box.
- Fill out the field below with the text you want as a default value.
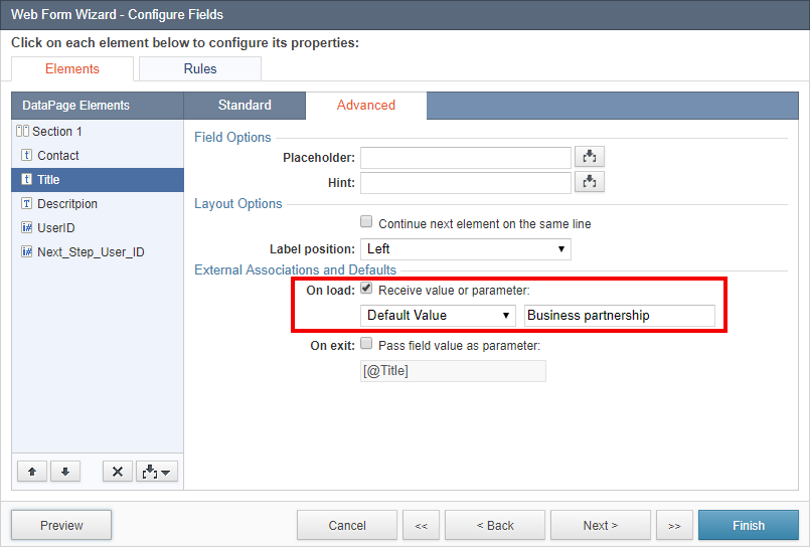
You can also receive a default value as an external parameter. To configure this please read the Receiving parameters article.
Listbox and dropdown fields with custom values
For listbox and dropdown fields, you can manually define your default choices in Custom Values. It’s best to set the default selection to the most frequently selected option. The below example shows how to do so:
- Go to the Configure Fields screen in your Data Page wizard.
- Select a field under the DataPage Elements panel and change the Form element dropdown to Dropdown or Listbox.
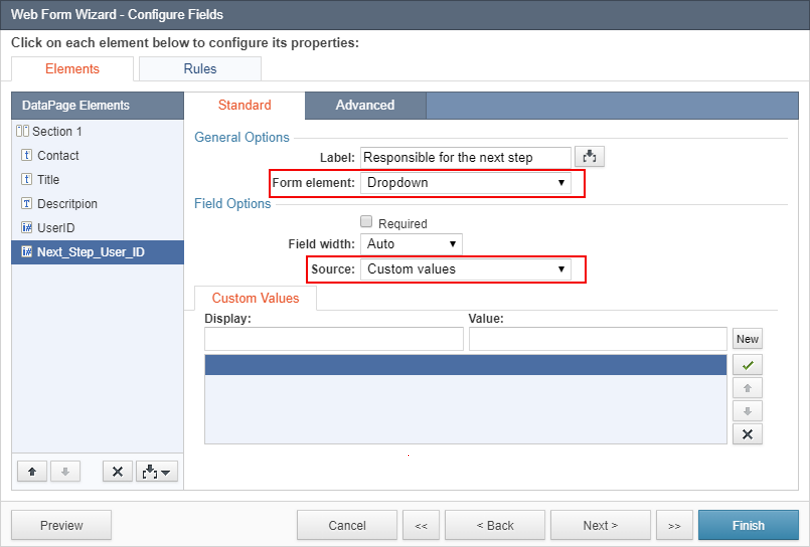
- Select Custom values from the Source.
- In the Display and Value fields, type in the text you want to appear in the dropdown or listbox.

- To add another value, click the New button.
- Use the Default
 button to mark the value that you want to have as a default one. Once selected, the selection will have an “X” at the far left of the display text.

Note: The default value in Custom Values can be configured only for submission forms, search forms in Reports DataPages and virtual fields. In other cases, the check mark will be gray and disabled.
You can also use default choices to create a prompt with a hint for users. To do so, simply add another option to the list, type in the text in the Display field and leave the Value field empty.

The result on your DataPage will look like this:

Triggered Actions as default values
You can set default values for all fields by means of Triggered Actions. Triggers work on tables, therefore, they can run anywhere where the field value is updated or modified, i.e. Submission Forms, edits in Reports, REST API and the Datasheet tab in Table. In other words, they can run on different actions on tables like insert, update, delete or all at once. A defined trigger can automatically fill out the Value field in case no value is selected or entered. Triggers can be used to fill out values also in related tables.
Note: Please note that the user will not see the default value before submitting or updating the form.
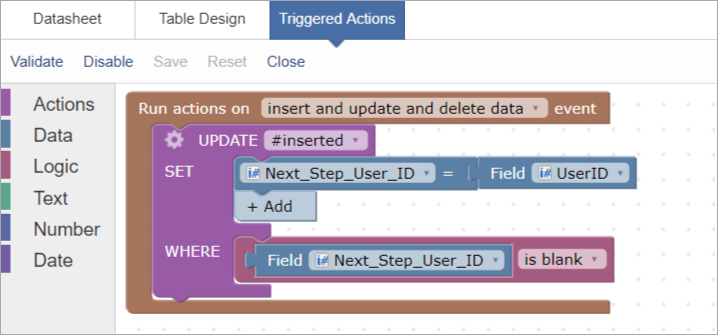
The example below shows how to define a default value by means of a Triggered Action for a Lookup Table in case no value is selected from the dropdown list:
- Open the DataPage wizard.
- Go to the Configure Fields.
- Choose Lookup table or view as the source from the Source dropdown.

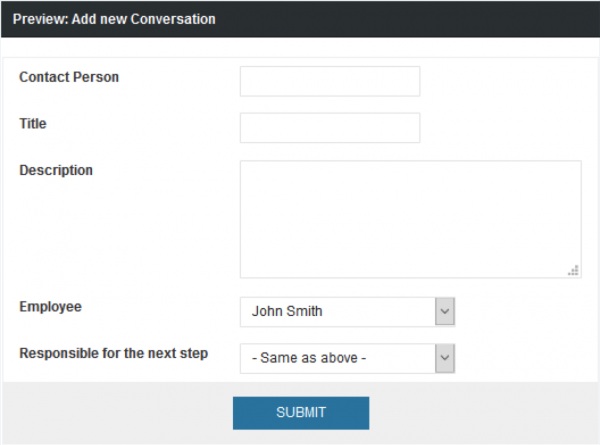
- Define a trigger on the table in which the data will be stored. The example in the screen below shows a Trigger that fills out the Next_Step_User_ID field with the value from the UserID field when the Next_Step_User_ID is blank.
When using lookup tables, you can also add a prompt to your form. To do so, select Both as the source, enter the text in the Display field in the Custom Values tab and leave the Value field empty.
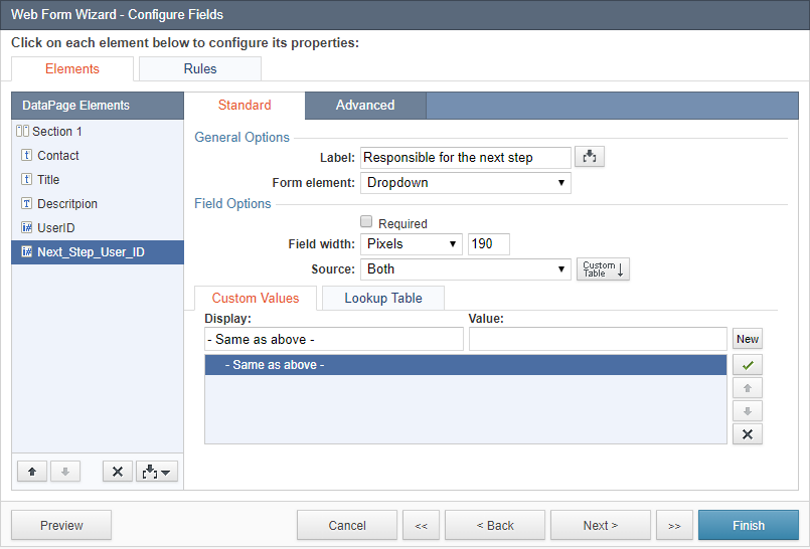
The result of the above steps exemplifies a situation in which employees fill out a form with information about the conversations they had. Based on the created Trigger, if the Employee (User_ID field) doesn’t select the person responsible for the next step (Next_Step_User_ID field) the trigger will choose them automatically (Next_Step_User_ID = User_ID).
Read the article to learn more about Triggered Actions.

