• search
  • Contact Sales
  • Support
    • Online Help
    • Community Forum
    • Contact Support
  • Log in
Get a Demo Try Free
High Contrast
Caspio logo Help
Try Free
  • High Contrast
  • search
  • Contact Sales
  • Support
    • Online Help
    • Community Forum
    • Contact Support
  • Log in
Get a Demo Try Free
  • Help Center
  • Tech Tips
  • Creating Vote Up and Vote Down For Individual Records
  • Launch Your Caspio Journey
  • Create Applications
    • Applications Overview
    • Creating Apps With Bridge
      • Bridge App Overview
        • Creating a New App Container
        • Importing an App
        • Exporting an App
        • Deleting an App
        • Shared Objects
        • Backing Up Your Applications
        • Sharing an App with Another Account
        • App Parameters
          • Adding App Parameters
          • Managing App Parameters
          • Using App Parameters
      • Authentication
        • Setting Up User Permissions in Your App
        • Adding a Logout Link
        • Record Level Security
          • Create a Workflow using Record Level Security and Filtered Dropdown
          • Restrict Access to Data by User or Role
          • Filter Lookup Dropdown or Listbox Based on User or Role
        • Stamp a Record with User Profile Data
        • OpenID
        • Create a Standalone Login Screen
        • Hiding Multiple Login Forms
      • DataPages
        • What is a DataPage?
        • DataPage Types
        • Forms
          • Submission Forms
          • Update Forms
          • Password Recovery Forms
          • Form Element Types
          • Conditional Forms
          • Child Forms
          • Accepting Payments in Your Application
        • Reports
          • Creating a Report DataPage
          • Comparison Types in Report DataPages
          • Search by Distance
          • Report Page Results Layout
          • Interactive Reporting Options
          • Pivot Table Reports
          • Counting the Number of Times a Record Has Been Viewed
          • Display a Field Data as Hyperlink
          • Fixed Rows and Columns
          • Making the Search Results Downloadable as PDF
          • Editing Data Through My Details Page
          • Making the Details Downloadable for Users
          • Data Editing Options in Reports
          • Combined Chart and Report
          • Adding “Today” to “After Now” or “Next X Days” Criteria
          • Filtering Reports Based on an Expiration Date
          • Advanced Reporting
            • Calculations in Reports
            • Data Grouping
            • Totals and Aggregations
            • Calculated Fields and Datediff Function
        • Charts
        • Calendars
          • Calendar DataPage – Monthly Example
          • Calendar DataPage – Weekly Example
        • HTML Pages
        • DataPage Components
          • Dropdowns and Listboxes
          • Cascading Elements
          • Calculated Values
          • Field Configuration Options
            • Field and Column Width
            • Placeholder Text
            • Rollover Hints – Mouse-Over Help Icon
            • Image Auto-Rotation
          • DataPage Header and Footer
          • HTML Blocks
          • Disabling HTML Editor in DataPage Header/Footer and HTML Blocks
          • Field Formatting Options
          • Custom Date Formatting
          • Multi-column and Sections
          • CAPTCHA
          • Virtual Fields
          • Setting up Default Values
          • AutoComplete
        • Managing DataPages
          • Modifying DataPages
          • Previewing DataPages
          • Moving DataPages
          • Copying DataPages
          • DataPage Revisions
          • DataPage Folders
          • Exporting and Importing DataPages
          • Moving Existing DataPages To a New App
        • Responsive DataPages
          • Responsive DataPage Prerequisites
          • Responsive Behavior on Tablet and Mobile
          • Modifying Styles for Tablet and Mobile
        • AJAX Loading
        • PDF Download
          • Adding a text watermark
          • Adding an image watermark
          • Adding page breaks to details page
          • Adding header and footer
        • Best Practices in Creating Caspio Applications
      • Notifications
        • Email Notifications
          • Verifying Email and Domain
          • Configuring Email
          • Setting Up Dynamic or Conditional Notification Emails
        • SMS Notifications
          • Configuring the SMS-enabled Countries
          • Configuring SMS
          • Adding SMS Sender Name
      • Parameters
        • Parameter Types
        • System Parameters
        • Passing Parameters through Caspio
        • Displaying Parameters
        • Parameters as Query String Values
        • Receiving Parameters
        • Resetting Parameters
        • Passing Multiple Values in One Parameter
        • Formatting Parameters in Email Body and HTML Blocks
        • Parameters in Dropdowns, Listboxes and Radio Buttons
        • Custom Filter Elements
      • Connections
        • SAML Single Sign-On
        • Setting Up ID Services
      • Styles
        • Creating or Editing a Style
        • Layout Options
        • Fix the Width of the DataPage
        • Button Alignment
        • Field Alignment
        • Border Options
        • Using Google Web Fonts
        • Glossy Heading Text
        • Gradient Backgrounds for DataPages
        • Gradient Backgrounds for Fields
        • Replace Links to Records with Images
        • Replace Standard Buttons with Images
        • Change the Color of Field Error Labels
        • Change Text on a Button
        • Put Multiple Fields on One Line
        • Styling Advanced Reports
        • Add Rounded Borders to the Form and Fields
        • Use an Image as Form Background
        • Fix the Width of Labels and Data in List and Gallery Reports
        • Customize the ID Service Icon of the Login Screen
      • Localizations
        • Creating or Editing a Localization
        • Handling Arabic, Hebrew and Other Right-to-Left Languages
        • Formatting Options
        • Using Localization Feature to Improve Usability
        • Format Types
      • Files and Images
        • Uploading Files and Images
        • FileStor CDN
        • Managing Files
        • Bulk File Import and Export
        • Creating Thumbnails with the Image Resizer
        • Using Files in DataPages
        • Orphan File Cleanup
    • Creating Apps With Flex
      • Flex Overview
      • Roles
        • Creating New Roles
        • Adding Users and Groups to Roles
        • DataPart Display Based on the User Role
        • Editing Role Permissions
          • User’s Own Records
          • Custom Access
        • Removing Users and Groups from Roles
        • Deleting Roles
      • Application Design
        • Segments
          • Editing Segment Settings
          • Themes and Widgets
        • Adding AppPages
        • AppPage Types
        • Moving DataParts
        • Resizing DataParts
        • Adding DataParts
        • Forms
          • Form Elements
          • Search Form
          • Submission Form
          • Details/Update Form
        • Reports
          • Tabular Report
          • Card Report
          • Pivot Table
        • Sign-up Form
        • Charts
          • Creating and Configuring Charts
          • Chart Display Options
        • Text/HTML
        • Data Filters
          • Creating Filters
        • Calculated Values in Flex DataParts
        • Communication Between DataParts
        • Designing User-Friendly Navigation Between AppPages
      • Parameters
        • Inserting Parameters
        • Application Parameters
        • Adding Support for Lookup Values in Data Source Parameters
        • Stamping Records with User ID
      • Branding
      • Flex FAQ
  • Manage Users and Groups
    • Directories Overview
      • User Authentication in Directories
      • Converting Tables to Directories
      • Creating Directories
    • Directory Users
      • User Status Overview
      • Creating Users
      • Activating Users
      • Adding Users to Groups
      • Resetting User Passwords
      • Resetting Two-Factor Authentication
      • Suspending and Unsuspending Users
      • Changing User Sign-In Method
    • Directory Groups
      • Creating Groups
      • Modifying Groups
      • Deleting Groups
    • Directory Security
      • Session Management
      • Turning On Two-Factor Authentication
      • Customizing Directory Security Policy
      • Redirecting to Custom URLs After Sign-in and Sign-out
    • Directory User Portal
    • Directory Emails
    • Identity Providers
      • Adding Identity Providers
        • Tutorial: Adding Microsoft Entra ID (formerly Azure AD) Identity Provider
        • Tutorial: Adding Okta Identity Provider
        • Tutorial: Adding OneLogin Identity Provider
      • Editing Identity Providers
      • Deleting and Disabling Identity Providers
      • Configuring Single Logout
    • App Connections
      • Creating App Connections 
        • Authenticating Users to Caspio Apps in Multiple Accounts Using a Single Directory
        • Tutorial: Adding HubSpot App Connection
        • Tutorial: Adding BambooHR App Connection
        • Tutorial: Adding Slack App Connection
      • Managing App Connections 
      • Deleting and Disabling App Connections
  • Manage and Organize Your Data
    • Data Management Overview
    • Tables and Views
      • Creating Tables
      • Modifying a Table’s Design
      • Removing Blanks From a Dropdown or Listbox
      • Lookup Tables
      • Views
        • Creating a View to Filter Data
        • Creating a View to Join Tables
        • Self-Join Views
        • Modifying Views
        • Importing and Exporting Views
    • Data Types
      • List Data Types
      • Function Reference
      • Adding a Formula Field in a Table
      • Managing Files With the Attachment Data Type
    • Managing Data in Datasheet
      • Find and Replace Specific Values
      • Filtering Data
      • Downloading Table or View Data
    • Database Relationships
      • Relationship Settings
    • Importing Data
    • Exporting Data
    • Sharing Data Between Apps
    • Best Practices for Designing Databases and Tables
    • Logs
      • Managing Logs
        • Logs Retention Period
      • App Access Logs
      • Directory Logs
      • Email Logs
      • Integrations Logs
      • Payment Logs
      • SMS Logs
  • Leverage AI
    • AI Assistant Overview
  • Automate Tasks and Workflows
    • Automations Overview
    • Triggered Actions
      • Creating a Triggered Action
        • Actions
          • UPDATE
          • DELETE
          • INSERT INTO
          • SEND EMAIL
          • SEND SMS
        • Data
          • SELECT
        • Logic
        • Loops
        • Text
        • Number
        • Date
        • Variables
    • Tasks
    • Data Import/Export Tasks
      • Data Import Tasks
      • Data Export Tasks
      • Configuring a Repository Site
      • IP Addresses for Data Import/Export Tasks
      • Data Import/Export Tasks Tips and Best Practices
  • Generate PDF Documents
    • Document Generation Overview
    • Creating Templates
    • Mapping Fields in Templates
    • Template Field Types
    • Configuring Template Settings
      • Formatting Field Values
      • Adding Watermarks
      • Encrypting PDF Documents
      • Configuring PDF Document Properties
      • Changing PDF File for a Template
    • Enabling Document Generation in Applications
    • Managing Templates
  • Integrate and Extend Your Apps
    • Integrations Overview
    • Webhooks
      • Getting Started with Webhooks in Caspio
      • Webhooks Rules and Limitations
      • IP Addresses for Webhooks
      • Creating and Managing Webhooks
        • Configuring Call Throttling
      • Creating and Managing Events
        • Event Types
        • Activating or Deactivating Events
      • Testing Webhooks
    • Extensions
      • AI-Powered GPT Connect
      • Extension for Slack
      • QR Code Generator
      • Barcode Generator
    • Web Services API
      • Creating a Web Services API Profile
      • Authenticating REST API
      • Important Header Parameters
      • Special Considerations
      • Error Handling
      • Swagger UI
      • Migration from REST API v2 to v3
    • Integration with Make
    • Integration with Zapier
  • Deploy Your Apps
    • Deploying Bridge Apps
      • General Deployment Guide
      • Remove iFrame Border and Change Size
      • Block Access to DataPages by IP Address
    • Deploying Flex Apps
      • Mapping a Friendly Subdomain
  • Manage Account and Billing
    • Account Settings
    • Account Users, Groups and API Profiles
      • Inviting New Account Users
      • Creating Groups for Account Users
      • Managing Permissions
      • Changing Account Owner
    • Changing Your Plan
    • Updating Payment Information
    • Payment History
    • Custom Domain
    • Account Notifications
    • Resource Usage
    • Caspio ID
      • Managing Your Caspio ID
      • Forgot Your Password
      • Getting Support PIN
    • Support Login
    • Search for Objects
  • Videos
    • Bridge Videos
      • Build Your First App
      • Recorded Training
      • Customize Your Apps
      • Advanced Topics
      • Full App Implementation
      • Tips and Tricks
    • Flex Videos
      • Build Your First App
      • Recorded Training
  • Resources and Best Practices
    • Frequently Asked Questions (FAQ)
    • Tech Tips
    • Troubleshooting
      • Troubleshooting SMS Delivery
      • Troubleshooting Email Delivery and Domain Verification
      • Cannot Log in to My Caspio Account
      • Issue with Login to Apps or DataPages
      • Issue with Redirection After Logout
      • Acknowledgement Emails Are Not Received
      • Issues with Email Verification Code
      • JavaScript Does Not Work with Multiple DataPages
      • Cannot See an SSL Lock Icon for My Web Page
      • Responsive UI Does Not Display Properly
      • Date Fields from Excel Import Incorrectly
      • Troubleshooting Custom PDF Generator
      • Troubleshooting Data Import Speed
      • System Limitations
      • Errors and Messages
    • System Requirements
    • Deprecations
      • Deprecation of Twitter as an ID Service in Authentications and Connections
      • Deprecation of Google Drive for Data Import/Export Tasks
      • Deprecation of HTTP Deployment
      • Deprecation of the Option to Disable AJAX Loading
      • Deprecation of MS Access for Import/Export
      • Deprecation of Cb_ErrorLog Tables
      • Deprecation of Google Map Mashup Generator
      • Deprecation of Frame Deployment
      • Deprecation of .xls Excel Format for Data Import
      • Deprecation of SEO Deployment Method
      • Deprecation of WordPress Deployment
      • Deprecation of Unverified Email Addresses
      • Deprecation of SOAP Web Service
      • Deprecation of Internet Explorer 11 and Microsoft Edge Legacy Browsers
  • Release Notes
    • Impacted Areas 61.0
    • Caspio 60.0
    • Caspio 59.0
    • Caspio 58.0
    • Caspio 57.0
    • Caspio 56.0
    • Caspio 55.0
    • Caspio 54.0
    • Introducing Flex
    • Caspio 53.0
    • Caspio 52.0
    • Caspio 51.0
    • Caspio 50.0
    • Caspio 49.0
    • Caspio 48.0
    • Caspio 47.0
    • Caspio 46.0
    • Caspio 45.0
    • Caspio 44.0
    • Caspio 43.0
    • Caspio 42.0
      • Known Issue: Scrolling on macOS Devices
    • Caspio 41.0
    • Caspio 40.0
    • Caspio 39.0
    • Caspio 38.0
    • Caspio 37.0
      • Impacted Areas 37.0
    • Caspio 36.0
    • Caspio 35.0
    • Caspio 34.0
      • Impacted Areas 34.0
    • Caspio 33.0
    • Caspio 32.0
    • Caspio 31.0
      • Impacted Areas 31.0
    • Caspio 30.0
    • Caspio 29.0
    • Caspio 28.0
    • Caspio 27.0
    • Caspio 26.0
    • Caspio 25.0
    • Caspio 24.0
    • Caspio 23.0
    • Caspio 22.0
    • Caspio 21.5
    • Caspio 21.0
      • Impacted Areas 21.0
    • Caspio 20.0
    • Caspio 19.0
      • Impacted Areas 19.0
      • Security Patch 19.5
    • Caspio 18.0
    • Caspio 17.0
    • Caspio 16.0
    • Caspio 14.0
      • Impacted Areas 14.0
    • Caspio 15.0
    • Caspio 13.0
      • Caspio 13.0
      • Impacted Areas 13.0
    • Caspio 12.0
      • Impacted Areas 12.0
    • Caspio 11.0
      • Impacted Areas 11.0
    • Caspio 10.0
    • Caspio 9.9
      • Impacted Areas 9.9
    • Caspio 9.8
    • Caspio 9.7
    • Caspio 9.6
      • Impacted Areas 9.6
    • Caspio 9.5
      • Impacted Areas 9.5
    • Caspio 9.4
      • Impacted Areas 9.4
    • Caspio 9.3
      • Impacted Areas 9.3
      • Caspio 9.3
    • Caspio 9.2
      • Impacted Areas 9.2
    • Caspio 9.1
      • Impacted Areas 9.1
    • Caspio 9.0
      • Known Issues 9.0
      • Impacted Areas 9.0

Creating Vote Up and Vote Down For Individual Records

7 minutes to read

Using Caspio DataPages, you can create a system where highly rated records appear on top of less popular records. This technique gives active web users a chance to rate your content and helps to organize your content so that the most trusted responses appear first.

In this example, you create a commenting system, but this same self-organizing system could be applied to other scenarios, including documents, product reviews, event descriptions, company profiles, etc.

This technique uses three DataPages and requires some external JavaScript. It is recommended for advanced users and may require some JavaScript knowledge to customize.

Prerequisites:

Create a table to hold all of the comments submitted. Be sure to include a unique Comment_ID field with an AutoNumber data type. In this example, the following table design is used:

The Popularity field is used to keep track of the current number of up votes minus down votes for each record.

The Active (Yes/No) field allows us to create an approval process for new comments. For more information on how to set up this feature, see Create an Approval Process for New Records.

Steps:

1. Create a Submission Form to allow your users to leave new comments.

  1. Create a Submission Form DataPage with the Comments table as a data source.
  2. On the Select Fields screen, include all of the fields you would like the user to fill out. The Active field is not included in the selected fields (so it is set to “unchecked” when a new record is created).
  3. On the Configure Fields screen, configure the Title, Author, and Comment fields for the user to fill out. The Popularity field is set to Hidden and includes a default value of 0.

  4. The Topic_ID will be filled by receiving a parameter passed using a query string. Select the Topic_ID field from the DataPage Elements panel.  To receive a parameter in a field, in the Advanced tab, enable the On load option by checking the Receive value or parameter.

  1. This form has enabled notification email to notify the site admin when new comments are submitted so that they can review them and check Active using a separate DataPage in their Admin interface. Click Finish.

2. Create a List Report DataPage to view the comments in order of popularity.

  1. Create a List Report DataPage using the Comments table as your data source.
  2. Create a filter for this DataPage using the data located in the URL query string. Select Filter data based on your pre-defined criteria.
  3. On the Select Filtering Fields screen, select both the Topic_ID and the Active fields to be included in the filter.
  1. On the Configure Filtering Fields screen, select the Topic_ID element and click the Advanced tab. Enter the parameter name that matches the name of the query string in your URL exactly in the Value space. Be sure the Active (Yes/No) is set to display only “checked” records.

3. Format your results page.

  1. Select fields you wish to use in the results page on the Select Results Page Fields screen. The results page can include any data you want. Click Next.
  2. On the Configure Results Page Fields screen, add an HTML block to display the comment information and voting controls.
    • Insert the field parameters in the HTML block using the picker button.
    • Format the parameters using the rich text editor or insert HTML code in the Source mode.
  1. Add the voting controls. The voting controls consist of two links, one to vote a comment up, and one to vote a comment down. Both controls open a popup to the same DataPage and the comment is voted up or down depending on the extra data we pass via query string. In this step, we will create placeholder links.
    • Go to the Source mode of your HTML block and insert the following code. You will change the URL later.
  1. Go to the Details screen and select the No Details Page.
  2. Save your DataPage.

4. Create the Vote Submission Form using a Single Record Update Form.

  1. Create a new Single Record Update Form DataPage.
  2. Select the Comments table as the data source. This Single Record Update Form will locate the appropriate comment using the Comment_ID parameter.
  1. Move the Popularity field to the right-hand panel using the arrow button.
  2. On the Configure Fields screen, be sure to set the Popularity field from Display Only to Calculated Value using the form element dropdown.
  3. Insert the following formula for the Popularity field:
  4. In the Advanced tab of the Popularity field, select Hide Field.
  1. Using the Insert button at the lower right-hand corner of the DataPage elements panel, insert one virtual field, one HTML block, and Header and Footer elements.
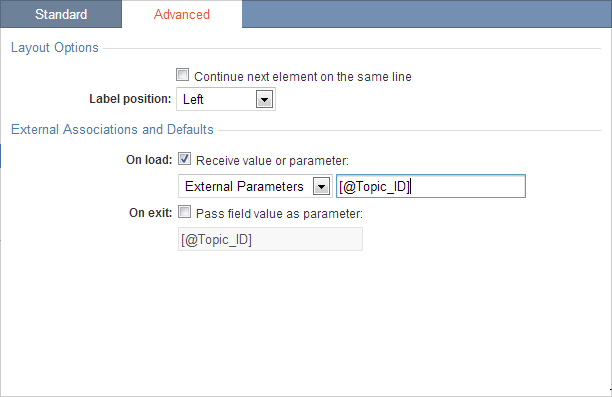
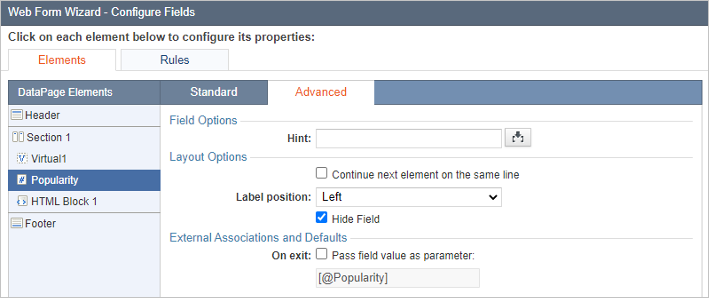
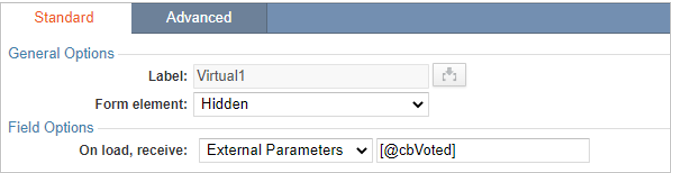
  2. Select the virtual field, and change Form Element to Hidden. In On load, receive select External Parameters and enter the parameter: [@cbVoted]
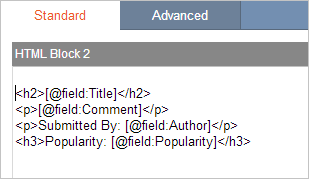
    • To hide the Update button, disable the HTML editor in the Advanced tab of the DataPage Header and add the following code: Then, in your HTML block, disable the HTML editor in the Advanced tab and add the following code:
    • The following script checks to see if the user has cast more than 5 votes. If the user hasn’t, then this script will add or subtract from the popularity depending on whether the user was “voting up” the comment or “voting down”. If you want this functionality in your Form, replace the code shown above that goes in the HTML block with this one:
    • You can customize the maximum number of votes by changing ‘maxVotes = 5’ to another number. This script will either submit the Caspio Form or display a message if the user has exceeded their number of votes.
  1. In Destination and Messaging set Destination after record update to be Close window, disable the HTML editor, remove the existing message and replace it with the following code:
  2. Save the changes.

5. Deployment

The comment submission form and the comment rating form can be embedded directly to the same webpage.

The vote Submission Form must also be embedded to a webpage at the same domain. For example, if you embed your www.samplesite.com, you will also need to embed your vote submission form to another page at www.samplesite.com.

If you use the URL Caspio deployment method, the parent page – holding the comment Report and Submission Form – will not automatically refresh. This is due to a security concept in JavaScript called the Same Origin Policy. Basically, the popup window will not be able to ask the parent window to refresh.

URL in the Report page

Once you’ve embedded the Vote Submission Form, we can now complete the placeholder voting controls in the comment viewer Report.

  1. Select your comment viewer Report DataPage and click the Edit button.
  2. Navigate to the Configure Results Fields screen.
  3. Locate the “Up” and “Down” links that were added in a previous step.
  4. Replace the temporary URL in these links in the HTML block with the URL of your Vote Submission Form webpage. We also need to add two query strings to transmit the Comment_ID, and whether the vote is positive or negative.

Sample URL:

Up:

http://www.samplesite.com?Comment_ID=[@field:Comment_ID]&cbVoted=1

Down:

http://www.samplesite.com?Comment_ID=[@field:Comment_ID]&cbVoted=-1

At this point, you should be able to submit and arrange the comments by voting them up or down.

Note: This article references external HTML codes, JavaScript, or third-party solutions which are not built-in features of Caspio, and as such are provided “as is” without any warranties, support or guarantees. These tips are provided as samples to assist you in the customization of your applications, and you will need a basic understanding of these languages in order to implement successfully.

For assistance with further customization based on your specific application requirements, please contact our Professional Services team.

code1
<a onclick="window.open('URL','popup','width=10,height=10, scrollbars=no,resizable=no,toolbar=no,directories=no,location=no,menubar=no,status=no,left=50,top=50'); return false"> UP </a>
Choose your vote 
<a onclick="window.open('URL','popup','width=10,height=10, scrollbars=no,resizable=no,toolbar=no,directories=no,location=no,menubar=no,status=no,left=50,top=50'); return false"> DOWN </a>
code2
IsNull((SELECT Popularity FROM Coments WHERE Comment_ID=target.[@field:Comment_ID]), 0) + [@cbParamVirtual1]
code3
<style>
      .cbUpdateButton {
      display: none !important;
      }
</style>
code4
Thank you for submission!
    <script type="text/javascript">
          document.addEventListener('DataPageReady', function (event) {
             if(document.getElementById("caspioform")) {
             setTimeout('document.forms["caspioform"].submit()',1000); }
          });   
</script>
code5
<span id='message'></span>
<script>
const maxVotes = 5;
document.addEventListener('DataPageReady', function(event) {
    const popularity = document.querySelector('input[name="EditRecordPopularity"]');
    popularity.addEventListener('change', function() {
        if (this.value > maxVotes && '[@cbVoted]'==1) {
            document.querySelector('#message').textContent = 'You have reached the maximum amount of votes allowed for this period.';
        } else {
            document.querySelector('#message').textContent = 'Thank you for submission!';
            setTimeout('document.forms["caspioform"].submit()', 500);
        }
    });
});
 </script>
code6
    <script>
          window.close();
          if (window.opener && !window.opener.closed) {
             window.opener.location.reload();
          }
   </script>
  • PRODUCT

  • Platform Overview
  • Why Low Code
  • Case Studies
  • App Marketplace
  • Pricing
  • Get a Custom Demo
  • Free Trial
  • SOLUTIONS

  • Healthcare
  • Education
  • Government
  • Financial Services
  • Energy and Utilities
  • Nonprofits
  • Media
  • Consulting
  • RESOURCES

  • Resource Center
  • Blog
  • Free Training
  • Online Help
  • Onboarding
  • Get Certified
  • Professional Services
  • Support Center
  • COMPANY

  • Our Story
  • Careers
  • Leadership
  • News
  • Partner Programs
  • Referral Program
  • Academic Program
  • Discount Programs
  • Contact Us
  • TRENDING

  • Build Custom CRM
  • Create Web Dashboards
  • Best Online Database
  • Convert Excel to Web
  • Migrate MS Access Online
  • HIPAA Compliant Database
  • Create a Patient Portal
Caspio Logo

Caspio is the world’s leading cloud platform for building online database applications without coding.
Start a free trial today and experience the power of no-code.

Footer Partners

© 2025 Caspio, Inc. Sunnyvale, California. All rights reserved.

  • Privacy Statement
  • Terms of Use
  • Report Abuse
  • Feedback