Creating Vote Up and Vote Down For Individual Records
7 minutes to readUsing Caspio DataPages, you can create a system where highly rated records appear on top of less popular records. This technique gives active web users a chance to rate your content and helps to organize your content so that the most trusted responses appear first.
In this example, you create a commenting system, but this same self-organizing system could be applied to other scenarios, including documents, product reviews, event descriptions, company profiles, etc.
This technique uses three DataPages and requires some external JavaScript. It is recommended for advanced users and may require some JavaScript knowledge to customize.
Prerequisites:
Create a table to hold all of the comments submitted. Be sure to include a unique Comment_ID field with an AutoNumber data type. In this example, the following table design is used:
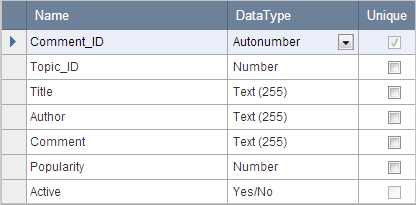
The Popularity field is used to keep track of the current number of up votes minus down votes for each record.
The Active (Yes/No) field allows us to create an approval process for new comments. For more information on how to set up this feature, see Create an Approval Process for New Records.
Steps:
1. Create a Submission Form to allow your users to leave new comments.
- Create a Submission Form DataPage with the Comments table as a data source.
- On the Select Fields screen, include all of the fields you would like the user to fill out. The Active field is not included in the selected fields (so it is set to “unchecked” when a new record is created).
On the Configure Fields screen, configure the Title, Author, and Comment fields for the user to fill out. The Popularity field is set to Hidden and includes a default value of 0.
The Topic_ID will be filled by receiving a parameter passed using a query string. Select the Topic_ID field from the DataPage Elements panel. To receive a parameter in a field, in the Advanced tab, enable the On load option by checking the Receive value or parameter.
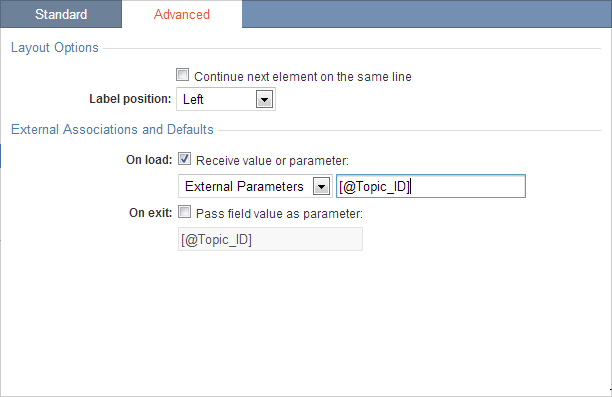
- This form has enabled notification email to notify the site admin when new comments are submitted so that they can review them and check Active using a separate DataPage in their Admin interface. Click Finish.
2. Create a List Report DataPage to view the comments in order of popularity.
- Create a List Report DataPage using the Comments table as your data source.
- Create a filter for this DataPage using the data located in the URL query string. Select Filter data based on your pre-defined criteria.
- On the Select Filtering Fields screen, select both the Topic_ID and the Active fields to be included in the filter.
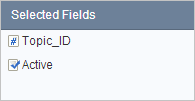
- On the Configure Filtering Fields screen, select the Topic_ID element and click the Advanced tab. Enter the parameter name that matches the name of the query string in your URL exactly in the Value space. Be sure the Active (Yes/No) is set to display only “checked” records.

3. Format your results page.
- Select fields you wish to use in the results page on the Select Results Page Fields screen. The results page can include any data you want. Click Next.
- On the Configure Results Page Fields screen, add an HTML block to display the comment information and voting controls.
- Insert the field parameters in the HTML block using the picker button.
- Format the parameters using the rich text editor or insert HTML code in the Source mode.
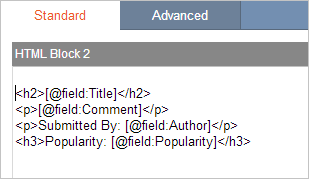
- Add the voting controls. The voting controls consist of two links, one to vote a comment up, and one to vote a comment down. Both controls open a popup to the same DataPage and the comment is voted up or down depending on the extra data we pass via query string. In this step, we will create placeholder links.
- Go to the Source mode of your HTML block and insert the following code. You will change the URL later.
- Go to the Details screen and select the No Details Page.
- Save your DataPage.
4. Create the Vote Submission Form using a Single Record Update Form.
- Create a new Single Record Update Form DataPage.
- Select the Comments table as the data source. This Single Record Update Form will locate the appropriate comment using the Comment_ID parameter.

- Move the Popularity field to the right-hand panel using the arrow button.
- On the Configure Fields screen, be sure to set the Popularity field from Display Only to Calculated Value using the form element dropdown.
- Insert the following formula for the Popularity field:
- In the Advanced tab of the Popularity field, select Hide Field.
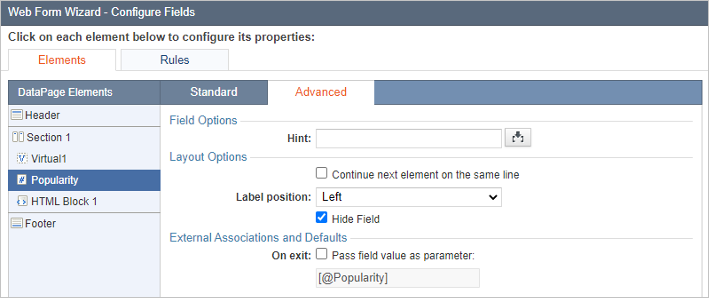
- Using the Insert button at the lower right-hand corner of the DataPage elements panel, insert one virtual field, one HTML block, and Header and Footer elements.
- Select the virtual field, and change Form Element to Hidden. In On load, receive select External Parameters and enter the parameter: [@cbVoted]

- To hide the Update button, disable the HTML editor in the Advanced tab of the DataPage Header and add the following code: Then, in your HTML block, disable the HTML editor in the Advanced tab and add the following code:
- The following script checks to see if the user has cast more than 5 votes. If the user hasn’t, then this script will add or subtract from the popularity depending on whether the user was “voting up” the comment or “voting down”. If you want this functionality in your Form, replace the code shown above that goes in the HTML block with this one:
- You can customize the maximum number of votes by changing ‘maxVotes = 5’ to another number. This script will either submit the Caspio Form or display a message if the user has exceeded their number of votes.
- In Destination and Messaging set Destination after record update to be Close window, disable the HTML editor, remove the existing message and replace it with the following code:
- Save the changes.
5. Deployment
The comment submission form and the comment rating form can be embedded directly to the same webpage.
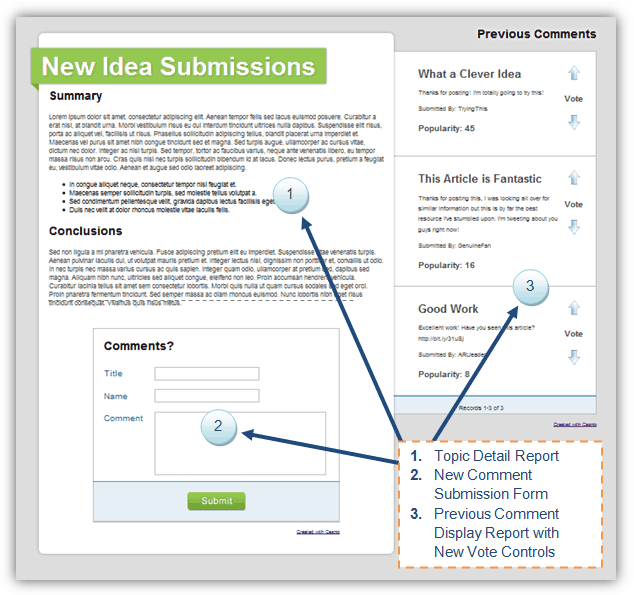
The vote Submission Form must also be embedded to a webpage at the same domain. For example, if you embed your www.samplesite.com, you will also need to embed your vote submission form to another page at www.samplesite.com.
If you use the URL Caspio deployment method, the parent page – holding the comment Report and Submission Form – will not automatically refresh. This is due to a security concept in JavaScript called the Same Origin Policy. Basically, the popup window will not be able to ask the parent window to refresh.
URL in the Report page
Once you’ve embedded the Vote Submission Form, we can now complete the placeholder voting controls in the comment viewer Report.
- Select your comment viewer Report DataPage and click the Edit button.
- Navigate to the Configure Results Fields screen.
- Locate the “Up” and “Down” links that were added in a previous step.
- Replace the temporary URL in these links in the HTML block with the URL of your Vote Submission Form webpage. We also need to add two query strings to transmit the Comment_ID, and whether the vote is positive or negative.
Sample URL:
Up:
http://www.samplesite.com?Comment_ID=[@field:Comment_ID]&cbVoted=1
Down:
http://www.samplesite.com?Comment_ID=[@field:Comment_ID]&cbVoted=-1
At this point, you should be able to submit and arrange the comments by voting them up or down.
Note: This article references external HTML codes, JavaScript, or third-party solutions which are not built-in features of Caspio, and as such are provided “as is” without any warranties, support or guarantees. These tips are provided as samples to assist you in the customization of your applications, and you will need a basic understanding of these languages in order to implement successfully.
For assistance with further customization based on your specific application requirements, please contact our Professional Services team.
code1
<a onclick="window.open('URL','popup','width=10,height=10, scrollbars=no,resizable=no,toolbar=no,directories=no,location=no,menubar=no,status=no,left=50,top=50'); return false"> UP </a>
Choose your vote
<a onclick="window.open('URL','popup','width=10,height=10, scrollbars=no,resizable=no,toolbar=no,directories=no,location=no,menubar=no,status=no,left=50,top=50'); return false"> DOWN </a>
code2
IsNull((SELECT Popularity FROM Coments WHERE Comment_ID=target.[@field:Comment_ID]), 0) + [@cbParamVirtual1]
code3
<style>
      .cbUpdateButton {
      display: none !important;
      }
</style>
code4
Thank you for submission!
    <script type="text/javascript">
          document.addEventListener('DataPageReady', function (event) {
             if(document.getElementById("caspioform")) {
             setTimeout('document.forms["caspioform"].submit()',1000); }
          });
</script>
code5
<span id='message'></span>
<script>
const maxVotes = 5;
document.addEventListener('DataPageReady', function(event) {
    const popularity = document.querySelector('input[name="EditRecordPopularity"]');
    popularity.addEventListener('change', function() {
        if (this.value > maxVotes && '[@cbVoted]'==1) {
            document.querySelector('#message').textContent = 'You have reached the maximum amount of votes allowed for this period.';
        } else {
            document.querySelector('#message').textContent = 'Thank you for submission!';
            setTimeout('document.forms["caspioform"].submit()', 500);
        }
    });
});
 </script>
code6
    <script>
          window.close();
          if (window.opener && !window.opener.closed) {
             window.opener.location.reload();
          }
   </script>

