• search
  • Contact Sales
  • Support
    • Online Help
    • Community Forum
    • Contact Support
  • Log in
Get a Demo Try Free
High Contrast
Caspio logo Help
Try Free
  • High Contrast
  • search
  • Contact Sales
  • Support
    • Online Help
    • Community Forum
    • Contact Support
  • Log in
Get a Demo Try Free
  • Help Center
  • Tech Tips
  • Limiting the Number of Submissions
  • Launch Your Caspio Journey
  • Create Applications
    • Applications Overview
    • Creating Apps With Bridge
      • Bridge App Overview
        • Creating a New App Container
        • Importing an App
        • Exporting an App
        • Deleting an App
        • Shared Objects
        • Backing Up Your Applications
        • Sharing an App with Another Account
        • App Parameters
          • Adding App Parameters
          • Managing App Parameters
          • Using App Parameters
      • Authentication
        • Setting Up User Permissions in Your App
        • Adding a Logout Link
        • Record Level Security
          • Create a Workflow using Record Level Security and Filtered Dropdown
          • Restrict Access to Data by User or Role
          • Filter Lookup Dropdown or Listbox Based on User or Role
        • Stamp a Record with User Profile Data
        • OpenID
        • Create a Standalone Login Screen
        • Hiding Multiple Login Forms
      • DataPages
        • What is a DataPage?
        • DataPage Types
        • Forms
          • Submission Forms
          • Update Forms
          • Password Recovery Forms
          • Form Element Types
          • Conditional Forms
          • Child Forms
          • Accepting Payments in Your Application
        • Reports
          • Creating a Report DataPage
          • Comparison Types in Report DataPages
          • Search by Distance
          • Report Page Results Layout
          • Interactive Reporting Options
          • Pivot Table Reports
          • Counting the Number of Times a Record Has Been Viewed
          • Display a Field Data as Hyperlink
          • Fixed Rows and Columns
          • Making the Search Results Downloadable as PDF
          • Editing Data Through My Details Page
          • Making the Details Downloadable for Users
          • Data Editing Options in Reports
          • Combined Chart and Report
          • Adding “Today” to “After Now” or “Next X Days” Criteria
          • Filtering Reports Based on an Expiration Date
          • Advanced Reporting
            • Calculations in Reports
            • Data Grouping
            • Totals and Aggregations
            • Calculated Fields and Datediff Function
        • Charts
        • Calendars
        • HTML Pages
        • DataPage Components
          • Dropdowns and Listboxes
          • Cascading Elements
          • Calculated Values
          • Field Configuration Options
            • Field and Column Width
            • Placeholder Text
            • Rollover Hints – Mouse-Over Help Icon
            • Image Auto-Rotation
          • DataPage Header and Footer
          • HTML Blocks
          • Disabling HTML Editor in DataPage Header/Footer and HTML Blocks
          • Field Formatting Options
          • Custom Date Formatting
          • Multi-column and Sections
          • CAPTCHA
          • Virtual Fields
          • Setting up Default Values
          • AutoComplete
        • Managing DataPages
          • Modifying DataPages
          • Previewing DataPages
          • Moving DataPages
          • Copying DataPages
          • DataPage Revisions
          • DataPage Folders
          • Exporting and Importing DataPages
          • Moving Existing DataPages To a New App
        • Responsive DataPages
          • Responsive DataPage Prerequisites
          • Responsive Behavior on Tablet and Mobile
          • Modifying Styles for Tablet and Mobile
        • AJAX Loading
        • PDF Download
          • Adding a text watermark
          • Adding an image watermark
          • Adding page breaks to details page
          • Adding header and footer
        • Best Practices in Creating Caspio Applications
      • Notifications
        • Email Notifications
          • Verifying Email and Domain
          • Configuring Email
          • Setting Up Dynamic or Conditional Notification Emails
        • SMS Notifications
          • Configuring the SMS-enabled Countries
          • Configuring SMS
          • Adding SMS Sender Name
      • Parameters
        • Parameter Types
        • System Parameters
        • Passing Parameters through Caspio
        • Displaying Parameters
        • Parameters as Query String Values
        • Receiving Parameters
        • Resetting Parameters
        • Passing Multiple Values in One Parameter
        • Formatting Parameters in Email Body and HTML Blocks
        • Parameters in Dropdowns, Listboxes and Radio Buttons
        • Custom Filter Elements
      • Connections
        • SAML Single Sign-On
        • Setting Up ID Services
      • Styles
        • Creating or Editing a Style
        • Layout Options
        • Fix the Width of the DataPage
        • Button Alignment
        • Field Alignment
        • Border Options
        • Using Google Web Fonts
        • Glossy Heading Text
        • Gradient Backgrounds for DataPages
        • Gradient Backgrounds for Fields
        • Replace Links to Records with Images
        • Replace Standard Buttons with Images
        • Change the Color of Field Error Labels
        • Change Text on a Button
        • Put Multiple Fields on One Line
        • Styling Advanced Reports
        • Add Rounded Borders to the Form and Fields
        • Use an Image as Form Background
        • Fix the Width of Labels and Data in List and Gallery Reports
        • Customize the ID Service Icon of the Login Screen
      • Localizations
        • Creating or Editing a Localization
        • Handling Arabic, Hebrew and Other Right-to-Left Languages
        • Formatting Options
        • Using Localization Feature to Improve Usability
        • Format Types
      • Files and Images
        • Uploading Files and Images
        • FileStor CDN
        • Managing Files
        • Bulk File Import and Export
        • Creating Thumbnails with the Image Resizer
        • Using Files in DataPages
        • Orphan File Cleanup
    • Creating Apps With Flex
      • Flex Overview
      • Roles
        • Creating New Roles
        • Adding Users and Groups to Roles
        • DataPart Display Based on the User Role
        • Editing Role Permissions
          • User’s Own Records
          • Custom Access
        • Removing Users and Groups from Roles
        • Deleting Roles
      • Application Design
        • Segments
          • Editing Segment Settings
          • Themes and Widgets
        • Adding AppPages
        • AppPage Types
        • Adding DataParts
        • Moving DataParts
        • Resizing DataParts
        • Adding Elements to DataParts
          • Calculated Values in Flex DataParts
        • Forms
          • Form Elements
          • Search Form
          • Submission Form
          • Details/Update Form
        • Reports
          • Tabular Report
          • Card Report
          • Pivot Table
        • Sign-up Form
        • Charts
          • Creating and Configuring Charts
          • Chart Display Options
        • Text/HTML
        • Data Filters
          • Creating Filters
        • Communication Between DataParts
        • Designing User-Friendly Navigation Between AppPages
      • Parameters
        • Inserting Parameters
        • Application Parameters
        • Adding Support for Lookup Values in Data Source Parameters
        • Stamping Records with User ID
      • Branding
      • Flex FAQ
  • Manage Users and Groups
    • Directories Overview
      • User Authentication in Directories
      • Converting Tables to Directories
      • Creating Directories
    • Directory Users
      • User Status Overview
      • Creating Users
      • Activating Users
      • Adding Users to Groups
      • Resetting User Passwords
      • Resetting Two-Factor Authentication
      • Suspending and Unsuspending Users
      • Changing User Sign-In Method
    • Directory Groups
      • Creating Groups
      • Modifying Groups
      • Deleting Groups
    • Directory Security
      • Session Management
      • Turning On Two-Factor Authentication
      • Customizing Directory Security Policy
      • Redirecting to Custom URLs After Sign-in and Sign-out
    • Directory User Portal
    • Directory Emails
    • Identity Providers
      • Adding Identity Providers
        • Tutorial: Adding Microsoft Entra ID (formerly Azure AD) Identity Provider
        • Tutorial: Adding Okta Identity Provider
        • Tutorial: Adding OneLogin Identity Provider
      • Editing Identity Providers
      • Deleting and Disabling Identity Providers
      • Configuring Single Logout
    • App Connections
      • Creating App Connections 
        • Authenticating Users to Caspio Apps in Multiple Accounts Using a Single Directory
        • Tutorial: Adding HubSpot App Connection
        • Tutorial: Adding BambooHR App Connection
        • Tutorial: Adding Slack App Connection
      • Managing App Connections 
      • Deleting and Disabling App Connections
  • Manage and Organize Your Data
    • Data Management Overview
    • Tables and Views
      • Creating Tables
      • Modifying a Table’s Design
      • Removing Blanks From a Dropdown or Listbox
      • Lookup Tables
      • Views
        • Creating a View to Filter Data
        • Creating a View to Join Tables
        • Self-Join Views
        • Modifying Views
        • Importing and Exporting Views
    • Data Types
      • List Data Types
      • Function Reference
      • Adding a Formula Field in a Table
      • Managing Files With the Attachment Data Type
    • Managing Data in Datasheet
      • Find and Replace Specific Values
      • Filtering Data
      • Downloading Table or View Data
    • Database Relationships
      • Relationship Settings
    • Importing Data
    • Exporting Data
    • Sharing Data Between Apps
    • Best Practices for Designing Databases and Tables
    • Logs
      • Managing Logs
        • Logs Retention Period
      • App Access Logs
      • Directory Logs
      • Email Logs
      • Integrations Logs
      • Payment Logs
      • SMS Logs
  • Leverage AI
    • AI Assistant Overview
  • Automate Tasks and Workflows
    • Automations Overview
    • Triggered Actions
      • Creating a Triggered Action
        • Actions
          • UPDATE
          • DELETE
          • INSERT INTO
          • SEND EMAIL
          • SEND SMS
        • Data
          • SELECT
        • Logic
        • Loops
        • Text
        • Number
        • Date
        • Variables
    • Tasks
    • Data Import/Export Tasks
      • Data Import Tasks
      • Data Export Tasks
      • Configuring a Repository Site
      • IP Addresses for Data Import/Export Tasks
      • Data Import/Export Tasks Tips and Best Practices
  • Generate PDF Documents
    • Document Generation Overview
    • Creating Templates
    • Mapping Fields in Templates
    • Template Field Types
    • Configuring Template Settings
      • Formatting Field Values
      • Adding Watermarks
      • Encrypting PDF Documents
      • Configuring PDF Document Properties
      • Changing PDF File for a Template
    • Enabling Document Generation in Applications
    • Managing Templates
  • Integrate and Extend Your Apps
    • Integrations Overview
    • Webhooks
      • Getting Started with Webhooks in Caspio
      • Webhooks Rules and Limitations
      • IP Addresses for Webhooks
      • Creating and Managing Webhooks
        • Configuring Call Throttling
      • Creating and Managing Events
        • Event Types
        • Activating or Deactivating Events
      • Testing Webhooks
    • Extensions
      • AI-Powered GPT Connect
      • Extension for Slack
      • QR Code Generator
      • Barcode Generator
      • Location IQ
    • Web Services API
      • Creating a Web Services API Profile
      • Authenticating REST API
      • Important Header Parameters
      • Special Considerations
      • Error Handling
      • Swagger UI
      • Migration from REST API v2 to v3
    • Integration with Make
    • Integration with Zapier
  • Deploy Your Apps
    • Deploying Bridge Apps
      • General Deployment Guide
      • Remove iFrame Border and Change Size
      • Block Access to DataPages by IP Address
    • Deploying Flex Apps
      • Mapping a Friendly Subdomain
  • Manage Account and Billing
    • Account Settings
    • Account Users, Groups and API Profiles
      • Inviting New Account Users
      • Creating Groups for Account Users
      • Managing Permissions
      • Changing Account Owner
    • Changing Your Plan
    • Updating Payment Information
    • Payment History
    • Custom Domain
    • Account Notifications
    • Resource Usage
    • Caspio ID
      • Managing Your Caspio ID
      • Forgot Your Password
      • Getting Support PIN
    • Support Login
    • Search for Objects
  • Videos
    • Bridge Videos
      • Build Your First App
      • Recorded Training
      • Customize Your Apps
      • Advanced Topics
      • Full App Implementation
      • Tips and Tricks
    • Flex Videos
      • Build Your First App
      • Recorded Training
  • Resources and Best Practices
    • Frequently Asked Questions (FAQ)
    • Tech Tips
    • Troubleshooting
      • Troubleshooting SMS Delivery
      • Troubleshooting Email Delivery and Domain Verification
      • Cannot Log in to My Caspio Account
      • Issue with Login to Apps or DataPages
      • Issue with Redirection After Logout
      • Acknowledgement Emails Are Not Received
      • Issues with Email Verification Code
      • JavaScript Does Not Work with Multiple DataPages
      • Cannot See an SSL Lock Icon for My Web Page
      • Responsive UI Does Not Display Properly
      • Date Fields from Excel Import Incorrectly
      • Troubleshooting Custom PDF Generator
      • Troubleshooting Data Import Speed
      • System Limitations
      • Errors and Messages
    • System Requirements
    • Deprecations
      • Deprecation of Twitter as an ID Service in Authentications and Connections
      • Deprecation of Google Drive for Data Import/Export Tasks
      • Deprecation of HTTP Deployment
      • Deprecation of the Option to Disable AJAX Loading
      • Deprecation of MS Access for Import/Export
      • Deprecation of Cb_ErrorLog Tables
      • Deprecation of Google Map Mashup Generator
      • Deprecation of Frame Deployment
      • Deprecation of .xls Excel Format for Data Import
      • Deprecation of SEO Deployment Method
      • Deprecation of WordPress Deployment
      • Deprecation of Unverified Email Addresses
      • Deprecation of SOAP Web Service
      • Deprecation of Internet Explorer 11 and Microsoft Edge Legacy Browsers
  • Release Notes
    • Caspio 61.0
      • Impacted Areas 61.0
    • Caspio 60.0
    • Caspio 59.0
    • Caspio 58.0
    • Caspio 57.0
    • Caspio 56.0
    • Caspio 55.0
    • Caspio 54.0
    • Introducing Flex
    • Caspio 53.0
    • Caspio 52.0
    • Caspio 51.0
    • Caspio 50.0
    • Caspio 49.0
    • Caspio 48.0
    • Caspio 47.0
    • Caspio 46.0
    • Caspio 45.0
    • Caspio 44.0
    • Caspio 43.0
    • Caspio 42.0
      • Known Issue: Scrolling on macOS Devices
    • Caspio 41.0
    • Caspio 40.0
    • Caspio 39.0
    • Caspio 38.0
    • Caspio 37.0
      • Impacted Areas 37.0
    • Caspio 36.0
    • Caspio 35.0
    • Caspio 34.0
      • Impacted Areas 34.0
    • Caspio 33.0
    • Caspio 32.0
    • Caspio 31.0
      • Impacted Areas 31.0
    • Caspio 30.0
    • Caspio 29.0
    • Caspio 28.0
    • Caspio 27.0
    • Caspio 26.0
    • Caspio 25.0
    • Caspio 24.0
    • Caspio 23.0
    • Caspio 22.0
    • Caspio 21.5
    • Caspio 21.0
      • Impacted Areas 21.0
    • Caspio 20.0
    • Caspio 19.0
      • Impacted Areas 19.0
      • Security Patch 19.5
    • Caspio 18.0
    • Caspio 17.0
    • Caspio 16.0
    • Caspio 14.0
      • Impacted Areas 14.0
    • Caspio 15.0
    • Caspio 13.0
      • Caspio 13.0
      • Impacted Areas 13.0
    • Caspio 12.0
      • Impacted Areas 12.0
    • Caspio 11.0
      • Impacted Areas 11.0
    • Caspio 10.0
    • Caspio 9.9
      • Impacted Areas 9.9
    • Caspio 9.8
    • Caspio 9.7
    • Caspio 9.6
      • Impacted Areas 9.6
    • Caspio 9.5
      • Impacted Areas 9.5
    • Caspio 9.4
      • Impacted Areas 9.4
    • Caspio 9.3
      • Impacted Areas 9.3
      • Caspio 9.3
    • Caspio 9.2
      • Impacted Areas 9.2
    • Caspio 9.1
      • Impacted Areas 9.1
    • Caspio 9.0
      • Known Issues 9.0
      • Impacted Areas 9.0

Limiting the Number of Submissions

7 minutes to read

In this article, we will guide you on how to limit submissions based on a maximum number. The process requires a listing from where users go to a submission form. We will explain how to toggle the link to the submission form based on the maximum number.

Note: If users open the submission form directly, validation is required upon submission. Therefore, a combination of JavaScript and Web Services API is needed which can be programmed by our Professional Services team.

In our example, we set up a “Course sign-up” system where there is a limited number of available seats in each Course. This sample system can be applied to any solution with a limited inventory.

Additionally, our solution will include a customizable message displayed when all available submissions are filled. It requires creating three DataPages and uses some basic JavaScript.

Steps:

  1. Design and set up the tables.
    This technique involves two separate tables. One table keeps track of submissions and the other holds information about
    the main records. In this example, you create one table for Courses (main records) and the second table for Attendees (submissions).

Prerequisites for Courses table (containing the main records)

For this system to work, you must include at least the following three fields: 

  • An ID field such as an AutoNumber (Course_ID) 
  • The maximum submissions as a Number DataType (Maximum_Attendees) 
  • The current number of received submissions as a Number DataType (Attendees) 

Prerequisites for Attendees table (records the submission)

In this table, you only need the following field to make the system work: 

  • The foreign ID field from the main records table (Course_ID), which must be a Number datatype 

You can add any additional fields to this functional skeleton as needed. 

  1. Create a Report for your primary records table (Courses).
    Now that the tables have been designed, create a Report for our main records table (Courses). The same basic technique could be used for List or Gallery Reports or even on Details Pages.
    1. Create a new Report DataPage. 
    2. On the DataPage Data Source screen, select your Courses table as your data source. You can configure the Search page as needed as it does not affect this technique. 
    3. In the Configure Results Page Fields screen, include JavaScript code to display a link to a Submission Form (Course signup form) if there are spaces available. 
    4. Add an HTML block using the insert button at the lower right-hand corner of the DataPage Elements panel. In the HTML block, go to the Source mode and add the following JavaScript:
      <span id="Course[@field:Course_ID#]"></span>  
      
      <script> 
      document.addEventListener('DataPageReady', function (event) { 
      
        var let data = ''; 
      
      if (parseInt('[@field:Attendees#]' || '0') < parseInt('[@field:Maximum_Attendees#]' || '0')){ 
      
        data = "<a href='SubmissionURL?Course_ID=[@field:Course_ID]'> Signup </a>"; 
      
      }else{ 
      
        data = "<p>Signup Closed</p>"; 


      } 
      
      document.getElementById("Course[@field:Course_ID]").innerHTML = data; 
      
      }); 
      
      </script> 
    5. Replace Attendees, Maximum_Attendees, and Course_ID with the appropriate field names from your table. The submission URL will be replaced in a later step. You can also replace Signup and Signup Closed with more appropriate messages for your app.
    6. Optional: At this point you can also add a calculated field to show the remaining submissions available. 
    7. Continue with the wizard until you can select No Details Page. Press Finish to save your DataPage.
  1. Create the New Record Submission Form.
    Now we are going to create the Submission Form. In this example, the Submission Form will allow students to sign-up for a Course.
    1. Create a new Submission Form. 
    2. On DataPage Data Source screen, choose the submissions table (Attendees) as the data source. 
    3. This Submission Form can include any field you would like to record about each submission, but it must include the foreign key value (Course_ID). The one crucial thing this form must do is receive the query string parameter from the course listing report and pass it on to the final Single Record Update Form, which will be created in the last step. 
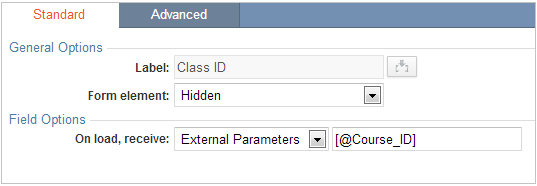
    4. In Configure Fields screen, select the foreign key value (Course_ID) and click the Advanced Tab. To receive a parameter in a field, enable the On load option by checking the Receive value or parameter. Ensure the parameter name that is generated matches exactly with the query string in the hyperlink we created in the previous step (Course_ID). 
    5. To pass the parameter, enter the same parameter name by enabling the On exit option and by checking Pass field value as parameter.
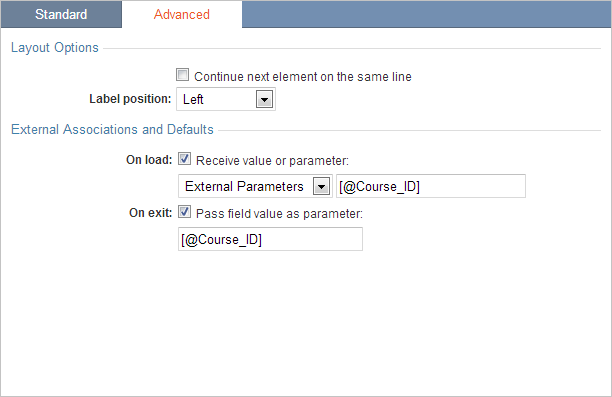
    6. In the Standard tab, hide this element from the user by selecting Hidden from the Form element dropdown.
    7. Click Finish. You will customize the destination of this page after we create the next Single Record Update Form. 
  1. Create a Single Record Update Form
    The last DataPage we need to create is a Single Record Update Form that will automatically increase the number of attendees in the main record (Courses).
    1. Create a Single Record Update Form from the Forms DataPage Type. 
    2. On the DataPage Data Source screen, select your Courses table as the data source. 
    3. On the Record Identification screen, select Find record through Unique ID and locate the record using a Unique ID (Course_ID). Select Course_ID from the Unique ID field dropdown and add the parameter.
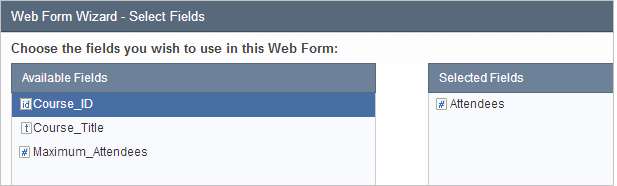
    4. On the Select Fields screen, include only the current number of submissions (Attendees field). Move Attendees to the right-hand panel using the arrow button.
    5. On the Configure Fields screen, change the Form element of the Attendees field to Text field. 
    6. Using the Insert button at the lower right-hand corner of the DataPage Elements panel, add Header & Footer element. Click on the Header and disable the HTML editor in the Advanced tab. Add the following div tag in the Header to hide this DataPage, so your end users cannot access the number of attendees:
      <div style="display:none"
    7. Click on the Footer and disable the HTML editor in the Advanced tab. Add the following JavaScript in the Footer to increase the Attendees by one and submit this Single Record Update Form automatically:
       </div> 
      
      <script> 
      
      document.addEventListener('DataPageReady', function (event) { 
      
      document.getElementById('EditRecordAttendees').value = parseInt(document.getElementById('EditRecordAttendees').value || '0') + 1; 
      
      if(document.getElementById("caspioform")) { 
      
                      document.getElementById("caspioform").style.display = 'none'; 
      
                      setTimeout('document.forms["caspioform"].submit()',1000); }  


      });</script>	 
    8. Replace “Attendees” with the actual fieldname from your table as it is listed in the DataPage Elements panel. Click Next. 
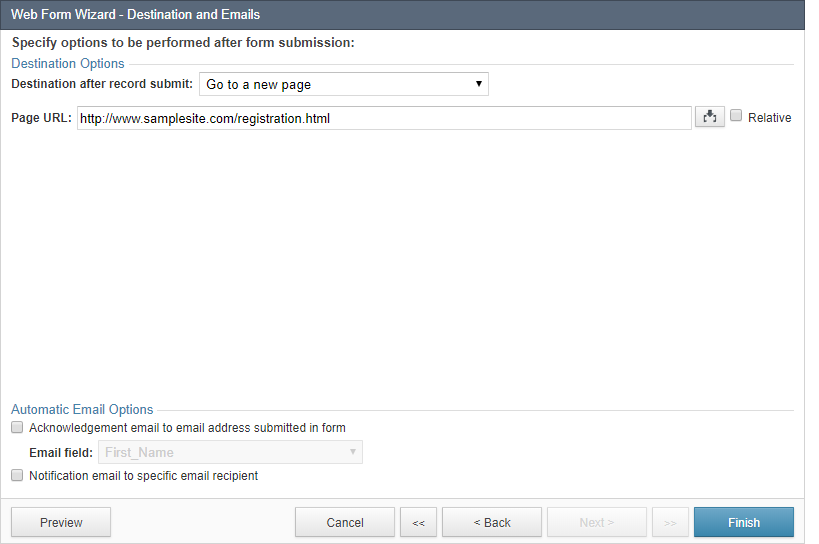
    9. On the Destination and Emails screen, you can choose the final destination after a user completes their registration / submission. In this example, we will direct the user to a page indicating that their submission has been sent and to view their email for a message containing their confirmation number. Click Finish.
  1. Deployment
    Now, that all of the DataPages have been created, you can work backwards to connect them into a single process.
    1. Select the Single Record Update Form created in the last step and click Deploy. Enable the Deployment Status for the DataPage. Click Close. 
    2. Select the New Record Submission Form and click Edit. Navigate to the Destination and Emails screen (the last screen in the wizard) and select the option Go to a DataPage. When the user submits this form, they should be directed immediately to the (Increment Attendees) Single Record Update Form. Using the Browse button, select the Single Record Update Form. At this point, you can also set up an Acknowledgement Email to notify the user that their submission has been received. Click Finish to save your DataPage.
    3. Deploy the Submission Form. Select this DataPage and click Deploy. Enable the Deployment Status for the DataPage. This submission form can be embedded into a webpage or deployed using the URL method. Deploy the DataPage and copy the URL where this DataPage is hosted for use in the last step. Click Close. 
    4. Finally, tie the original Report DataPage to the Submission Form. Select your original Report DataPage and click Edit. Proceed to the Configure Results Page Fields screen and select the HTML block. Within the JavaScript we added in a previous step, locate the “SubmissionURL” text. This Submission URL can now be replaced with the URL of the Submission Form. Click Finish to save your DataPage. 
  1. Optional: Test the application to see that when the number of submissions surpasses the maximum number of allowed submissions, the link to the signup/submission form becomes unavailable.

Note: In this implementation, there is no validation if users access the submission form directly.

Note: This article uses external HTML, JavaScript, or third-party solutions to add functionality outside of Caspio standard feature set. These solutions are provided “as is” without warranty, support or guarantee. The code within this article is provided as a sample to assist you in the customization of your web applications. You may need a basic understanding of HTML and JavaScript to implement successfully.

For assistance with further customization based on your specific application requirements, please contact our Professional Services team.

code1
code3
code2
  • PRODUCT

  • Platform Overview
  • Why Low Code
  • Case Studies
  • App Marketplace
  • Pricing
  • Get a Custom Demo
  • Free Trial
  • SOLUTIONS

  • Healthcare
  • Education
  • Government
  • Financial Services
  • Energy and Utilities
  • Nonprofits
  • Media
  • Consulting
  • RESOURCES

  • Resource Center
  • Blog
  • Free Training
  • Online Help
  • Onboarding
  • Get Certified
  • Professional Services
  • Support Center
  • COMPANY

  • Our Story
  • Careers
  • Leadership
  • News
  • Partner Programs
  • Referral Program
  • Academic Program
  • Discount Programs
  • Contact Us
  • TRENDING

  • Build Custom CRM
  • Create Web Dashboards
  • Best Online Database
  • Convert Excel to Web
  • Migrate MS Access Online
  • HIPAA Compliant Database
  • Create a Patient Portal
Caspio Logo

Caspio is the world’s leading cloud platform for building online database applications without coding.
Start a free trial today and experience the power of no-code.

Footer Partners

© 2025 Caspio, Inc. Sunnyvale, California. All rights reserved.

  • Privacy Statement
  • Terms of Use
  • Report Abuse
  • Feedback