In image-heavy apps like photo galleries or property listings, your users might benefit from the ability to zoom in and zoom out the images rendered by Caspio DataPages. This article will guide you on how to add this feature to your Report DataPages using some JavaScript and CSS code. You can use this solution in Tabular, List, Gallery, and Details DataPages.

[@field:Description]

Prerequisites: Make sure that you have a table with at least one file field for images and one unique field.

Steps:
    1. Create or edit a Report DataPage. Choose a relevant table as the data source. Proceed to the Configure Results Page or Configure Details Page and add an HTML block.
    2. In the HTML block, disable the HTML Editor and paste the following code: 
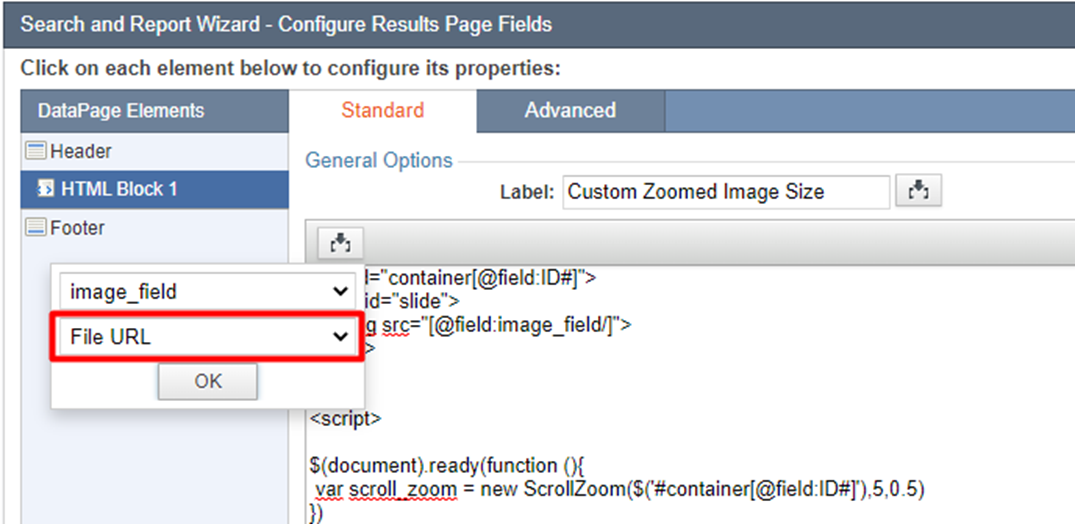
    3. In the pasted code:
      1. replace [@field:ID] with the unique field.
      2. replace [@field: image_field/] with the image field from your table, choosing File URL format from the dropdown.
    4. Add a Header & Footer to the Configure Results Page. In the Header, disable the HTML Editor and paste the following code:
    5. Optional: In the code from the previous step, you can change the overflow property value from hidden to auto, scroll, or overlay to modify the effect. Each of these renders overflow slightly differently:
      • scroll adds scroll bars to the original and zoomed-in image. 
      • auto and overlay add scroll bars only while zooming in an image.

        Note: When the overlay value is used, the zoom-in function is not supported by Firefox.

      • hidden shows no scroll bars. You have to use the mouse to move within a zoomed-in image. 

      When changing the overflow value to a value other than hidden, set the height value to auto as shown in the example below:

Here are some examples of original and zoomed-in images for different overflow values.

Before zooming in (auto, overlay, hidden)
After zooming in (auto, overlay, scroll)
After zooming in (hidden)

Note: This article uses external HTML, JavaScript, or third-party solutions to add functionality outside of Caspio standard feature set. These solutions are provided “as is” without warranty, support or guarantee. The code within this article is provided as a sample to assist you in the customization of your web applications. You may need a basic understanding of HTML and JavaScript to implement successfully.

For assistance with further customization based on your specific application requirements, please contact our Professional Services team.

code2
<script src="https://ajax.googleapis.com/ajax/libs/jquery/3.6.0/jquery.min.js"></script>  
<style>  
div[id^='container']{  
  width: 500px;  
  height: 250px;  
  overflow: hidden;  
}  
#slide{  
  width:100%;  
  height:100%;  
  transition: transform .3s;  
}  
img{  
  width: auto;  
  height: auto;  
  max-width:100%;  
  pointer-events: none;  
}  
</style>
code3
div[id^='container'] {  
  width: 500px;  
  height: auto;  
  overflow: auto;  
}
code4
<div id="container[@field:ID]"> 
     <div id="slide"> 
    		<img src="[@field:image_field/]"> 
     </div> 
</div> 
<script> 
document.addEventListener('DataPageReady', function (event) { 
var scroll_zoom = new ScrollZoom($('#container[@field:ID]'),5,0.5); 
}); 
//The parameters are: 
// 
//container: The wrapper of the element to be zoomed. The script will look for the first child of the container and apply the transforms to it. 
//max_scale: The maximum scale (4 = 400% zoom) 
//factor: The zoom-speed (1 = +100% zoom per mouse wheel tick) 
function ScrollZoom(container[@field:ID],max_scale,factor){ 
 var target = container[@field:ID].children().first(); 
 var size = {w:target.width(),h:target.height()}; 
 var pos = {x:0,y:0}; 
 var scale = 1; 
 var zoom_target = {x:0,y:0}; 
 var zoom_point = {x:0,y:0}; 
 var curr_tranform = target.css('transition'); 
 var last_mouse_position = { x:0, y:0 }; 
 var drag_started = 0; 
 target.css('transform-origin','0 0'); 
 target.on("mousewheel DOMMouseScroll",scrolled); 
 target.on('mousemove', moved); 
 target.on('mousedown', function() { 
  drag_started = 1; 
  target.css({'cursor':'move', 'transition': 'transform 0s'}); 
  /* Save mouse position */ 
  last_mouse_position = { x: event.pageX, y: event.pageY}; 
 }); 
 target.on('mouseup mouseout', function() { 
  drag_started = 0; 
  target.css({'cursor':'default', 'transition': curr_tranform}); 
 }); 
function scrolled(e){ 
  var offset = container[@field:ID].offset(); 
  zoom_point.x = e.pageX - offset.left; 
  zoom_point.y = e.pageY - offset.top; 
  e.preventDefault(); 
  var delta = e.delta || e.originalEvent.wheelDelta; 
  if (delta === undefined) { 
    //we are on firefox 
    delta = e.originalEvent.detail; 
  } 
  delta = Math.max(-1,Math.min(1,delta)) // cap the delta to [-1,1] for cross browser consistency 
  // determine the point on where the slide is zoomed in 
  zoom_target.x = (zoom_point.x - pos.x)/scale; 
  zoom_target.y = (zoom_point.y - pos.y)/scale; 
  // apply zoom 
  scale += delta * factor * scale; 
  scale = Math.max(1,Math.min(max_scale,scale)); 
  // calculate x and y based on zoom 
  pos.x = -zoom_target.x * scale + zoom_point.x; 
  pos.y = -zoom_target.y * scale + zoom_point.y; 
  update(); 
 } 
 function moved(event){ 
  if(drag_started == 1) { 
   var current_mouse_position = { x: event.pageX, y: event.pageY}; 
   var change_x = current_mouse_position.x - last_mouse_position.x; 
   var change_y = current_mouse_position.y - last_mouse_position.y; 
   /* Save mouse position */ 
   last_mouse_position = current_mouse_position; 
   //Add the position change 
   pos.x += change_x; 
   pos.y += change_y; 
  update(); 
  } 
 } 
function update(){ 
  // Make sure the slide stays in its container area when zooming out 
  if(pos.x>0) 
   pos.x = 0; 
  if(pos.x+size.w*scale<size.w) 
   pos.x = -size.w*(scale-1); 
  if(pos.y>0) 
   pos.y = 0; 
  if(pos.y+size.h*scale<size.h) 
   pos.y = -size.h*(scale-1); 
  target.css('transform','translate('+(pos.x)+'px,'+(pos.y)+'px) scale('+scale+','+scale+')'); 
 } 
} 
</script>