
A lookup table is usually a simple table containing a list of records that are meant to be displayed as options in dropdowns, listboxes, or radio buttons. For example, a lookup table can have a field named ‘Department_Name’. The records of that table would contain the names of departments in your organization.
Note: The term ‘lookup table’ is just a designation. There is no special object in Caspio that is called as such. Any table can be used for lookup, although some may not be efficient. For example, you could make a dropdown in your DataPage and set it to show a list of all your customers from your Customers table. The list may be very long and can potentially have an adverse effect on the performance of your form. If, at the time during the designing of your DataPage, Caspio detects that a lookup table contains many values, it gives you the option to automatically create a lookup table based on its distinct values.
Lookup tables are convenient to app users because the same lookup table can be referenced on multiple DataPages, which means all user selections are standardized. At any time, you can add or remove options from your lookup table. The modification is instantly reflected on all the DataPages that use that lookup table in their dropdowns, listboxes, or radio buttons.
The image below shows an example of a simple Departments table in Table Design and Datasheet views. This table can be used as a list of Departments anywhere in the application.
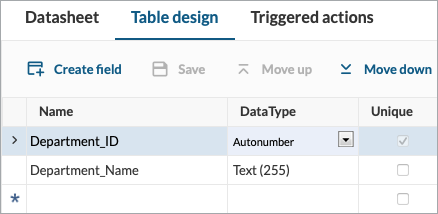
Table design view
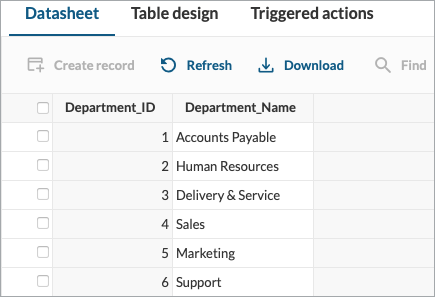
Datasheet view
For your convenience, we have provided some commonly-used lookup tables that you can download and import into your account. Right-click any of the links below and click Save As from the context menu to save the file on your computer. You can then import the file into your Caspio account and use the resulting table in your DataPages. For more information, see Importing Data.
A cascading lookup table is a lookup table with multiple fields that are related to each other and are used in cascading dropdowns or listboxes. It contains data that can be narrowed down from one related field to another.
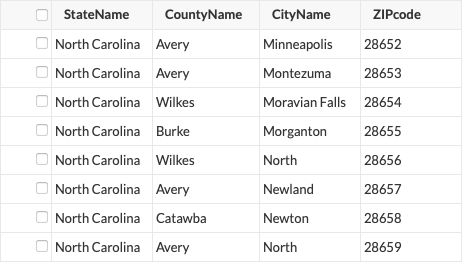
The following is an example of a table containing all U.S. states, counties, cities, and ZIP codes. It can be used in an app to cascade from state to city or any other descending combination.
Note: In order for a cascading lookup table to function correctly, all lookup fields must contain values for each record to provide options for each level of the sequence. In the example above, each record has a state, county, city, and ZIP code entry. This establishes the connection that each zip code is associated with a city, each city is associated with a county, and each county is associated with a state.
When the cascading lookup table is used on a form, the options in cascading dropdowns and listboxes dynamically change based on a user’s previous selection. For example, if a user selects a state, the subsequent dropdown will list cities located within the selected state.
To learn how to create cascading dropdowns and listboxes, see Cascading Elements.
| Lookup Function | Cascading Table Fields |
|---|---|
| Finding a shoe model | Brand > Color > Size |
| Finding a particular automobile type | Year > Make > Model |
| Finding a university class | College > Department > Course |
Caspio is the world’s leading cloud platform for building online database applications without coding.
Start a free trial today and experience the power of no-code.

© 2025 Caspio, Inc. Sunnyvale, California. All rights reserved.