This article explains how your users can dynamically add new options to dropdowns or listboxes. For instance, you may want your users to provide information about their referrers using a dropdown that does not include the relevant option. In this case, you can add an additional field for your users to add their own option.
There are two solutions possible, the new item can be either visible only to the user who added it or to all users. In this article we will guide you how to implement both of them.
Steps to adding options to public facing dropdowns or listboxes with limited visibility:
This method will make the new item visible only to the user who added it, but also record the new item in your lookup table (as inactive) so that you can enable it later for all public users.
- Create a filtered view of your lookup table.
- Add a field called “Active” to your table and set its data type to Yes/No.
- Select the checkbox for each option you would like to be visible in your dropdown.
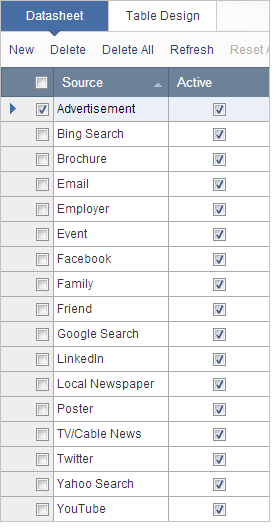
- In the Views section, create a view containing your lookup table and filter based on the Active field having a Yes value. Ensure that inactive records are not included. For more information on how to create a filtered view, see Creating a View to Filter Data.
- Base your dropdown on the filtered view.
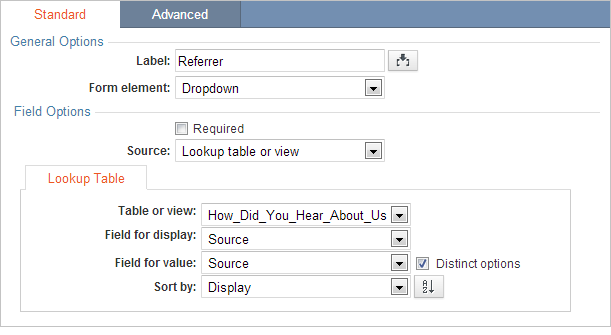
- Edit the DataPage that will contain your dropdown.
- In the Configure Fields screen, select dropdown from the form element dropdown, and select lookup table or view as the dropdown source.
- Select the filtered view you created in the previous step as the source for your dropdown.
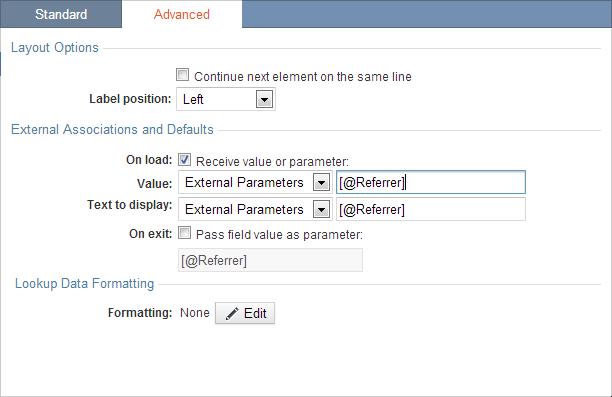
- In the Advanced tab > External Associations and Defaults, select On load, select External Parameters, and enter the parameter name. Ensure to note the name of the parameter as it will be used later.
- On the Destination and Emails page, replace the success message with the JavaScript code. This JavaScript will close the Submission Form’s popup window and refresh the original form’s page so the dropdown item will be visible to the user who submitted it.
- Optional: Send a notification email when the form has been filled out so that you can mark new options as active if you believe they are a good permanent addition to your dropdown.
- Create a link in your original DataPage to display the Submission Form in a popup window.
- Edit the original DataPage.
- In the Configure Fields screen, add an HTML block and add the following code:
- Replace the DataPageURL portion with the Deploy code from the “Add Option” Submission Form. Update the other options in this hyperlink as needed.
- To move the link to the same line as the dropdown, select the dropdown DataPage element and go to the Advanced tab. Check Continue next element on same line.
- Save the changes.
Steps to adding options to public facing dropdowns or listboxes with public visibility:
The added option will be visible immediately for all users.
- Use a lookup table as the base reference for your dropdowns.
- Create a Submission Form DataPage with your lookup table as the data source.
- On the Destination and Emails page, replace the success message with the JavaScript code. This JavaScript will close the popup window and refresh the parent page so the new dropdown items will be visible.
- Deploy your Submission Form. To refresh the original form, both DataPages must be embedded in webpages with the same domain name. You can make an empty webpage containing only the following HTML:
- Replace “CASPIO DEPLOY CODE” with the deploy code of your submission form. If your original form is deployed using the URL deployment method you can deploy the submission form using the same method. Ensure to note the URL of the submission form as it will be used in the next steps.
- Create a link in your original DataPage to display the Submission Form in a popup window.
- Edit the DataPage where you would like to add the link.
- In the Configure Fields screen, add an HTML block with the following code:
- Replace the DataPage URL portion with the the URL of the first Submission Form. Update the other options in this hyperlink as needed.
- To move the link to the same line as the dropdown, select the dropdown DataPage element and go to the Advanced tab. Check Continue next element on same line.
- Save the changes.
- Optional: Test your application.
- When testing inside of Caspio the popup window will appear, however, the original form will not refresh when a new item is submitted. To properly test this feature you will need to deploy the original form and view it outside of Caspio.
- In Internet Explorer, if you are using this method in a submission form, after submitting a new dropdown option any information in the original form will be cleared, for that reason it is a good idea to add a dynamic dropdown link as close to the top of the form as possible. Another option would be to have the user submit the form then provide an “Add an Option” link in an Update Form.
Note: This article uses external HTML, JavaScript, or third-party solutions to add functionality outside of Caspio standard feature set. These solutions are provided “as is” without warranty, support or guarantee. The code within this article is provided as a sample to assist you in the customization of your web applications. You may need a basic understanding of HTML and JavaScript to implement successfully.
For assistance with further customization based on your specific application requirements, please contact our Professional Services team.
code1
 <script>

window.close();

if (window.opener && !window.opener.closed) {

window.opener.location.reload();

}

</script>

Click <strong>Finish</strong> to Save Your DataPage. Select the Submission Form again and click the Deploy button. Select <b>URL </b>as your <b>Deployment method.</b> Copy the URL and save it for future reference.
code2
<a>Add Option</a>
code3
 <script>

window.close();

if (window.opener && !window.opener.closed) {

window.opener.location.reload();

}
code4
<!DOCTYPE HTML PUBLIC "-//W3C//DTD HTML 4.01 Transitional//EN"

"http://www.w3.org/TR/html4/loose.dtd">

<html>

<body>

CASPIO DEPLOY CODE

</body>

</html>
code5
<a onclick="window.open('DataPageURL','popup','width=307,height=341,scrollbars=no,resizable=no,toolbar=no,directories=no,location=no,menubar=no,status=no,left=0,top=0'); return false">Add Option</a>