Using JavaScript, you can dynamically change the background color of a results page item based on data in the referenced record. This can be helpful for highlighting records that require immediate action. This article shows methods for changing the color of both gallery/list reports, and tabular reports.

Steps to set the background color for a row (record) in tabular report :
Prerequisites:
In order to work correctly, your source table must have one unique field such as an AutoNumber. An AutoNumber field can be added at any time in the table Design view. The JavaScript included in this article uses a Yes/No field to determine what color the record background should be.
- Select the DataPage you would like to update for this scenario and click Edit to open the DataPage wizard.
- Proceed to the Configure Results Page Fields screen.
- Create a placeholder column. Be aware that this method will make one of your columns unsortable. Choose a column that is not used for sorting your results page and use the delete button to remove it from the DataPage elements panel.
- Using the Insert button at the lower right hand corner of the DataPage elements panel add an HTML block.
- In the Advanced tab, disable the HTML editor.
- Using the HTML block’s Insert button at the lower right corner, insert the parameter for the column you removed in step one.
- Write the parameter name (or appropriate label) in the label field above the HTML block panel.
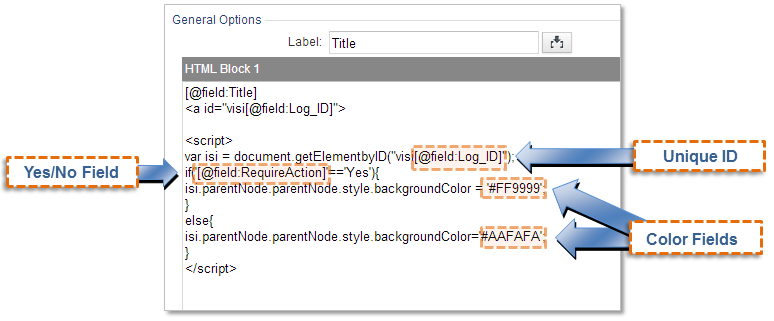
- Add the row color changing JavaScript. To do that, add an anchor tag and the JavaScript to change the background of the row in the HTML block.
- Create an HTML anchor tag and set its id value to “visi” followed immediately by the unique field (e.g. AutoNumber) parameter. For example:
- Paste the JavaScript after this anchor tag. Be sure that the JavaScript is surrounded by script tags.
- Replace the [@Yes/No FieldName]with the Yes/No field parameter from your table. Be sure the parameter is surrounded by single quotes.
- Change the colors in the JavaScript to match your Style/website.
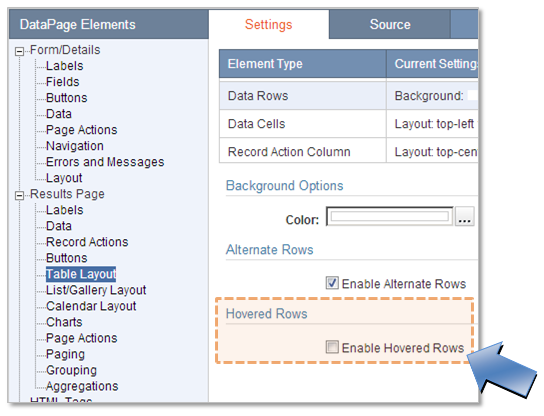
This technique requires that your DataPage Style does not have Hovered Rows enabled. Hovered rows will change the background color back to the default if the end-user moves their mouse over the row. You can disable Hovered Rows in the Table Layout section of the Style wizard.
Note: This solution does not work when the DataPage in non-responsive and freeze columns option is enabled.
Steps to dynamically set up a list/gallery report record background color:
List/gallery report backgrounds are changed in much the same way as tabular reports. In list/gallery reports you can:
- Apply background color for the records based on condition.
- Replace a record information and details link with an image indicating the record is no longer available.
- Proceed to the Configure Results Page Fields screen.
- Using the Insert button at the lower right-hand corner of the DataPage elements panel, insert two HTML blocks.
- Using the arrow buttons, position the HTML blocks at the beginning and the end of the DataPage elements list.
- In the Advanced tab, disable the HTML editor for both HTML blocks.
- If the DataPage is non-responsive and you need to apply the background color:
- In the first HTML block. add the following code and replace [@field:ID] with your Autonumber field name.
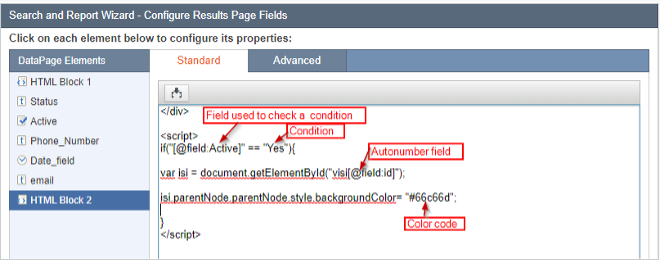
- In the second HTML block add, the following code:
- Replace the corresponding parts of the code:
- If the DataPage is responsive and you need to apply the background color:
- In the first HTML block add the following code and replace [@field:ID] with your Autonumber field name.
- In the second HTML block, add the following code:
- Replace the corresponding parts of the code as shown on the following screenshot.
- If the DataPage is non-responsive and you need to apply the background image:
- In the first HTML block, add the following code and replace [@field:ID] with your Autonumber field name.
- In the second HTML block, add the following code:
- Replace the corresponding parts of the code:
- If the DataPage is responsive and you need to apply the background image:
- In the first HTML block, add the following code and replace [@field:ID] with your Autonumber field name.
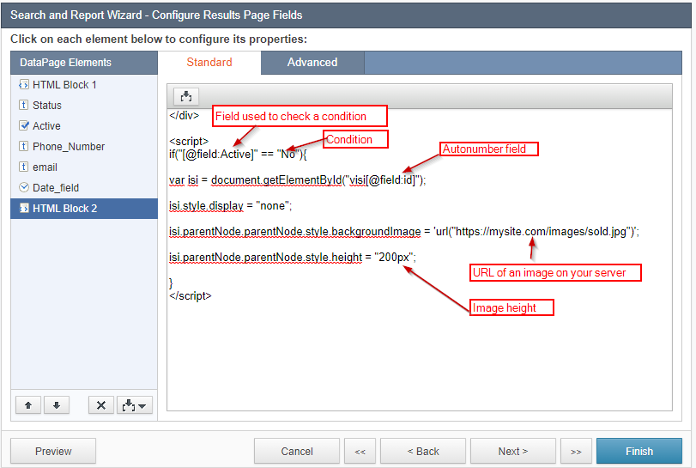
- In the second HTML block, add the following code:
- Replace the corresponding parts of the code as shown on the following screenshot.
- Click Finish.
Steps to set a standard height for the report rows:
You can set a fixed height for the table rows. This way if all of the records in a single row have hidden data, the row will still have a standard height.
- Open the Style wizard by selecting your DataPage Style and pressing the Edit button.
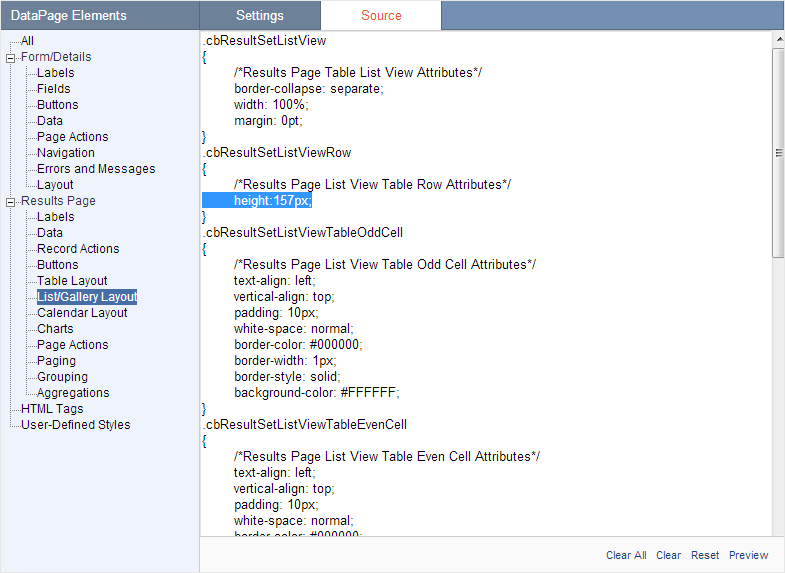
- In the Style Settings screen, click the Source tab.
- In the DataPage elements panel, click Results Page and select the List/Grid Layout section.
- Add a fixed height to the cbResultSetListViewRow class as shown in the following picture.
Note: This article uses external HTML, JavaScript, or third-party solutions to add functionality outside of Caspio standard feature set. These solutions are provided "as is" without warranty, support or guarantee. The code within this article is provided as a sample to assist you in the customization of your web applications. You may need a basic understanding of HTML and JavaScript to implement successfully.
For assistance with further customization based on your specific application requirements, please contact our Professional Services team.
code2
<script>
var isi = document.getElementById("visi[@field:UniqueFieldName]");
if('[@Yes/No FieldName]' == 'Yes'){
isi.parentNode.parentNode.style.backgroundColor = '#YesColor';
}
else{
isi.parentNode.parentNode.style.backgroundColor = '#NoColor';
}
</script>
code1
<a id="visi[@field:ID]">
code3
<div id="visi[@field:ID]">
code4
</div>

<script>
if("[@field:Active]" == "Yes"){
var isi = document.getElementById("visi[@field:ID]");
isi.parentNode.parentNode.style.backgroundColor= "#66c66d";
}
</script>
code5
<p id="visi[@field:ID]">
code6
</p>

<script>
if("[@field:Status]" == "Yes"){
var isi = document.getElementById("visi[@field:ID]");
isi.parentNode.parentNode.style.backgroundColor= "#66c66d";
}
</script>
code7
<div id="visi[@field:ID]">
code8
</div>

<script>
if("[@field:Active]" == "No"){
var isi = document.getElementById("visi[@field:ID]");
isi.style.display = "none";
isi.parentNode.parentNode.style.backgroundImage = 'url("https://mysite.com/images/sold.jpg")';
isi.parentNode.parentNode.style.height = "300px";
}
</script>
code9
</dd><div id="visi[@field:ID]"><dd>
code10
</dd></div><dd>

<script>
if("[@field:Active]" == "No"){
var isi = document.getElementById("visi[@field:ID]");
isi.style.display = "none";
isi.parentNode.parentNode.style.backgroundImage = 'url("https://mysite.com/images/sold.jpg")';
isi.parentNode.parentNode.style.height = "200px";
}
</script>