Custom Authentication
With Custom Authentication, you have access to a variety of additional configuration options. For example, you can set up a login form with more fields than just username and password. You can customize the login form’s labels and field layout, and add CAPTCHA, HTML Blocks, Header & Footer, etc.
Using Custom Authentication, you can also integrate with third-party ID Services such as Google, Twitter and OpenID. ID Services allow your users to login with their own social profile credentials. Note that their username must still be present in your users Table, but you no longer need a password field.
Additionally, users can be authenticated with directories – Caspio's own identity provider service. For more information on directories, see Directories Overview.
Authentications can be created entirely based on a Caspio Table where all your users have their username and password in that table. You may also use one or more ID Services to allow your users to log in with their ID Service username and password.
We recommend not using more than one ID Service in an Authentication, because your users may forget which ID Service they should use to login, which may lead to double registration and user frustration. Of course, it’s ultimately up to you to decide how many ID Services to enable and whether to include a standard Caspio login or not.
To enable an ID Service, your app must be already registered with the provider. Read the article about Setting Up ID Services for more information.
Creating a Custom Authentication
Follow these steps to create a custom authentication:
- Anywhere in your app click Authentications on the sidebar menu and click New Authentication.
- In the Authentication table or view drop-down, select the table or view that contains or will contain the list of your authorized users. If you don't have one, select the Create a new table and a basic new users table will be created for you when you finish the creation of the Authentication object.
- Next select Custom.

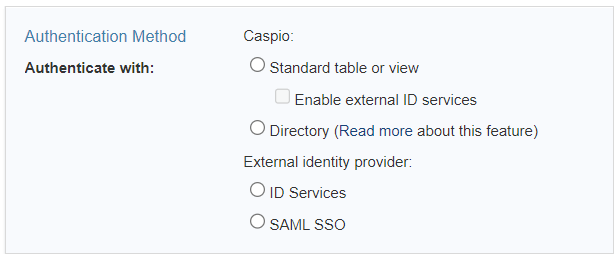
- Select the authentication type. The following options are available:
- Standard table or view – Users can only be authenticated through Caspio login form by providing login credentials that can be verified in the authentication data source.
- Enable external ID services –Users can be authenticated through Caspio login form or any of the enabled third-party providers (Google, Twitter, OpenID) if the unique ID of their user accounts matches the authentication data source.
- Directory – users will be authenticated with the directory's username and password, or with an external identity provider configured in the directory.
- ID Services – Users can only be authenticated through the ID Services you have enabled provided that the user's ID is present in your users' data source.
- SAML SSO – Users can be authenticated through SAML-based identity providers such as Active Directory, Microsoft Entra ID (formerly Azure AD), One Login, etc. This allows using a corporate username and password in order to access one or more applications eliminating the need to maintain multiple usernames and passwords.
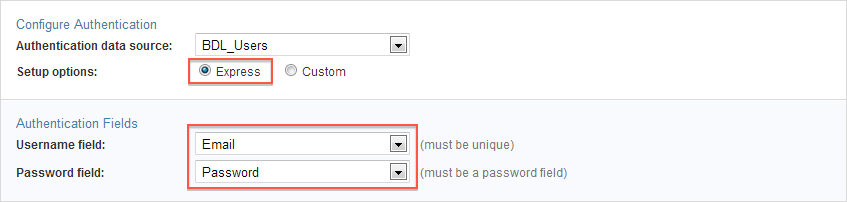
- If you have chosen Caspio as one of your choices, you can configure your authentication fields in this section. A username and password field are usually suggested but you need to verify that they are correct.
The Advanced tab gives you more field options and the ability to pass or receive parameters into your authentication fields. You can also insert other virtual fields, HTML blocks, CAPTHCA and much more into your login form. Simply click + button at the top-right of the Elements panel. If ID Services are enabled, the Elements panel displays the list of available ID Services.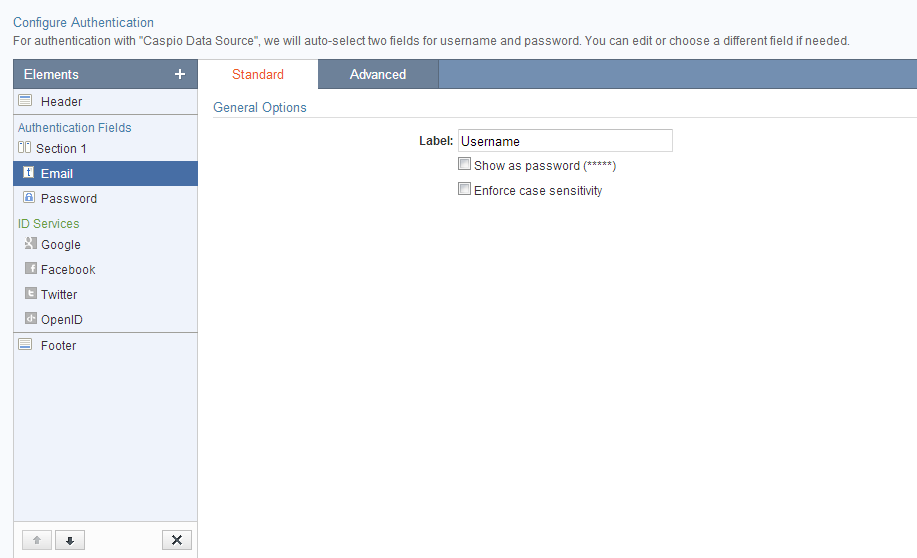
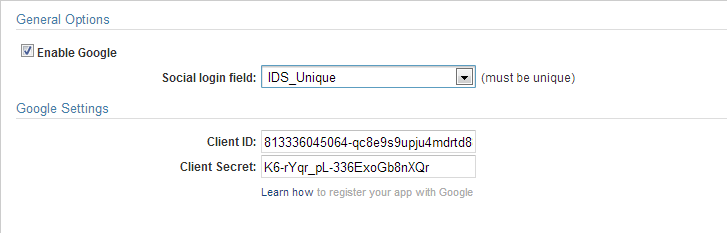
- To enable an ID Service, click on a service name on the Elements panel and set its options on the right.
For Google and Twitter after you enable the service you will be asked to map the field that contains the ID field of the Service in your users table. This is a unique field that contains values such as "Google: user unique ID (21 digits)". Only users that are listed in this way will be able to login to your app via that ID Service. - Next you will need to provide the ID and secret value that you received from the ID Service when you registered your app with them. Read the article about Setting Up ID Services for more information.
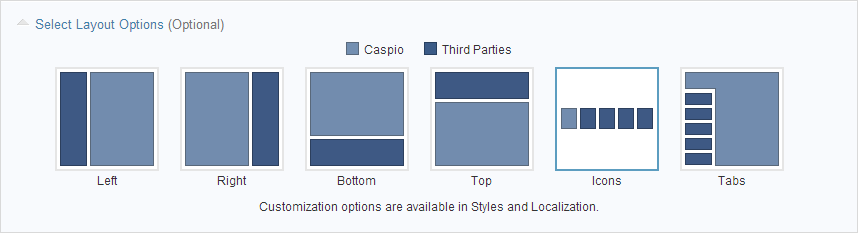
- You can select how you wish the Caspio authentication and ID Services buttons are displayed on the login form. The layout options differ between authentication types. More design options are available by editing the Style object applied to your authenticated DataPages. Text of your login form can also be modified in the Localization object of your DataPages.
- If you have chosen SAML Single Sign-On as the validation method, you will need configuration settings from your ID Provider. Read the article about setting up SAML Single Sign-On for more information.
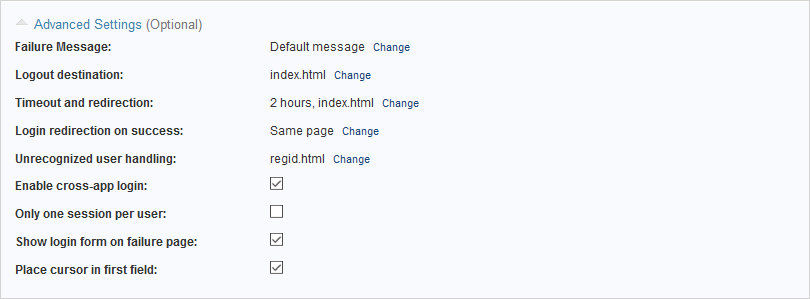
- Next, you can expand Advanced Settings and configure the following:
- Failure message - This message is displayed to users who cannot successful login.
- Logout destination - This page or URL is used to redirect users who logout of your authenticated app.
- Timeout and redirection:
- Time out after - With this option you can configure session expiration after user inactivity.
- Designated entry page - This option is for providing a page or URL destination to redirect all non-authenticated users.
- Login redirection on success - With this option you can designate a page as the home page of your app. Once the user successfully signs in you can redirect them to the page they need to go next. This is a good way to avoid multiple login forms on the same page.
- Unrecognized user handling - You can use this option to redirect ID Services users who are not present in your users table. For example you can send them to a page to register for your app or service.
- Enable cross-app login - With this option you can enable cross app login to users who already have an active session with another one of your apps that uses the same users table for its authentication. For example if your ticketing system and your sales system are based on the same Employees table, but different authentications object, authorized users who are signed into one app can access the second app without having to login again.
- Only one session per user - By enabling this option each of your app users can have only one active session. If another login is detected, the old session is expired immediately.
- Show login form on failure page - When users fail to login, you can display a message and with it display the login form again.
- Place cursor in first field - For usability purposes you can have the cursor sit on the first field of your login form when the page loads.
Click Create when done. Enter an Authentication name then, click OK.
Your new Authentication object is saved in your app's Authentication section. You can apply this authentication to your new or existing DataPage on the second screen of your DataPage wizard.